


An API (application programming interface) is a set of protocols and instructions that allows software applications to communicate with one other. In modern software development, developers rely heavily on APIs, which allow developers from different platforms to focus on user experience of an application, rather than duplicating and implementing the same business logic across every platform. This article will show you how to build and observe APIs so that you can maximize their value.
What Are the Properties of a Good API?
Implementing APIs for your web application is not particularly difficult. But creating APIs that can scale with a growing workload and can be reused across different platforms is not as easy. When creating an API, you need to take into account a number of essential properties.
Broad Use Cases
APIs support different platforms so it’s important to make sure that an APIs can be used with mobile, embedded, and web applications. Otherwise, you will need to rewrite the whole API for each platform.
Easy to Use
You are probably not the only one using the APIs that you create. Other developers may use your APIs to integrate with their applications. You’ll want to provide high quality and up-to-date documentation, and follow best practices when defining API paths and their methods.
Reliable
An API may have worked well when integrated into the author’s own system, but when running in a different production environment, it shows a status code error because of a recent update made in the API. This is an example of an unreliable APIs, which can lead to severe bugs and are often unacceptable, especially in domains such as finance, e-commerce, and healthcare.
Strong Security
Applying authentication and authorization is critical for keeping APIs secure. Only certain users should access APIs that manipulate sensitive and critical information. Whether you should use token-based or role-based access control depends on the use case, but should be planned in early development stages.
Scalable
APIs should be able to handle traffic spikes and increasing requests. One way to achieve scalability is with cloud solutions such as auto-scaling databases or Kubernetes auto-scaling pods. These solutions automatically scale up system resources when the number of user requests increases, ensuring that your APIs can handle the increased demand.
Versioning Support
It’s not unusual for APIs to need to support both legacy and current versions of an application. However, old application versions may use an old API, whereas the current version requires an updated API. This allows for a smooth transition for applications and helps avoid issues with compatibility.
Demonstration: Interacting with APIs
To better understand how to build and observe APIs, let’s deploy a set of APIs for managing pet stores. Let’s make use of this existing pet store API provided by the Swagger team. You’ll create AWS Lambda functions that call the existing pet store APIs, then create an API gateway to trigger these Lambda functions.
Introduction: Pet Store APIs
Let’s say you’re trying to manage the pets in our store. The pet store APIs allow us to create, update, and delete pets from the store.
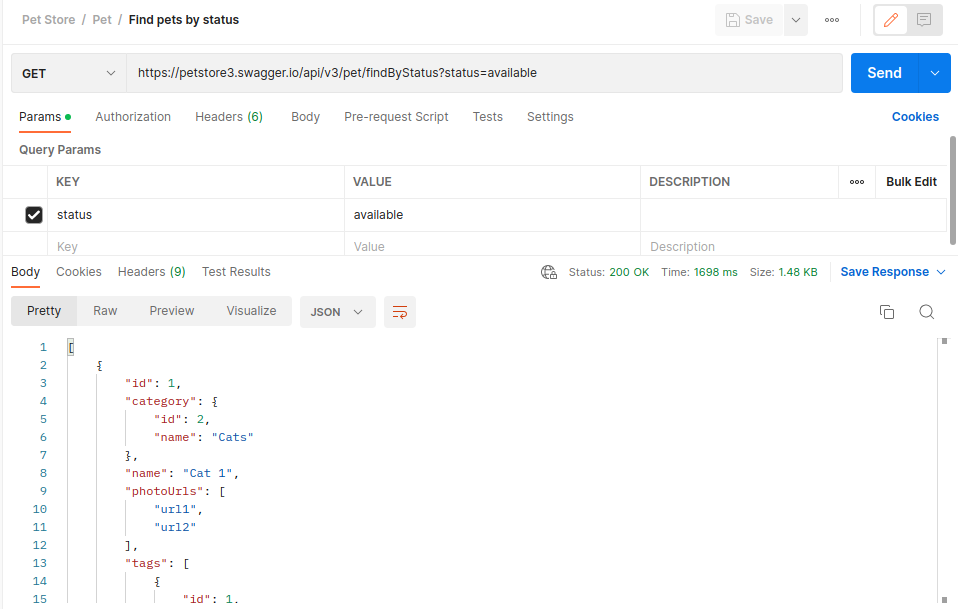
Figure 1: Example API request to the pet store API v3
Above is an example of an API for finding pets by available status.
Create Lambda Functions
Let’s deploy APIs as you would in real projects by creating Lambda functions that wrap the existing pet store APIs. You need to use an HTTP client to make API requests to the real pet store APIs; use the axios library to do that. The Lambda runtime for Node.js in AWS does not have axios. Prepare the runtime environment locally first, then import it to AWS Lambda.
Create a Local Runtime Environment
First, initiate a new Node.js project on your machine:
cd ~
mkdir Projects
cd Projects
mkdir pet-store-lambda
cd pet-store-lambda
npm init
Then, install the axios library by running:
npm install axios
Zip the pet-store-lambda directory to the pet-store-lambda.zip file:
cd ..
zip -r pet-store-lambda.zip pet-store-lambda
Import the Local Runtime to AWS Lambda Node.js
From the AWS Lambda page, create a new Lambda function using Node.js runtime.

Figure 2: Create a new Lambda function
Note: Node.js version 16 is more stable than version 18 at the time of writing this article, so let’s stick with that for now.
After creating a new Lambda function, import the zip file you created earlier into the function. The code structure of your AWS Lambda function should look like this:
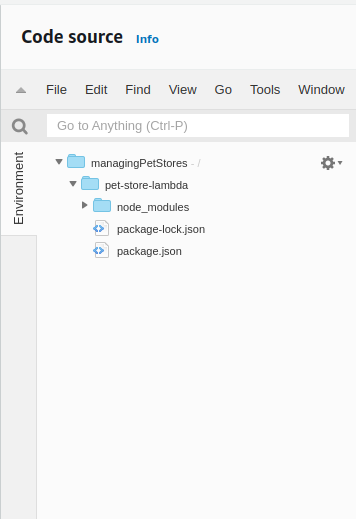
Figure 3: Code source tree after importing the zip file
You need to move the node_modules directory to under managingPetStores directory and remove the pet-store-lambda directory. Then create a new index.mjs file inside the managingPetStores directory.
Your code source structure should look like this:

Figure 4: The code source should look like this after your modification
Add the Code for AWS Lambda Function
The index.mjs is an entry point of our AWS Lambda function. Add the following code to the index.mjs file:
import axios from “axios”;
const domain = “https://petstore3.swagger.io/api/v3”;

export const handler = async (event) => {

    if(event.httpMethod === ‘POST’){

      let postRequestJSON = JSON.parse(event.body);
        const response = await axios
          .post(domain+’/pet’,postRequestJSON);
          console.log(postRequestJSON)
          return {
            statusCode: 200,
            body: JSON.stringify({
              message:”Success”,
              details:response.data
            })
        }
    }
    if(event.httpMethod === ‘DELETE’){
      const res = await axios
          .delete(domain+’/pet/’+event.pathParameters.id);
          console.log(res);
        return {
            statusCode: 200,
            body: JSON.stringify(“Delete successfully”)
        };
    }
    if(event.httpMethod === ‘PUT’){
      let putRequestJSON = JSON.parse(event.body);
        const response =  await axios
          .put(domain+’/pet’,putRequestJSON);
          console.log(putRequestJSON)
          return {
            statusCode: 200,
            body: JSON.stringify({
              message:”Success”,
              details: response.data
            })
        };
    }
    if(event.httpMethod === ‘GET’ && event.resource === ‘/pet/{id}’){

      const response = await axios.get(domain +’/pet/’+event.pathParameters.id);
      return {
        statusCode: 200,
        body: JSON.stringify({
          message:”Successful retrieving”,
          details:response.data
        })
      }
    }

    if(event.httpMethod === ‘GET’ && event.resource === ‘/pet/findByStatus’){

      const response = await axios.get(domain +’/pet/findByStatus’,{params: {
      status: event.queryStringParameters.status
    }
    });
      return {
        statusCode: 200,
        body: JSON.stringify({
          message:”Successful retrieving”,
          details:response.data
        })
      }
    }


};
The above code checks for event triggers from AWS API Gateway. If an event has a method with, ‘GET’ (event.httpMethod === ‘GET’,) and has a resource matched “/pet/findByStatus” (event.resource === ‘pet/findByStatus’,) the Lambda function will send a new request to the existing API pet store and get its API response.
Click “Deploy” to apply this change.
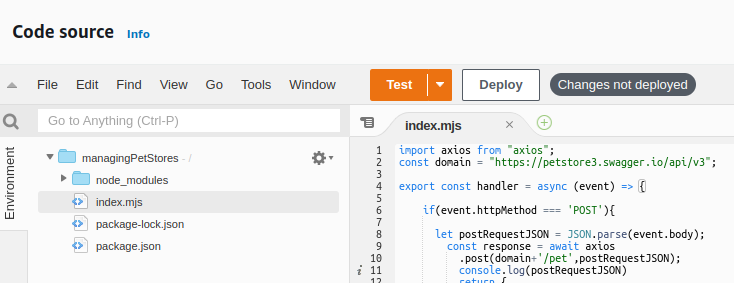
Figure 5: Add code to the index.mjs file and deploy the Lambda function
Add API Gateway
From the AWS API Gateway page, create a new REST API Gateway with the following structure:
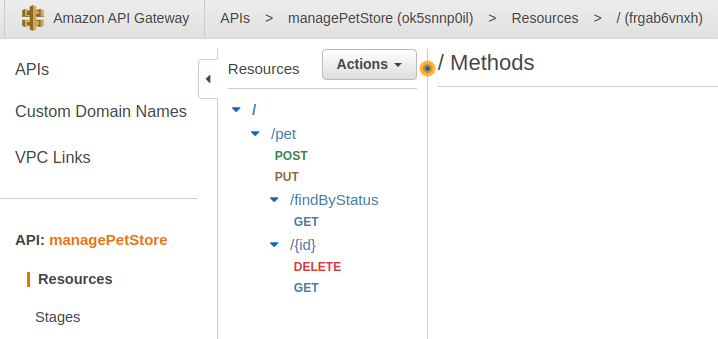
Figure 6: Add API specs to the Amazon API Gateway
Note that when creating the API gateway items, you need to add your Lambda function and tick “Use Lambda Proxy integration”:
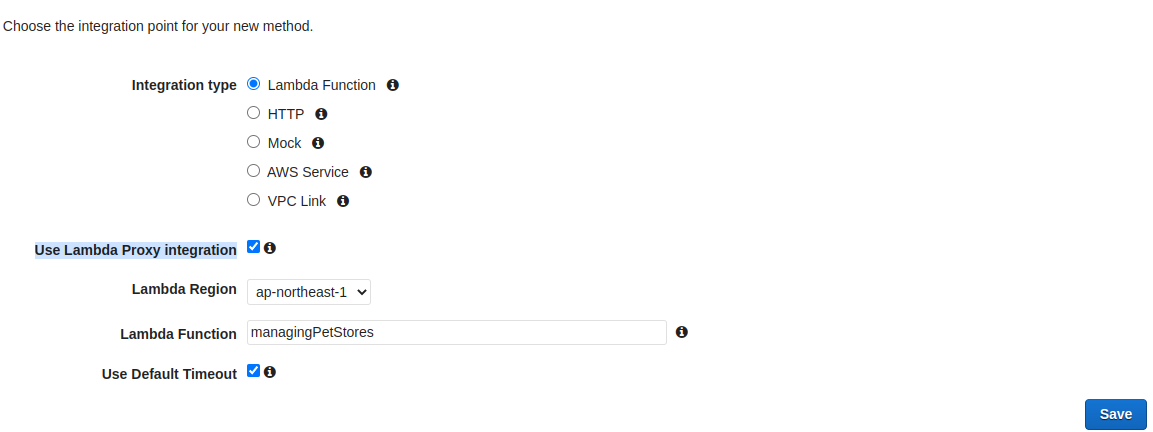
Figure 7: Add Lambda function and enable “Use Lambda Proxy Integration” when creating a new API in the API Gateway
Deploying the API is simple: click “Deploy” on the Deploy page.
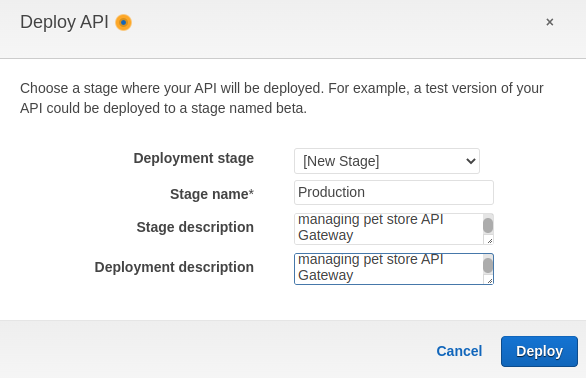
Figure 8: Deploy the new API Gateway stage named “Production”
You successfully implemented your API! Now, let’s interact with it.
Interact with the APIs
First, grab the AWS API Gateway invoking the URL from the Stage page’s Settings tab:
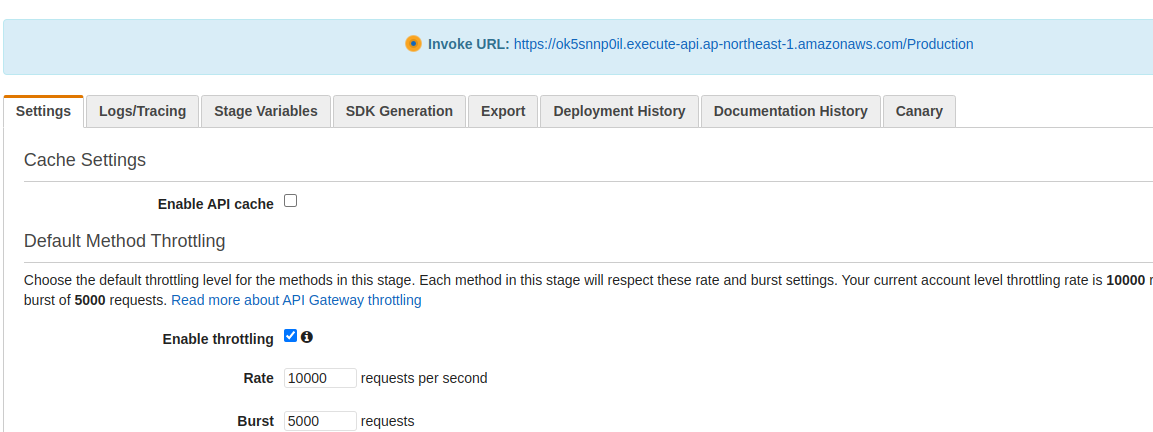
Figure 9: Grab the API Gateway
Then, open up Postman and try to add a new pet to the store.
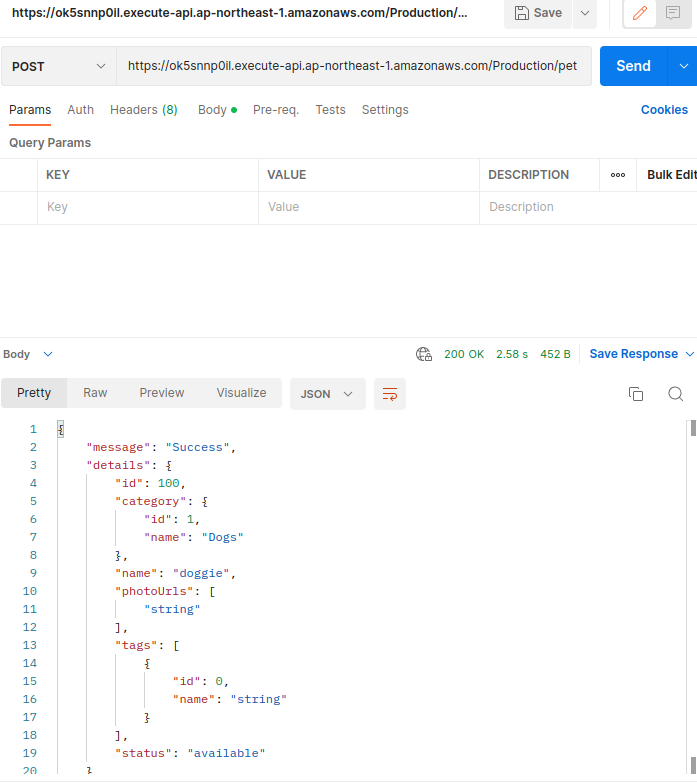
Figure 10: Add a new pet to the store using via your newly created API
The API works as expected. Now, try to remove the pet from the store.
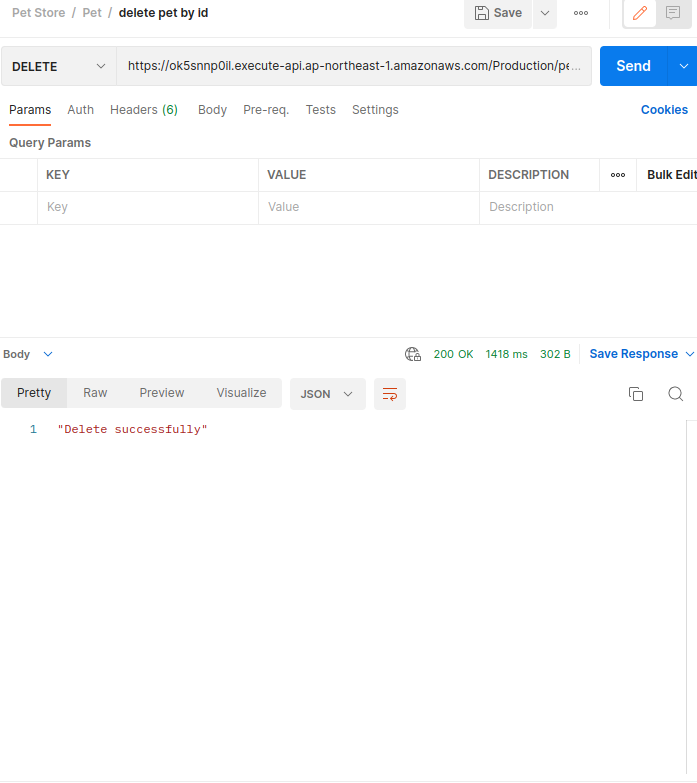
Figure 11: Remove a pet from the store using via your newly created API
The pet can be removed successfully.
Now that our APIs are up and running, we should set up monitoring and debugging. Implementing monitoring and logging components from scratch is time-consuming and could mean missing out on best practices, which in turn could lead to difficulties in setting up and maintenance of system resources. This is where you need a product like Lumigo to monitor your API.
Using Lumigo to Monitor the API
To observe how the deployed pet store API works, let’s add Lumigo monitoring and observability support to our AWS environment.
From the Lumigo page, connect to your AWS account.
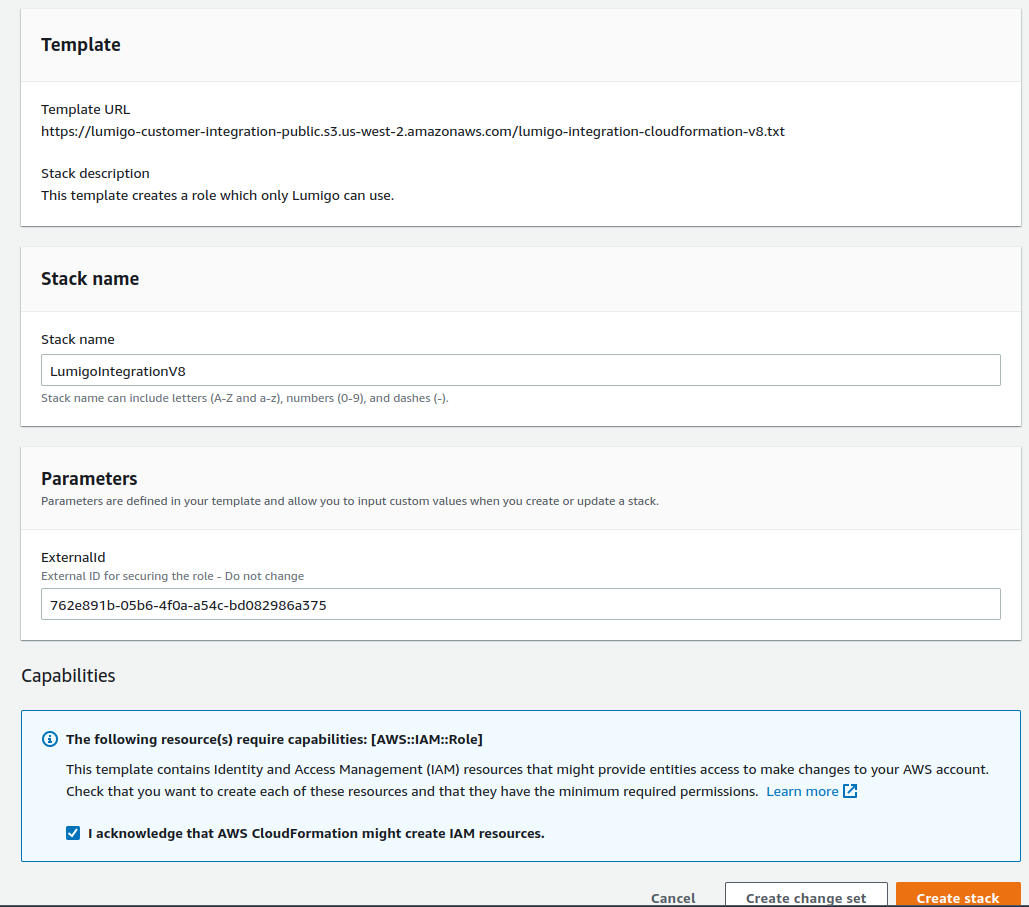
Figure 12: Connect Lumigo to your AWS account
Then, enable CloudWatch Logs for your API Gateway.
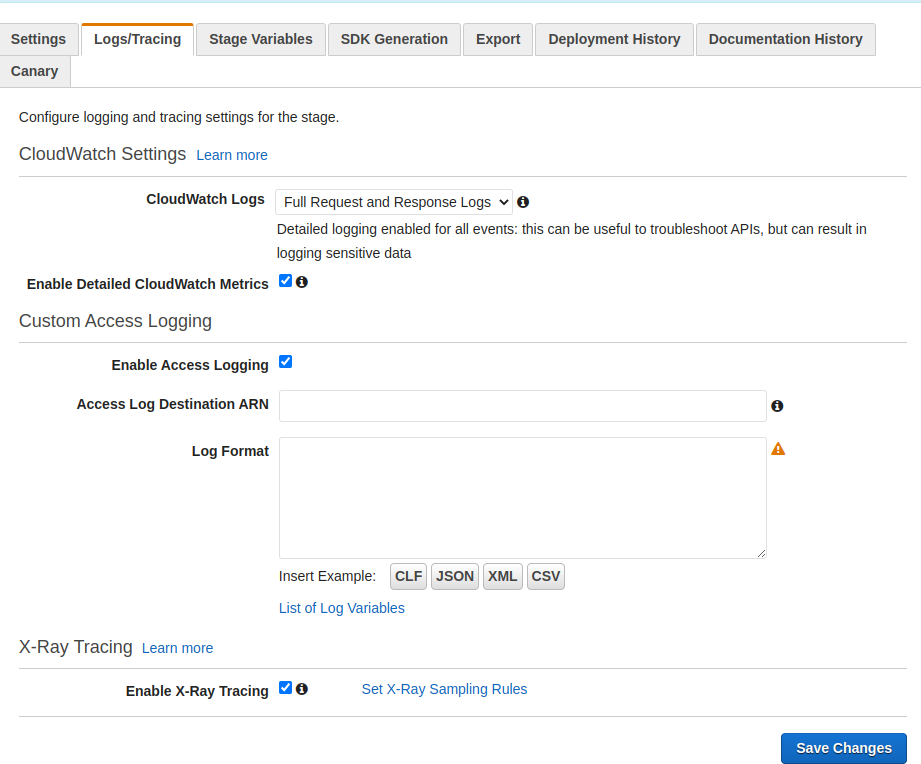
Figure 13: Enable Logs/Tracing in AWS API Gateway
At this stage, you need to provide log destination arn value. To do so, first create a new role for accessing AmazonAPIGateWay logs from CloudWatch.
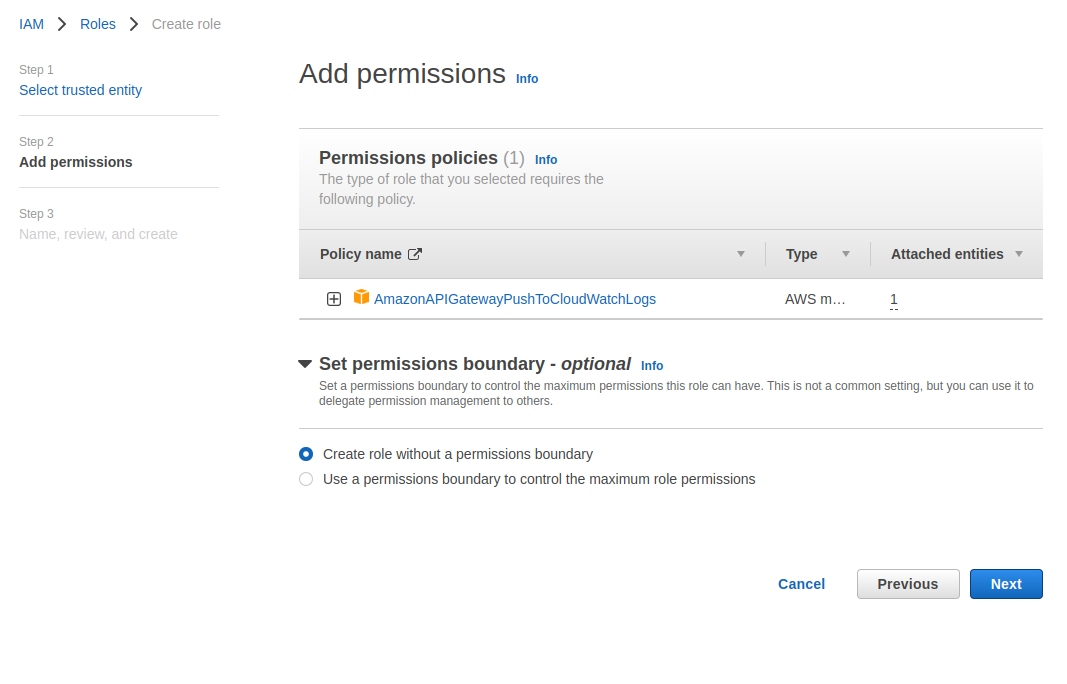
Figure 14: Create a new role for IAM account to get logs from API Gateway to CloudWatch
Copy the ARN value into the AWS CloudWatch setting.
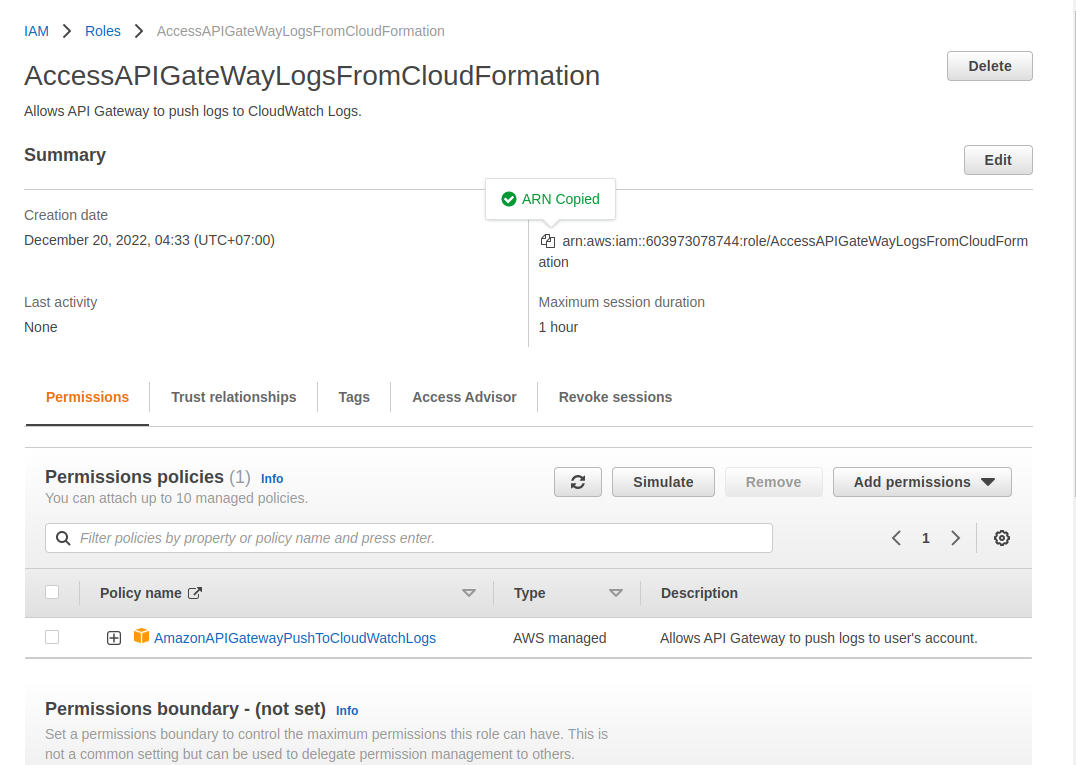
Figure 15: Copy the ARN address from the new role
Copy to console the ARN log group from CloudWatch Log group for Lambda function “managingPetStores.”
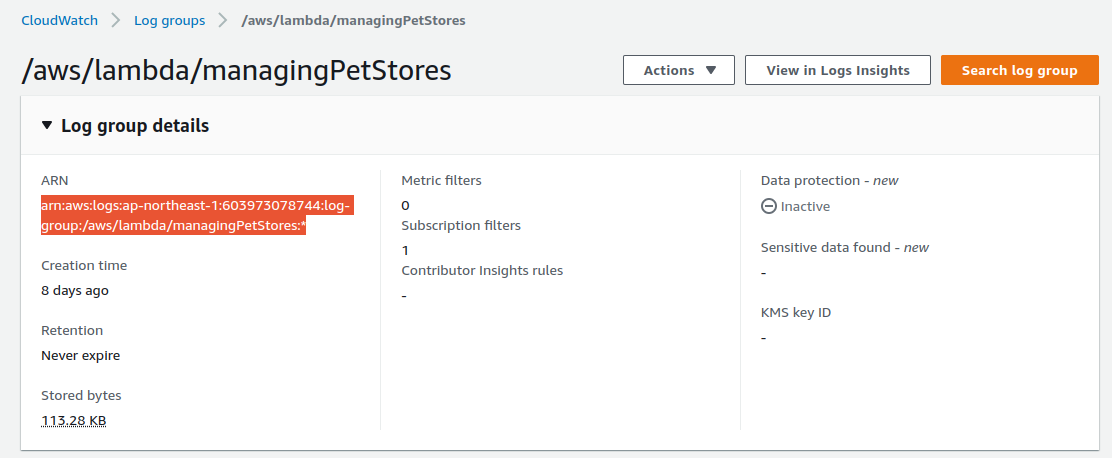
Figure 16: Copy the ARN log group to clipboard
Next, paste the value in the above step to Logs/Tracing page in API Gateway (you need to remove the final * character in the string.)
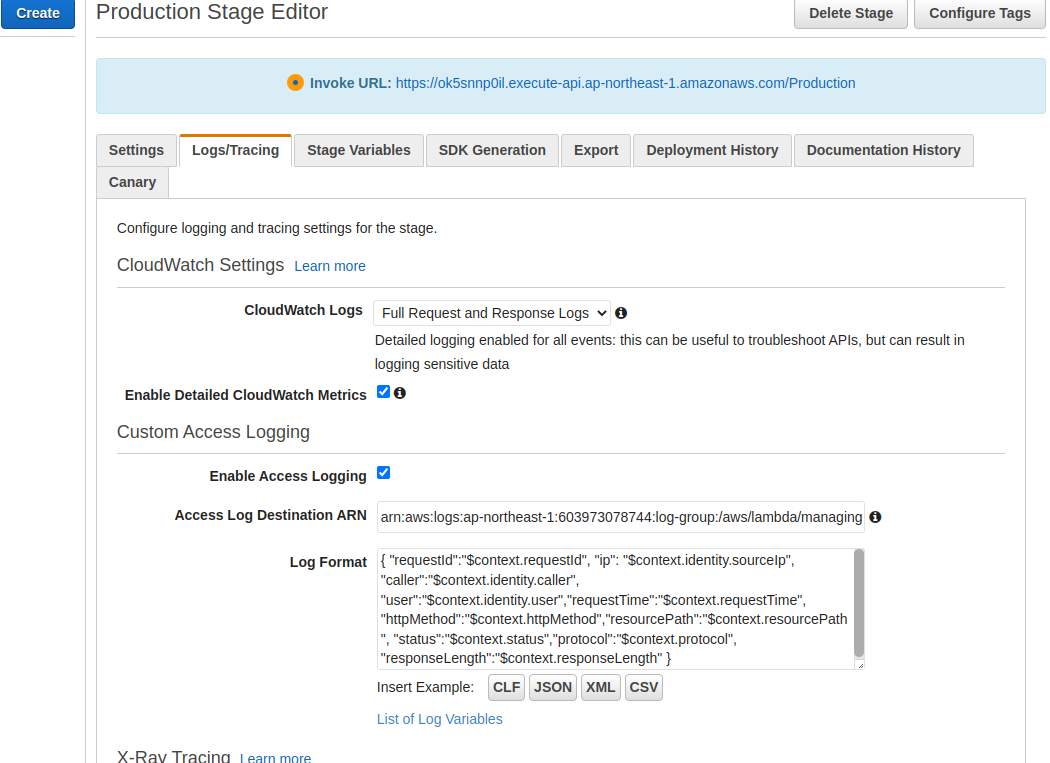
Figure 17: Enter the ARN Access Log and Log Format information in the Logs/Tracing tab of API Gateway
Update the code in your AWS Lambda function to allow Lumigo to collect Lambda function metrics. To do that, first install the @lumigo/tracer, and then add the wrapper code for the Lumigo tracer. To install the @lumigo/tracer in AWS Lambda function, install the @lumigo/tracer library in your local environment first.
cd pet-store-lambda
npm install @lumigo/tracer
Then zip the project and upload it to AWS Lambda function just like you already did when adding the axios library to AWS function runtime. You also need to add the following code in index.mjs file inside AWS Lambda function.
import lumigo from ‘@lumigo/tracer’;

const tracer = lumigo({ token: ‘YOUR-TOKEN-HERE’ });

export const handler = tracer.trace(async (event, context) => {
  …
});
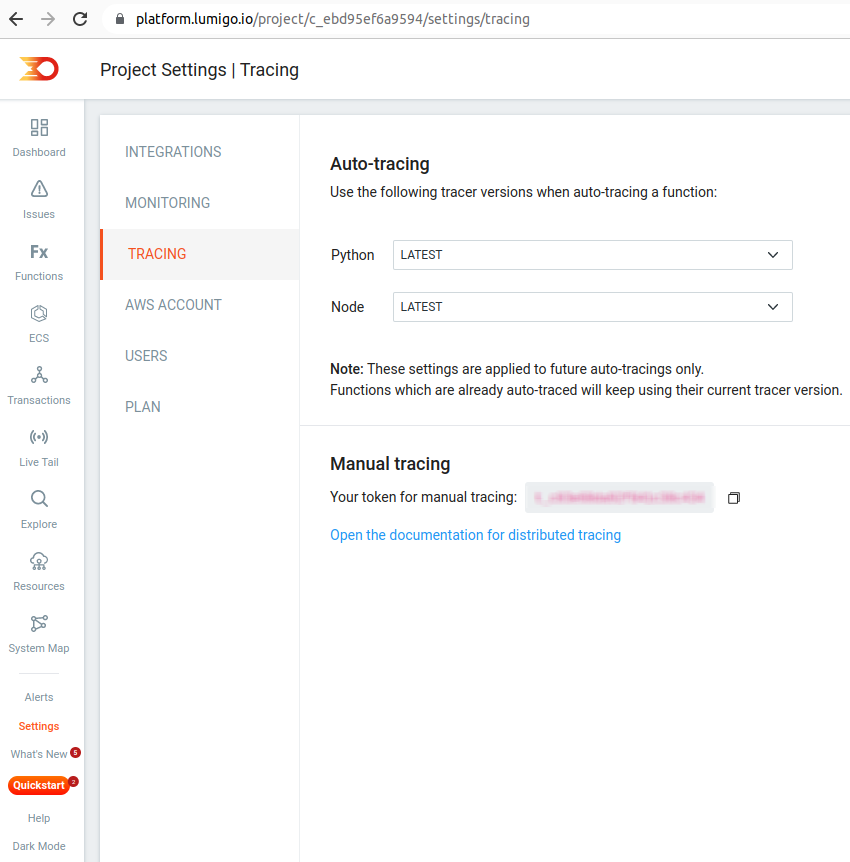
Figure 18: Grab the token for manual tracing from the Lumigo Settings page
Deploying the change in the AWS Lambda function. You’ve now successfully set up the Lumigo connection for monitoring the AWS Lambda functions.
Monitor AWS Lambda Functions Using Lumigo
From Lumigo dashboard, click on Functions on the left panel, and you can see the recent invocations from the “managingPetStores” Lambda function.
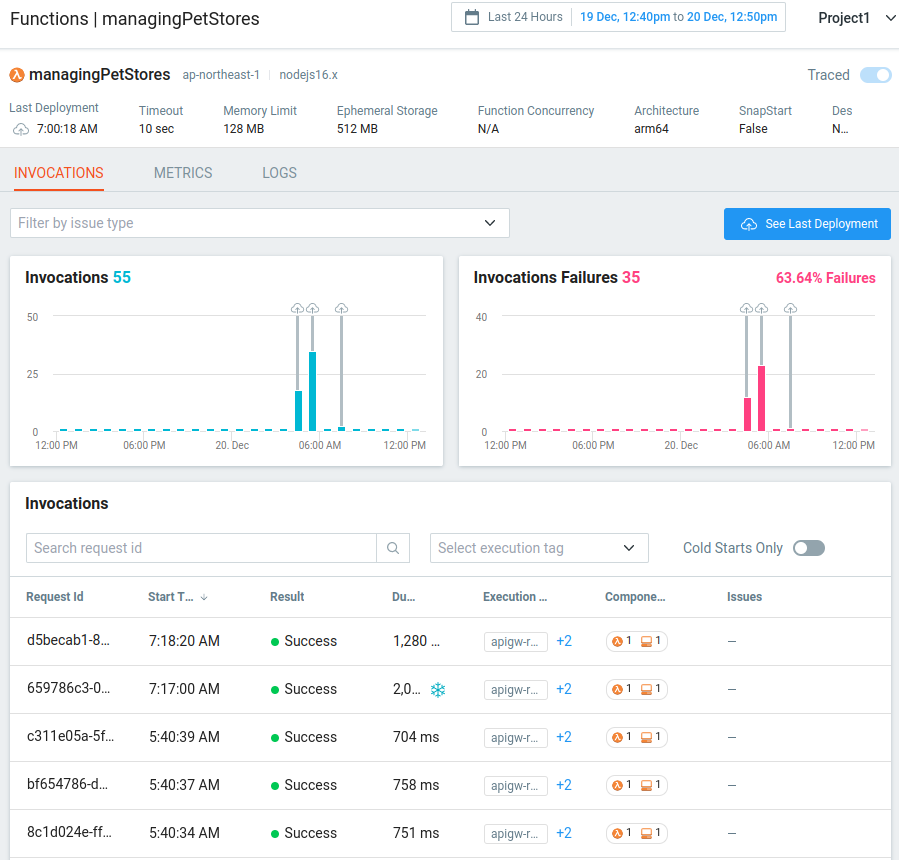
Figure 19: Overview of the collected invocations from Lumigo dashboard
Click on the “Metrics” tab to see the invocations successes and failures, along with other metrics like consumed memory and duration of each request that the Lambda function executed.
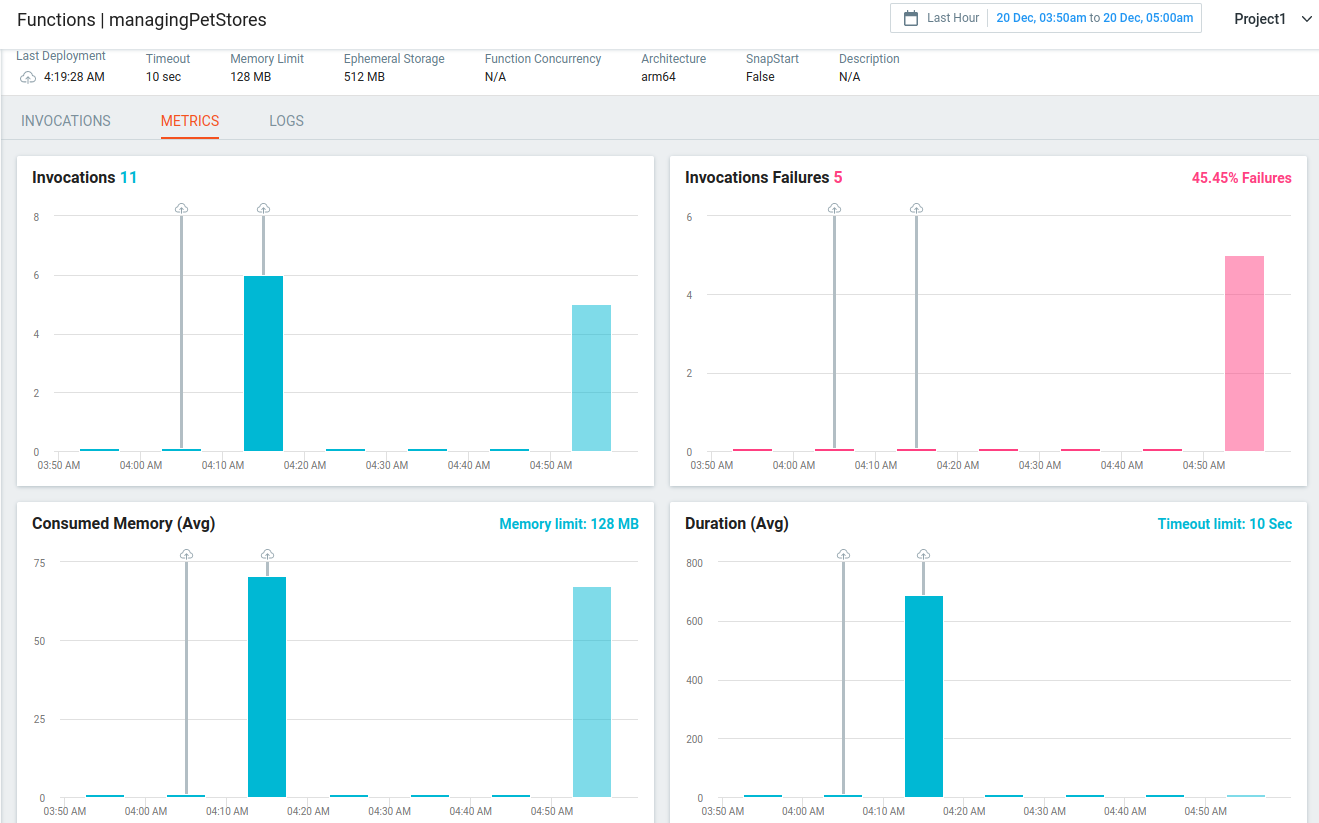
Figure 20: Overview of metrics for “managingPetStores” Lambda function
Click each recorded invocation to see how the components in the system interacted with one another inside the AWS Lambda function.
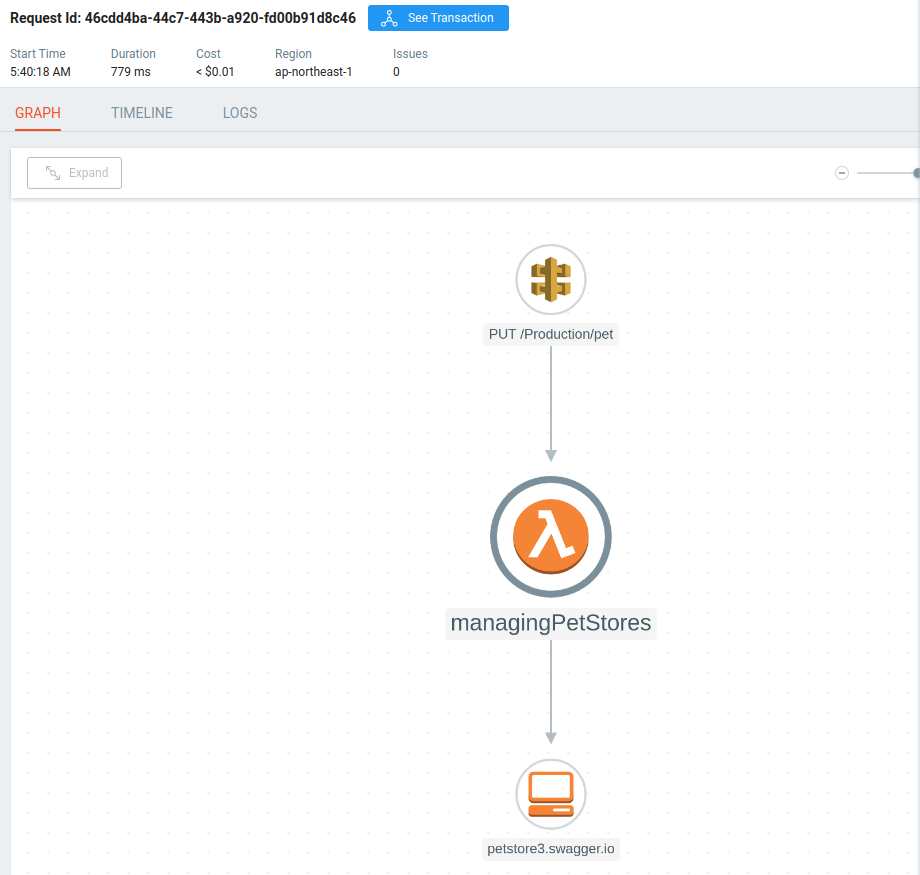
Figure 21: Visualization of how components interact with each other inside an invocation
In this invocation, the API gateway for API “PUT /Production/pet” made a request to “managingPetStores” Lambda function, and the Lambda function then requested to the actual “petstore3.swagger.io” API server.
On the other side of the screen, you can see the event data that the Lambda function received from API gateway, along with the return value from the Lambda function.
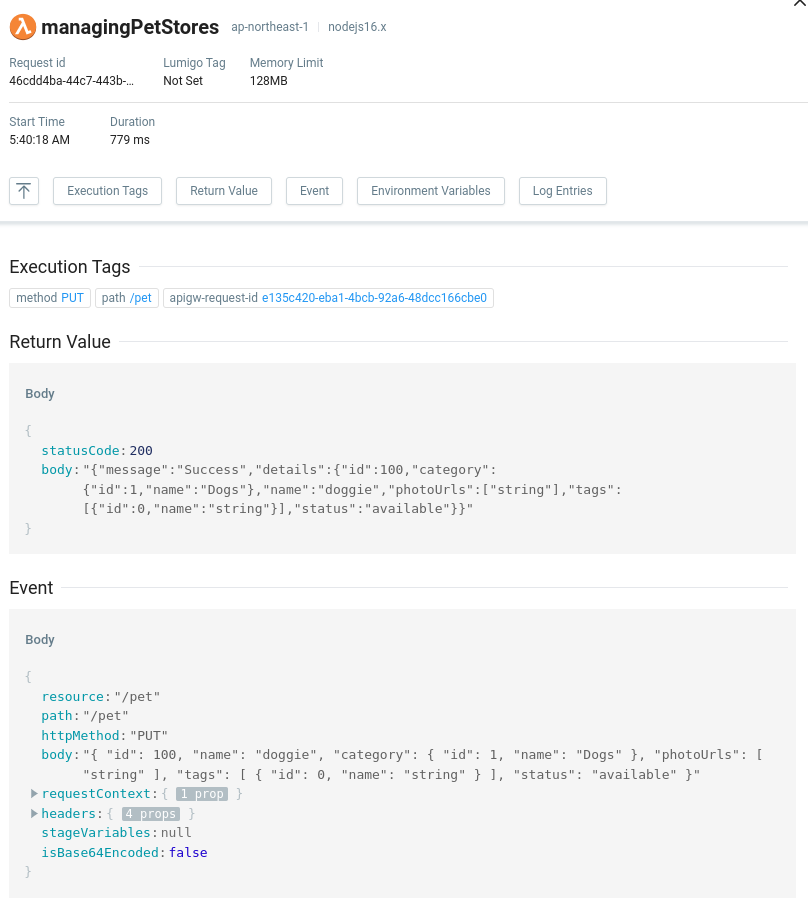
Figure 22: Details of the event body and return value from AWS Lambda function inside an invocation
Monitoring APIs is essential to maintaining their functionality and performance. Lumigo helps you to find and fix API issues in serverless and distributed environments in a matter of minutes, and saves you time and energy by offering a pre-built observing tool for all your API needs.
Stay tuned for part 2 where we will cover how to generate SDKs to make it even easier for developers to use your APIs, as well as how to monitor and maintain the performance of your SDKs.