


This is the second post in a 2 part blog series on debugging, monitoring and tracing NodeJS Lambda applications. If you haven’t yet seen part 1, check it out here (it’s a great read!)
Now let’s get back into our post with one of the most commonly experienced issues when it comes to Lambda functions, Cold Starts.
Cold Starts
A Lambda function is initialized in an execution environment only when it is invoked. In the case of our previous example, it also loaded in functionality from a library which added to the load time. An important note is that a single worker can process only one event at a time.
Although a single worker gets warm after its first invocation (for a period of approximately 5 minutes), the cold start could still occur for concurrent invocations. It happens because new workers get created for every concurrent event.
There are a few different ways to handle cold starts depending on what your function needs to do. Remember also, the most important thing is to look at how it affects the end-user experience—nobody likes timeouts or long waits and how they can scale.
Function Warmers
Lambda warmers facilitate the warming of your functions by analyzing invocation events and then attempting to manage handler processing. It’s especially important to note here that they do not manage the periodic invocation of your functions. To put it another way, they attempt to keep the engine idle based on the previous invocation as part of a “best guess”.
Let’s look at an example of setting up a function warmer using the Serverless Framework. To do this all you need is the Serverless WarmUp Plugin. It can be added to your project using the NPM command `npm i –save-dev serverless-plugin-warmup`.
The WarmUp plugin has to be configured after adding it to your project by declaring it in `plugins` within the `serverless.yml` file like this:
plugins:
  – serverless-plugin-warmup
Next, we need to give the warmer function permission to invoke selected Lambda functions. This can be done by providing an IAM Role statement, as shown below.
provider:
name: aws
runtime: nodejs12.x
lambdaHashingVersion: 20201221
iamRoleStatements:
  – Effect: ‘Allow’
    Action:- ‘lambda:invokeFunction’
    Resource: “*”
At this point, we can configure the Lambda function to use the function warmer. This can be done by adding the property `warmer: true` in the Lambda function declaration in the `serverless.yml`.
functions:fetchAccountInformation:warmup: true
handler: handler.fetchAccountInformation
After this, the Lambda function must be provided with a condition to break execution if triggered by the function warmer.
“use strict”;
module.exports.fetchAccountInformation = async (event, context, callback) => {
   if (event.source === “serverless-plugin-warmup”) {
      console.log(“Triggered by Function Warmer To Keep Environment   Warm”);
      callback(null, “Warming Lambda Up”);
   }
   return {
     statusCode: 200,
     body: JSON.stringify({
       message: “Go Serverless v2.0! Your function executed successfully!”,
     }),
   };
};
Once the function is deployed, the function warmer will be triggered every 5-6 minutes, allowing the selected Lambdas to get invoked to keep them warm. It ultimately increases performance by reducing latency.
However, AWS does not recommend function warmers in production workloads as the function can experience cold starts when Lambda functions scale up with traffic increase.
Provisioned Concurrency
AWS introduced Provisioned Concurrency to obtain consistent warm invocations with low latency in production workloads. It provides a way of preparing workers before receiving traffic—hence, provisioned. It downloads the function code, runs the initialization code, and keeps the worker on standby in a warmed state, ensuring that the API Gateway can respond quickly with low latency.
To enable Provisioned Concurrency:
- Go to your Lambda function in the AWS Console.
- Create a new version by publishing the function.
- Navigate to Configuration.
- Click Edit on Provisioned Concurrency.
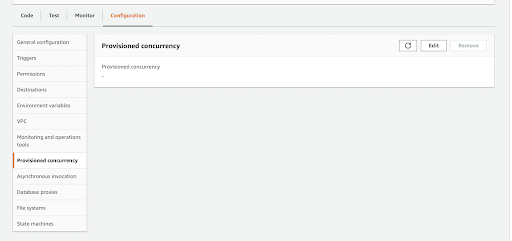
- Select the required workers (concurrency) to keep warm.

- Click Save, and the effect will take place in one minute.

Note: As we added Provisioned Concurrency to a new version, the invoker must call the newly published version of the function to use a warmed-up instance. Provisioned Concurrency cannot be applied to the $LATEST version.
During execution, if the active concurrent workers exceed 20 (set value), the Lambda function accepts the 21st and subsequent concurrent invocations as an on-demand basis where workers get allocated with cold starts.
More importantly, there is a significant difference in Lambda performance after implementing Provisioned Concurrency, as shown below.
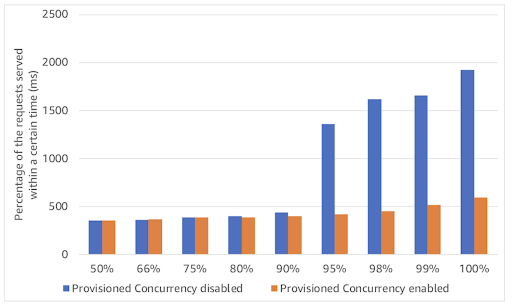
The above shows the results of Two Lambda functions (with/without Provisioned Concurrency) and how they each handle 10,000 requests through the API Gateway. The Lambda without Provisioned Concurrency creates high latency as workers need to initialize due to growing requests. The Lambda with Provisioned Concurrency provides responses under 500ms.
Therefore, AWS recommends using Provisioned Concurrency over function warmers to obtain low latency at a constant rate.
Whichever method you use to handle Lambda cold starts, I would highly recommend checking out the blog post This is All You Need to Know About Lambda Cold Starts to really delve into the topic further.
Set up a Tracing and Monitoring Tool
As demonstrated throughout this post, having some tools to gauge metrics alongside deployments and testing is extremely useful. Comparative measuring through configuration and changes helps with optimization on a number of levels.
What is vital throughout any NodeJS Lambda function deployment is building for scale. Your application might only have a few users today, but as people take to your platform, those few turn into many. As usage increases, so will costs and resource utilization.
Want to trace your entire stack in minutes? Sign up for Lumigo today and start tracing and monitoring with Lumigo.