


- Guide Content
The Complete Guide to AWS Step Functions: Concepts, Examples, and Best Practices

What are AWS Step Functions?
AWS Step Functions allow you to design and build the flow of execution of AWS serverless modules in an application. This lets developers focus solely on ensuring that each module performs its intended task, without having to worry about connecting each module with others. Step Functions is an orchestrator that helps to design and implement complex workflows. When we need to build a workflow or have multiple tasks that need orchestration, Step Functions coordinates between those tasks. This makes it simple to build multi-step systems. Step Functions is built on two main concepts: Tasks and State Machine. All work in the state machine is done by tasks. A task performs work by using an activity or an AWS Lambda function, or passing parameters to the API actions of other services. A state machine is defined using the JSON-based Amazon States Language. When an AWS Step Functions state machine is created, it stitches the components together and shows the developers their system and how it is being configured. Have a look at a simple example:

In this article
How AWS Step Functions Work
As discussed earlier, the state machine is a core component of the AWS Step Functions service. It defines communication between states and how data is passed from one state to another.
States
A state is referred to by its name, which can be any string but must be unique within the scope of the entire state machine. It does the following functions:
- Performs some work in the state machine (a Task state).
- Makes a choice between branches of execution (a Choice state).
- Stops execution with failure or success (a Fail or Succeed state).
- Simply passes its input to its output or injects some fixed data (a Pass state).
- Provides a delay for a certain amount of time or until a specified time/date (a Wait state).
- Begins parallel branches of execution (a Parallel state).
Here is an example of a state definition for Task type:
"States": {
"FirstState": {
"Type": "Task",
"Resource": "arn:aws:lambda:ap-southeast-2:710187714096:function:DivideNumbers",
"Next": "ChoiceState"
}
Learn more about AWS Serverless in our article: What is AWS X Ray?

Tasks and Activities
A Task is the basic unit of work in Step Functions. It represents a single unit of work performed by a state machine. A Task does its work in one of three ways:
- Invoking an AWS Lambda function.
- Using an Activity – this is code that awaits input from an operator. It can be hosted on Amazon EC2, ECS, or on mobile devices.
- Calling the API of another service.
You can define a Task by setting a state to “Type”: “Task” and providing the Amazon Resource Name (ARN) of the activity or Lambda function the Task should invoke.
Input and Output Processing
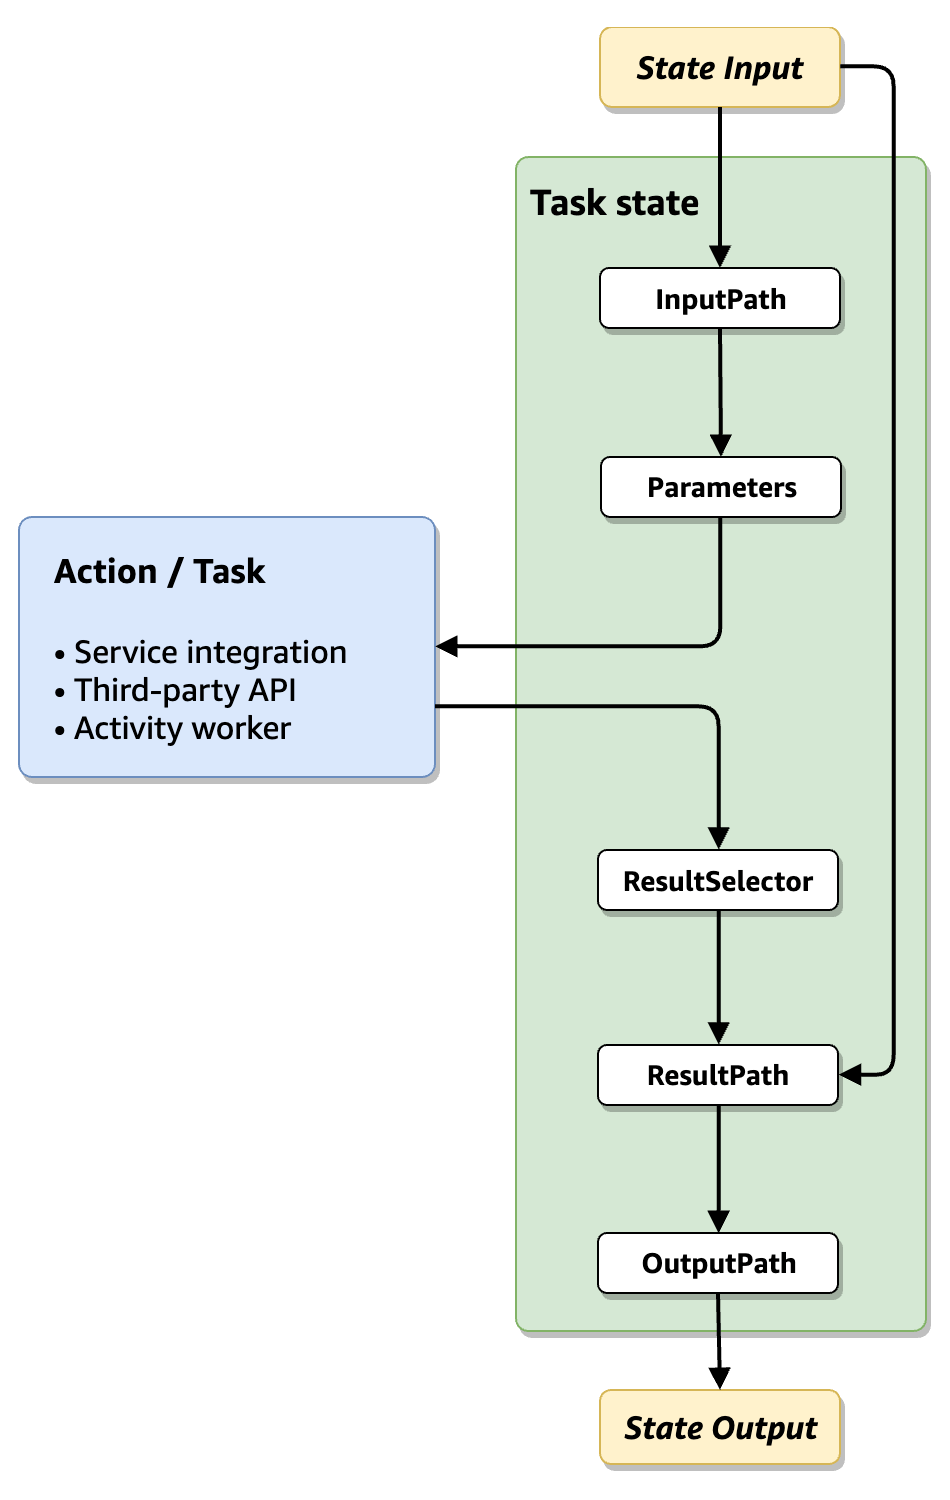
For Step Functions, input is always passed as a JSON file to the first state. However, it has to pass through InputPath, ResultPath and OutputPath before the final output is generated. JSON output is then passed to the next state. 
Image Source: AWS
InputPath – selects which parts of the JSON input to pass to the task of the Task state (for example, an AWS Lambda function). ResultPath then selects what combination of the state input and the task result to pass to the output. OutputPath can filter the JSON output to further limit the information that’s passed to the output. Let’s take a look at an example to better understand this in detail:  For Lambda execution, Input is described as JSON like above. That input is bound to the symbol $ and passed on as the input to the first state in the state machine. By default, the output of each state would be bound to $ and becomes the input of the next state. In Each state, we have InputPath, ResultPath and OutputPath attributes which filters the input and provide the final output. In the above scenario, “ExamResults” state is filtering “lambda” node, appending the result of a state execution to “results” node and final output is just “result” node rather than the whole JSON object:
  Hence, the final output will be:
{

"math": 80,

"eng": 93,

"total": 173

},
Error Handling
In Step Functions, you handle errors using retries and catch. The Amazon State Language lets you catch errors and define a retry – what to do to resume the operation. Step Functions Retry Here is a simple example (shared in the Step Functions documentation). It shows how Step Functions can identify an error handled in a Lambda function it is invoking, and retry the function invocation. You can also define maximum times to retry when an error is encountered, and a backoff rate – a multiplier by which the retry time increases with every retry attempt.
{
   "StartAt": "HelloWorld",
   "States": {
      "HelloWorld": {
         "Type": "Task",
         "Resource": "arn:aws:lambda:us-east-1:123456789012:function:FailFunction",
         "Retry": [ {
            "ErrorEquals": ["HandledError"],
            "IntervalSeconds": 1,
            "MaxAttempts": 2,
            "BackoffRate": 2.0
         } ],
      "End": true
      }
   }
}
Step Functions Catch
In more complex retry scenarios, you can perform different retry logic depending on the specific error thrown by the Lambda function. This also lets you log why specific tasks failed. You can use a Catch clause to define what should happen in case any other error occurs.
"Retry": [ {
      "ErrorEquals": [ "ErrorA", "ErrorB" ],
      "IntervalSeconds": 1,
      "BackoffRate": 2.0,
      "MaxAttempts": 2
   }, {
      "ErrorEquals": [ "ErrorC" ],
      "IntervalSeconds": 5
   } ],
   "Catch": [ {
      "ErrorEquals": [ "States.ALL" ],
      "Next": "Z"
   } ]
How Do Step Functions Integrate with Other Amazon Services?
Step Functions can be triggered in four ways :
- API Gateway
- CloudWatch Events
- S3 events
- Step Functions API – StartExecution
As I mentioned earlier, Step Functions is not only about Lambda Functions. It has support for several other Integration Patterns like SQS, DynamoDB, SNS, ECS, and many others. The Amazon State Language lets you directly call AWS services from your state definition. The following services are available directly from a step function:
- Task execution – you can run tasks either synchronously or asynchronously using Lambda function call, AWS Batch jobs, or Amazon ECS tasks
- Database operations – you can insert or retrieve data from Amazon DynamoDB
- Messaging – you can publish a topic to Amazon SNS or send a message via Amazon SQS
- Other services – you can also integrate step functions with any AWS or non-AWS service by implementing your own connector in your AWS Lambda function.
AWS Step Functions Examples
These examples were shared in the Step Functions documentation.
Step Function Lambda: Configuring a Lambda Function as a Task
The following example shows how to invoke a Lambda function directly from a Task state in Step Functions:
...
        "MyStateName":{
          "Type":"Task",
          "Resource":"arn:aws:lambda:us-west-2:01234567890:function:my_lambda_function",
          "End":true
      ...
Configuring a State Machine as an Event Source
You can create a state machine that invokes a Lambda function and waits for its input to continue to the next task. In the example below, a Task state invokes a Lambda function called my-function, passing an event payload with three parameters. When the Lambda function succeeds and returns a response, it transitions to “NEXT_STATE”.
...
"Invoke": {
  "Type": "Task",
  "Resource": "arn:aws:states:::lambda:invoke",
  "Parameters": {
    "FunctionName": "arn:aws:lambda:us-east-2:123456789012:function:my-function:1",
    "Payload": {
      "max-depth": 10,
      "current-depth": 0,
      "error-rate": 0.05
    }
  },
  "Next": "NEXT_STATE",
  "TimeoutSeconds": 25
}
You can also invoke the Lambda function asynchronously by setting “InvocationType“: “Event“.
AWS Step Functions Pricing
AWS Step Functions offers a pricing model based on usage, depending on the type of workflow you are using – a standard or an express workflow. Each time a workflow step is executed, the system counts a state transition. The system then creates a billing price according to the total number of state transitions, including all state machines as well as retries. Step Functions provides a free tier that provides 4,000 state transitions per month at no charge. If you exceed this usage, you are billed according to the official pricing. The system meters all charges daily and bills the total amount on a monthly basis. Beyond the free tier, there are two main pricing models: Standard workflows
- Pricing is $25 per 1 million state transitions. The duration of usage and memory usage are priced as an additional cost.
- Maximum duration of 1 year, 2,000 executions per section, and 4,000 state transitions.
Express workflows
- Pricing is broken into several components:
- $1.00 per 1 million requests
- $0.00001667 per GB-second of memory use for the first 1,000 GB-hours, down to $0.00000456 per GB-second over 4,000 GB-hours.
- Maximum duration of 5 minutes, 100,000 executions per sections, and unlimited state transitions.
AWS Step Functions Use Cases
There are many use cases that can be resolved using Step Functions. However, we’ll restrict ourselves to a few major ones here:
Sequence Batch Processing Job
If you have many Batch Jobs to be processed sequentially and need to coordinate the data between those, this is the best solution. For example, an e-commerce website can first read the product data and the next job will find out which products are running out of stock soon and then, the third job can send a notification to all the vendors to expedite the supply process.
Easy Integration with Manual Tasks
If a workflow needs manual approval/intervention, AWS Step Function would be the best solution to coordinate it. For example, the Employee promotion process – It needs approval from the manager. So the Step function can send the email using AWS SES service with Approve or Reject link and once receives it, can trigger the next action using lambda or ECS jobs.
Coordinate Container Task in Serverless Workflow
AWS Step functions can help to make a decision about how best to process data. Based on the file size, you can decide to use either lambda, ECS or on-premise activity to optimize the cost and runtime both.
Step Functions Benefits
Retry: Before Step Functions, there was no easy way to retry in the event of a timeout error or runtime error or any other type of failure. It also provides an exponential backoff feature.
"Retry": [ {
  "ErrorEquals": [ "States.Timeout" ],
  "IntervalSeconds": 3,
  "MaxAttempts": 2,
  "BackoffRate": 1.5
} ]
Error Handling: It provides an easy way of error handling at each state. It can handle several types of errors a state can throw out, like:
- States.Timeout – When a Task state cannot finish the job within the TimeoutSeconds or does not send heartbeat using SendTaskHeartbeat within HeartbeatSeconds value.
- States.TaskFailed – When a Task state fails for any reason.
- States.Permissions – When a Task state does not have sufficient privileges to call the Lambda/Activity code.
- States.All – It captures any known error name.
It can also catch Lambda service exceptions(Lambda.ServiceException) and even the unhandled errors (Lambda.Unknown). A typical example for an error handling:
"Catch": [ {
  "ErrorEquals": [ "States.TaskFailed", “States.Permission” ],
  "Next": “state x”
} ]
Additional benefits of Step Functions include:
- Parallelization: You can parallelize the work declaratively. A step machine can have a state calling multiple states in parallel. This will make the workflow complete faster.
- High Execution Time: Step Functions has one year as max execution time so if some of the tasks of the workflow are high (more than 15 minutes), they can be run on ECS or EC2 or as an Activity hosted outside of AWS.
Drawbacks of AWS Step Functions
Despite all the powerful features Step Functions offers, there are still a few things missing:
- Vendor lock-in: Amazon Step Functions is proprietary and can only be used on AWS. If you decide, later on, you wish to migrate to a different cloud vendor, you will need to re-design the orchestration layer or altogether replace it with an alternative offered by the new vendor.
- Complex syntax: The Amazon States Language, which is used to configure step functions, is highly complex. The syntax of this language is based on JSON. This means the language is ideal for machine readability, not for humans. Learning this language can be challenging, and you can only use it for AWS Step Functions, as it is proprietary to AWS.
- Shorter Execution History: The maximum limit for keeping execution history logs is 90 days. It cannot be extended and that may preclude the use of Step Functions for businesses that have longer retention requirements.
- Missing Triggers: Some Event Sources and Triggers are still missing, such as DynamoDB and Kinesis.
- State machine Execution name: Each Execution name for a state machine has to be unique (not used in the last 90 days). This can be very tricky.
- Does not horizontally scale to dynamically launch AWS Lambda functions in parallel. For example, if my state 1 generates 10 messages, it cannot spin up 10 AWS Lambda invocations at state 2 to process those messages individually (This feature is available if you use Lambda function directly with concurrent execution).
Step Functions Limits
In addition to the above drawbacks, the Step Functions service has several built-in service limits you should be aware of:
- A maximum of 25,000 item execution history per workflow: This limitation does not present an issue for the majority of use cases. You can perform long running executions with a higher number of state transitions, by splitting the workflow into multiple workflows that do not exceed the 25,000 limit.
- 1MB maximum request size: A request made to AWS Step Functions cannot carry a payload that is larger than 1MB. You can use larger files – if you store the files on Amazon S3 and use S3 URIs as inputs.
- Spikes in AWS API requests caused by a workflow: a peak in API requests might get throttled. If some workflow components inefficiently use the AWS API, a sudden spike in requests could trigger API limitations. To avoid this issue, you can group requests into a single API call (for made to the same service). Alternatively, you can introduce timeouts between operations.
- 50 tags per resource: Each Step Functions resource can have a maximum of 50 tags. If you need more tags, you’ll need to change your resource structure.
While the above limitations cannot be changed, others can be increased. You can, for example, request to increase the number of concurrent executions or the number of state machines per each account. You can submit your request in the AWS Support Center.
AWS Step Functions Alternatives
Here are several alternatives to Step Functions within the AWS ecosystem:
- Schedule AWS Lambda functions: You can run simple workflows (consisting mainly of one Lambda function) by incorporating the workflow logic into a Lambda function. You can then trigger the function by using an AWS Lambda schedule event.
- Combine Lambda functions with other AWS services: Some AWS services can manage entire functional tasks, such as user authentication. You can leverage these services to achieve faster implementation times and lower costs.
- Use queues for communication between services: For services that need to handle extremely high load, use queues to improve cross-service communication.
AWS Step Functions Best Practices
Use the following best practices to avoid common pitfalls with AWS Step Functions:
- Resume process from fail state – in a workflow, we sometimes need to resume the process from the fail state as opposed to re-running it from the beginning. This isn’t provided as a built-in feature, but there is a workaround to achieve this.
- Avoid infinite runs – State Machine can run infinitely. It has a max execution time of one year. On top of that, it provides a feature “Continue as new Execution”. This allows you to start a new execution before terminating your current running execution. This opens up the possibility of it running infinitely by mistake. Monitoring execution metrics is a good way to identify and fix those mistakes.
- Overcome the 25,000 event entries limit – you can implement a “Continue as new Execution” pattern, spinning up a new execution from an existing running execution. For example, if a long-running execution has 10 steps and you’re expecting to have 40,000 event entries in your execution history, start a new execution at step 5 and distribute entries between two executions.
- Handle timeouts – by default, the Amazon State Language doesn’t set timeouts in state machine definitions. In a scenario where a Lambda Function or Activity has a problem and keeps running without responding back to Step Functions, it will keep waiting for a year (max timeout) at least. To prevent this, set the timeout using TimeoutSeconds like this:
"ExamResults": {
   "Type": "Task",
   "Resource": "arn:aws:lambda:us-east-1:123456789012:function:HelloFunction",
   "TimeoutSeconds": 200,
   "HeartbeatSeconds": 30,
   "End": true
  }
Using TimeoutSeconds & HeartbeatSeconds, we can design a long-running workflow alive. HeartbeatSeconds value should be less than TimeoutSeconds. And, we need to use SendTaskHeartbeat periodically within the time we set in HeartbeatSeconds in our state machine task definition to keep the task from timing out.
Logging and Monitoring Step Functions
Similar to Lambda functions, Step Functions also sends logs to CloudWatch and it generates several metrics around it. For example, Execution metrics, Activity metrics, Lambda metrics, etc. Below is an example of Execution Metrics:  Visual Workflow panel shows the current status of the execution. Look at the right side of the panel (below picture). We can see the details of any state by clicking on the state in the workflow diagram. It shows the input, output, and an exception (if any) for the state.
  It also logs the execution history and status for each state. AWS Console does provide a nice visual of the states from start to end. We can also click on CloudWatch Logs to go to LogGroups and see detail logs.
  One recommendation is to create a Unique Trace ID which should be passed to all the integration services these states connect to. It will help to track the transactions easily. It also has integration with CloudTrail to log the events. Another option is to integrate Step Functions with Lumigo, the serverless monitoring platform. You can start using Lumigo free, and you’ll be able to see dashboards showing function invocations, cold starts, estimates of costs, and detailed information about every transaction in your system.
 To learn more see our blog post, or get a free Lumigo account and start monitoring Step Functions.
Conclusion
In this article, we explored the basic concepts of Step Functions and how it works. We also talked about how with the Visualization panel, Error Handling and Retry features, it makes the workflow creation process much smoother. Step Functions should properly be described as state-as-a-service. Without it, we would not be able to maintain the state of each execution having multiple lambda functions/activities. Just keep in mind that you need to keep a watch on your bills as it can burn a hole in your pocket very fast. And the best way to do that is to ensure that proper monitoring and metrics are in place. Learn how easy AWS serverless monitoring can be with Lumigo