


“Testing your production environment” refers to the practice of running tests on production servers, using actual data from real users. Production testing doesn’t replace other methods like unit or integration testing. Instead, it extends them.
Smoke testing is one approach that Lumigo has implemented to test our own production environments. In this blog, I will explain what smoke testing is, why it is an important testing method, and share some insights about the development process.
In this article
What is Smoke Testing?
Smoke testing allows us to quickly assess the status of an application by running a set of end-to-end tests targeted at checking the most significant user flows. Significant user flows are a collection of the basic and main functionality in your system.
Typically, a smoke test is run just after a new deployment and at regular intervals after that. It consists of many small and quick-to-execute testing blocks and its main goal is to identify production issues as fast as possible.
At Lumigo, smoke testing is one of the main approaches we take for verifying the stability of our system in the production environment. The tests perform consistent central user flows in a rapid and repetitive manner and immediately send a notification in case something goes wrong.
Let’s begin!
Implement Smoke Testing In Production
You can manually run smoke tests, but it’s easier and more reliable to automate the critical flows you want to test. For example, if you have an eCommerce app, you might want to run a test to ensure that users can sign-up, log in, log out, connect to APIs, etc.
Smoke testing should ideally run consistently at accurate intervals. If you have a build procedure in place or a well-defined CI infrastructure, the initial implementation for smoke testing is easy to adopt.
Before we dive into the implementation, here are some tips that will level up your “smoke tests” on production environments:
- Avoid data pollution – Running different user flows will probably produce redundant data which will be saved on the server. For example, a sign-up test will create a new user. Make sure that you delete unnecessary data to avoid data pollution at the end of the iteration.
- Avoid flakiness – Ensure the tests are as stable and reliable as possible. In addition, it is possible to configure a threshold and get an alert only if you cross it.
- Avoid false positive alarms – Think carefully about which errors you want to be alerted about in each test. For example, If your test goal is to check API requests, you probably don’t want the test to fail because of an unrelated error that popped up in the console.
- Ignore analytics – Make sure you don’t send any analytics (front-end and back-end) from your tests so you’re not spamming your analytics data.
The Process
Testing Framework – Cypress
Designed to make you more productive, Cypress is a great tool for E2E and UI testing. It records videos of test runs out-of-the-box and provides fast feedback, full access to the application, time travel, and most importantly, a great developer experience.
*Side note:* First time building Cypress test infrastructure for serverless applications? Read Here to find out more: Build a Cypress tests infrastructure for serverless applications
Code Your Tests
Make a list of the core functionality and user flows that you want to test.
Your smoke tests should ensure that key functionalities in your application are working correctly. Main user flows can be:
- Signup
- Logging in
- Interacting with your application
- Availability of backend services.
As mentioned before, your tests should take just a few minutes, and, ideally, run in parallel, making them even faster.
Here’s an example:
it("should verify each page responses status codes", () => {
  cy.login({
     username,
     password: Cypress.env("PASSWORD")
  });

  pages.forEach(({ requestsUrls, navItemSelector }) => {
     // Stub network requests
     requestsUrls.forEach((requestAlias) => {
        cy.intercept(`prod/${requestAlias}*`).as(requestAlias);
     });

     // Navigate to the relevant page
     cy.getBySel(`nav-item-${navItemSelector}`).click();

     // Assert responses status codes
     requestsUrls.forEach((requestAlias) => {
        cy.wait(`@${requestAlias}`).its("response.statusCode")
           .should("eq", 200);
     });
  });
});
CI Platform – CircleCI
CircleCI is a continuous integration and continuous delivery platform that can be used to implement DevOps practices. In CircleCI, create a new conditional workflow that will be executed according to your relevant pipeline parameter.
Inside that workflow, declare a new job in order to run your smoke tests.
workflows:
 smoke-tests:
   when: << pipeline.parameters.blackbox-e2e-schedule >>
   jobs:
     - smoke-tests-testing
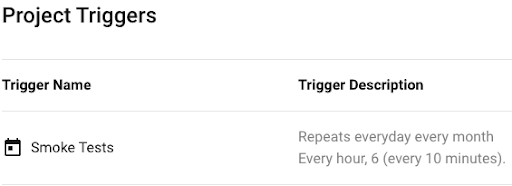
Frequent Intervals – CircleCI Scheduled Pipelines
Scheduled pipelines allow you to trigger pipelines periodically based on a schedule.
It lets you schedule pipelines at regular intervals whether hourly, daily, or weekly, using both the API and the UI. The more frequently you configure the intervals, the earlier you will be notified about a problem.
Don’t forget to define the pipeline parameter you used in the conditional workflow we mentioned earlier.

Monitoring and Alarming – Lumigo and AWS Services
After all the hard work we did and the tests run perfectly, we still need a way to track our results and get notified if and when something goes wrong.
First, we will use Cloudwatch Metric to collect our test results.
Create a script that will put metric data at our relevant smoke-tests-metric with an appropriate value, 1 for failure and 0 for success.
if ! npm run cypress:smoke-tests ; then
 aws cloudwatch put-metric-data --metric-name smoke-tests --namespace smoke-tests --dimensions test-results=test-results --value 1
 exit 1
else
 aws cloudwatch put-metric-data --metric-name smoke-tests --namespace smoke-tests --dimensions test-results=test-results --value 0
 exit 0
Then, create a Cloudwatch alarm based on that metric and define your conditions based on your needs.
Configure notifications to alert whenever the alarm is “in alarm” state. You can create an SNS topic to send notifications to where you can configure relevant endpoints (emails, HTTPS, etc.).
For Lumigo users, this entire process can be done easily and intuitively with Lumigo’s Cloudwatch Metric Alert creation. If you don’t have Lumigo yet, you can sign up for free in just a few minutes.

Congratulations! You just created a powerful system to ensure your application behaves as it should.
If you have questions or any more ideas regarding smoke testing in production, we’d love to hear from you!
Feel free to contact me at ido@lumigo.io or on my LinkedIn profile.