


Lumigo uses JetBrains IDEs everywhere. The back-end developers love their PyCharm and us frontend developers use WebStorm all the time. No doubt that it’s one of the most popular IDE’s out there.
One of the perks at Lumigo is that as employees, we can use 10% of our working time to invest in personal projects or do cool things for self-development and innovation.
On my last innovation project, I teamed up with my colleague Ido Golan and we talked about ways we could do something new that would give our clients a better product experience.
“Let’s build an IntelliJ plugin!” we both said together.
So why am I telling you about this?
Firstly, this is the first time we ever developed an IntelliJ plugin. Even though it sounds frontend oriented, the plugin is written in Java and Koltin which was a challenge for us both.
Secondly, it was a great opportunity for us to leave our comfort zone and our daily tasks and run through our product from a developer perspective and see how we can improve it. Every good product has integrations with others: Slack, Jira, GitHub, and the list goes on… We wanted to position ourselves on this list and create tools that help our clients use our platform.
Lumigo is a monitoring and debugging platform for serverless applications, and naturally we primarily cater to R&D teams. Our users usually spend their days writing some code in their IDE and when they want to check their performance or issues, they switch to Lumigo. We want to make their lives easier and link their IDE directly to the Lumigo platform for several reasons:
- It’s faster
- It improves product engagement
- As a company, it gives us the ability to not only monitor and debug your code, but also better assist and partner with you, the developer, in improving your code
Our innovation project goal was to automatically map the user serverless.yml file which is commonly used by Serverless Framework, locate their functions and add a Lumigo icon that opens the corresponding function directly in Lumigo.
What are the challenges we faced?
The first challenge for us was the programming language. Kotin and Java were pretty new to us since we’re both frontend developers using Javascript. Luckily, there are countless tutorials for catching up with these languages so the barrier didn’t hold us back too much.
The second challenge was to automatically map the user file and locate their functions.
We took a quick look in the IntelliJ plugin documentation and we found something called a PSI file.
A PSI (Program Structure Interface) file is the root of a structure representing a file’s contents as a hierarchy of elements in a particular programming language.
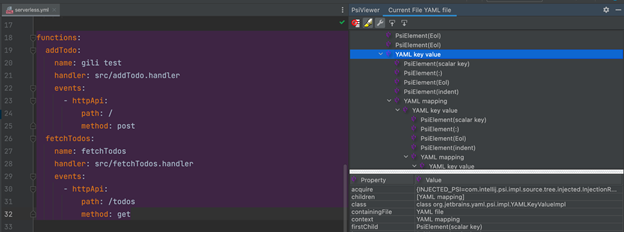
A more visualized way is to use an add-on called PsiViewer. It highlights the PSI blocks so you can better understand how to find what you’re looking for. I used it during the development of this plugin and will use it in this post for highlighting the relevant .yml parts.
To use a PSI file, you first need to grab an instance of your project and file. We’re getting those via overriding both projectOpened() and fileOpened functions.
[code lang=”plain”]override fun projectOpened(project: Project) {
project.messageBus.connect(project)
.subscribe(FileEditorManagerListener.FILE_EDITOR_MANAGER, object : FileEditorManagerListener {
override
fun fileOpened(source: FileEditorManager, file: VirtualFile) {
super.fileOpened(source, file)
val psiFile = PsiManager.getInstance(project)
.findFile(file);
}
});
}
[/code]
Now that we have the PsiFile instance, we can perform queries on it:
[code lang=”plain”][/code]
We’re passing the PsiFile instance as a parameter and for each element in this file, the predicate will run. Only truthy conditions return the element, So for this query we’ll get back the functions block (highlighted in purple in the below image).
Now that we distinguish the functions section from the other file, we can search for the actual functions elements.
[code lang=”plain”]// Get the actual functions psi elements from whiten the function element.
val functions = PsiTreeUtil.collectElements(functionsSection) { element ->
element.navigationElement.toString() == “YAML key value” &&
element.firstChild.text.toString() == “name”
}
[/code]
Like before, we are searching for elements based on a certain condition. This query will return all functions as PSI elements.
We were closing in on the finish line. We queried all functions from the file, but the question remained: how can we link them to Lumigo?
Well, first we needed to understand what are the line numbers of the function’s name (so we can position the icon correctly) and second, we needed to grab an instance of the markupModel that is used for adding the icon.
[code lang=”plain”]
// Get document instance for calculating line numbers.
val fileViewProvider = psiFile?.viewProvider
val document = fileViewProvider?.document
// Get a markup instance for appending the gutter icons.
val editor: Editor = FileEditorManager.getInstance(project).selectedTextEditor!!
val markup: MarkupModel = editor.markupModel
[/code]
Now that we had all the necessary information, we could loop over all functions, extract their name and line number and add the Lumigo icon for each function.
[code lang=”plain”]// Loop through all functions and append lumigo gutter action button.
for (function in functions) {
val textOffset: Int = function.firstChild.startOffset;
val name = { ->function.lastChild.text.substring(maxOf(function.lastChild.text.indexOf(‘}’) + 1,0))};
appendGutterIcon(markup, Action(name, document!!.getLineNumber(textOffset)));
}[/code]
For appending the icon we needed to create a GutterIconRenderer that overrides several functions. For that, we’d need to pass our icon from overriding the getIcon() function. Add tooltip with getTooltipText() and of course route to Lumigo by listening to icon clicks with getClickAction().
[code lang=”plain”]
fun appendGutterIcon(markup: MarkupModel, action: Action) {
val iconRenderer: GutterIconRenderer = object : GutterIconRenderer() {
override fun getIcon(): Icon {
return LumigoPluginIcons.LumigoLogo
}
override fun equals(other: Any?): Boolean {
return false
}
override fun hashCode(): Int {
return 0
}
override fun getTooltipText(): String {
return “Open in Lumigo”
}
override fun getClickAction(): AnAction {
return OpenFunctionInLumigo(action.name())
}
override fun isNavigateAction(): Boolean {
return true
}
}
val rangeHighlighter = markup.addLineHighlighter(action.line, 1, null)
rangeHighlighter.gutterIconRenderer = iconRenderer
}[/code]
Now, all that is left is to call markup.addLingHighkighter with the current line, assigning the gutterIconRenderer to the custom renderer created, sit back, relax and enjoy the show.
Recap
We’ve covered what PsiFiles are and how we use them to find elements inside files. With that in mind, the possibilities are endless, fFrom adding a background color to every debugger and up to complex code analyses. You can develop plugins that will contribute to your colleagues and to the community.
As a frontend developer, this exercise was both challenging and pleasant, and it couldn’t have been done without the perk of Lumigo’s 10% investment in personal development.
Feel free to contact me with any questions you might have or connect with me on my Linkedin profile.