


Late last year, during an engaging Twitch livestream by AWS Developer Advocate Darko Mesaroš, I was introduced to a new framework Id seen a few people talking about called Winglang. What really got my attention was this wasn’t just another entry in the list of cloud frameworks, Winglang was on a mission to redefine how we interact with cloud environments. Its ambition to serve as an expansive framework that could effortlessly connect different cloud platforms instantly caught my attention. This singular livestream opened a door to a world of possibilities where cloud deployments could transcend traditional boundaries, and I was eager to take Winglang for a spin.
What sets Winglang apart is its approach to blending infrastructure management with application development. The framework allows for directly integrating cloud resource definitions within the application code, proposing a more streamlined approach to the development process that could significantly reduce complexity and improve efficiency. The prospect of crafting application logic alongside infrastructure code together was compelling and needed to be tested with the tracing prowess that only OpenTelemetry can bring.
Let us fire up the development environments as we take a closer look at Winglang
Getting started with Winglang
Firstly, ensure you have Node.js installed in your development environment (at least version 18.13.0 or higher). Like all good development adventures, Winglang can be installed through npm simply by running run npm install -g winglang in your terminal, and once the installation is finished, verify it by running wing –version.
With installation complete, the next step is to create a new directory in your development environment. Inside this directory, create a file named main.w. This file will serve as your Wing app’s entry point and contain your initial Winglang code, if you’re familiar with JavaScript or TypeScript, the code structure should be easy to follow and write.
The example we are going to be using is a counter app from the winglang docs, add the following to the main.w file:
bring cloud;


// define a queue, a bucket and a counter

let bucket = new cloud.Bucket();

let counter = new cloud.Counter(initial: 1);

let queue = new cloud.Queue();


// When a message is received in the queue it should be consumed

// by the following closure

queue.setConsumer(inflight (message: str) => {

  // Increment the distributed counter, the index variable will

  // store the value prior to the increment

  let index = counter.inc();

  // Once two messages are pushed to the queue, e.g. "Wing" and "Queue".

  // Two files will be created:

  // - wing-1.txt with "Hello Wing"

  // - wing-2.txt with "Hello Queue"

  bucket.put("wing-{index}.txt", "Hello, {message}");

  log("file wing-{index}.txt created");

});
This script sets up a basic demo app with a queue, a counter, and a bucket. It processes messages received in the queue, increments a counter, and returns an output response. To get this example up and running, you need to use the Wing console via wing it main.w in the root directory via the terminal.
One of the features that really stands out with Winglang is that the console automatically hot reloads by default each time you change source files. Hot reload in development is always a brilliant and handy feature that helps reduce development time, so you don’t have to keep stopping, starting and reloading to see the changes.
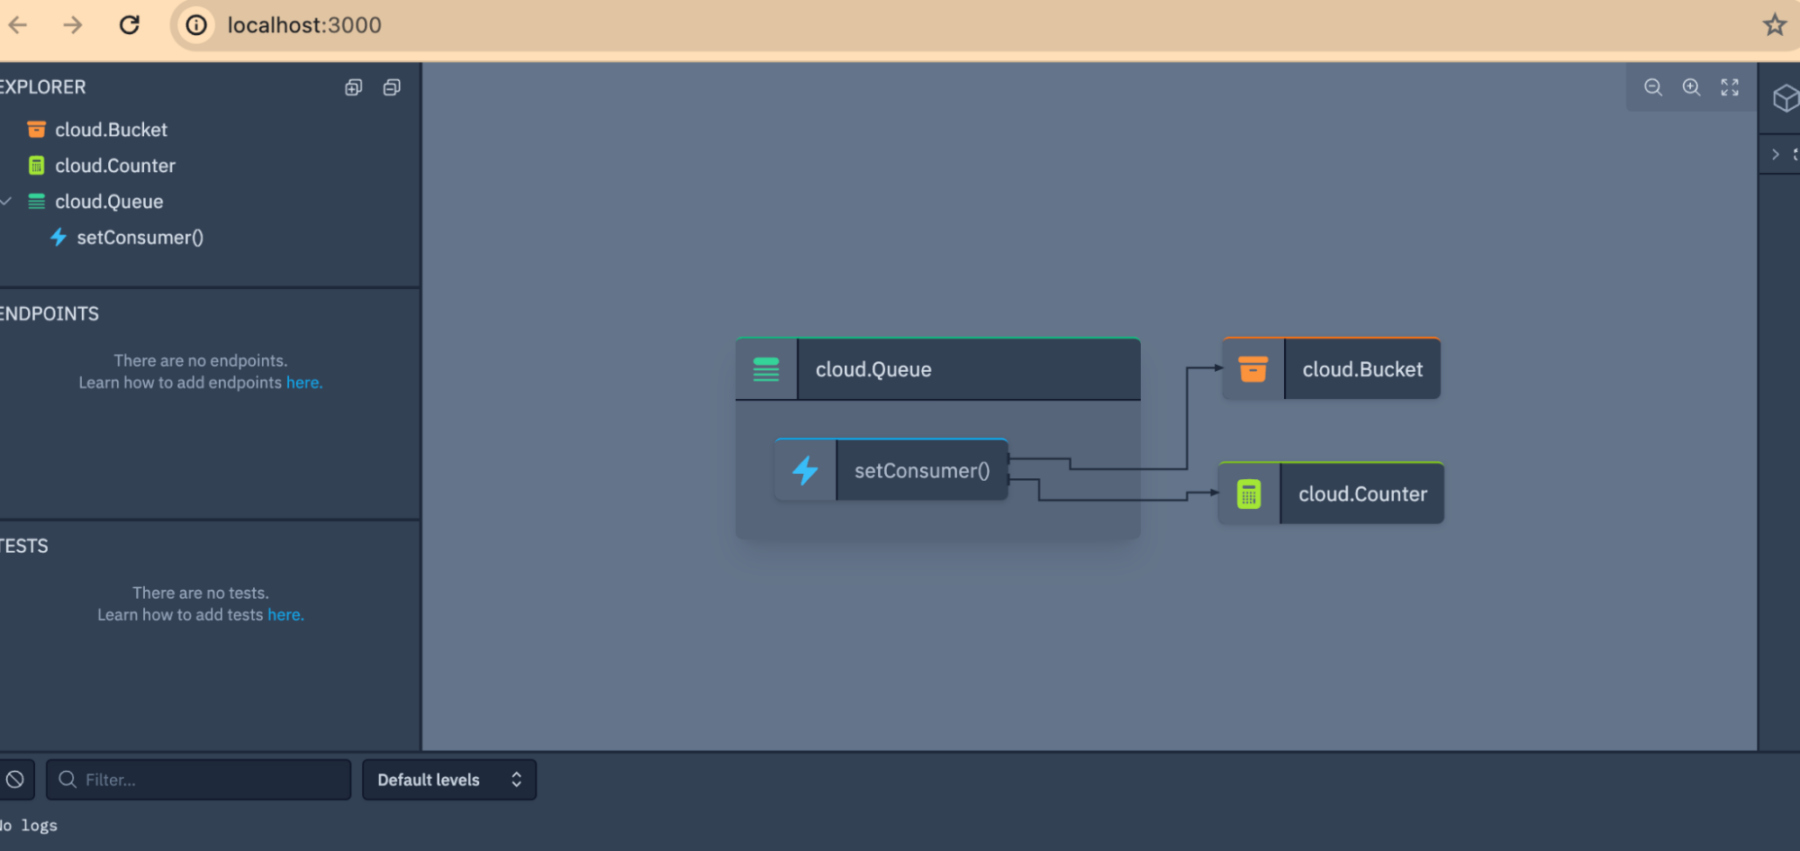
Within the Wing Console, you can access a map view that displays several resources: a Queue, a Counter, a Function, and a Bucket. These resources are connected to a message handler via the function resource. You can interact with them directly from the console by clicking on them or through a terminal using localhost routes and curl. On that note, you can also push a message to the queue using the interaction panel on the right and see the results in the bucket through the console.
Deploying and OpenTelemetry Tracing
You will need a few more pre-requisite things for this next part. The first of which is Terraform, which will help with the build, configure and deploy aspects of our AWS deployment; if you haven’t yet set that one up, it’s as quick as clicking this link. You will also need an authenticated AWS CLI, which is equally as easy to get set up and configured by checking out the AWS documentation on this link. The other thing you will need for this is a Lumigo account created and connected to the authenticated AWS account you are about to deploy this app; if you haven’t yet got a lumigo account, head over to get set up.

With the prerequisites sorted, it’s all steam ahead with deploying, and for that, we need to run wing compile --platform tf-aws main.w in the directory root. This will get the Wing compiler to bind the required resources with AWS resources using Terraform to provision. While there should be no output returned from this command, you will be left with a compiled app featuring a target directory containing a Terraform config folder called main.tfaws

Navigate to the /target/main.tfaws directory via the terminal and with your AWS deployment region of choice set ( export AWS_REGION=us-east-1) run terraform init.

Lastly, deploy using terraform apply which should then show you a list of resources to be created and a “Do you want to perform these actions?” prompt. Answer yes if you are happy to proceed, note you actually need to type ‘yes’ and not just the usual ‘y’ that we can sometimes get away with, and you should then see the resources being created and spun up. If you encounter errors here, circle back to the AWS CLI Authentication to see if it’s an auth error.

You should eventually see a “Apply Complete” message if everything goes as planned.
![]()
To test this new deployment, you need to put a message into the SQS queue, which will be picked up by the deployed lambda, and a file will be created in the S3 bucket with a DynamoDB counter in tow keeping score.

However, jumping through a myriad of distributed systems can get a bit clunky, so with your lumigo account connected to the AWS environment from the prerequisites and the trace function switched on for the lambda in the lumigo dashboard
 You can now more easily see the full trace picture once you invoke the SQS queue message.

It’s important to note here that as part of this, you get the full trace picture with body payloads and headers from each step of the invocation through all services in the trace. This becomes invaluable, especially when debugging, as it helps you see the output from each step and the data involved.

Additionally, you can get some great insights from the metrics associated with the deployment, along with each invocation identifying any issues between the trace components and the run duration.

When you are done invoking invocations with Winglang, simply run terraform destroy from the terminal to undo and remove the infrastructure deployed from this demo app. The added bonus here is you also get to keep using the Lumigo account for free!
Wrapping up Winglang
Winglang, still in its early stages, continues to evolve and refine its capabilities. Since my initial testing last year when Darko was testing it, the framework has shown considerable evolution, highlighting its potential to simplify and enhance cloud deployments. Its journey from a fledgling project to a more robust platform reflects the vibrant community’s dedication and the framework’s inherent promise to streamline cloud operations. Like any good open-source project, the Winglang community actively seeks contributors and enthusiasts to add to its development, and I would highly encourage anyone to contribute where they can, even if it’s just giving feedback on new features, functions and future direction.
For those experimenting with Winglang or any cloud deployments, getting visibility and monitoring into your apps is always essential and signing up for Lumigo will help you get visibility into your apps so that you can understand the inner workings of your deployments.
If you found this post interesting or useful, please share it on social media or why not reach out to is on social and let us know your thoughts.