


Kubernetes is the container orchestration platform of choice for many teams. In our ongoing efforts to bring the magic experience of Lumigo’s serverless capabilities to the world of containerized applications, we are delighted to share with you the Lumigo Kubernetes operator, a best-in-class operator to automatically trace your applications running on Kubernetes.
Kubernetes Operators in a nutshell
To run applications on Kubernetes, you interact with the Kubernetes APIs through tooling like kubectl, Helm or Terraform. Through these API interactions, you schedule resources like Deployments or DaemonSets that will manage the lifecycle of the pods and containers hosting your applications.
One of the things I personally like best about Kubernetes, is that its APIs can be extended using operators:
Operators are software extensions to Kubernetes that make use of custom resources to manage applications and their components. People who run workloads on Kubernetes often like to use automation to take care of repeatable tasks. The operator pattern captures how you can write code to automate a task beyond what Kubernetes itself provides.
In other words: a Kubernetes operator is an application that you deploy on your own Kubernetes clusters to automatically perform tasks based on specific custom resources that you create. There are Kubernetes operators for a lot of software, from monitoring and observability tools, to databases, to security tooling and much more. Effectively, if there is something you want to automate on Kubernetes, chances are someone has already written an operator that does that or at least something that is similar to what you want to achieve. Tracing your applications with Lumigo on Kubernetes is now one of those things that is entirely automated. The rest of this post will shine a light on the ease and level of automation we have been able to achieve.
How much automation is enough automation?
The short answer? Anything beyond having to simply say “Lumigo, trace me that!”, is too little automation for our taste.
Since we launched the first version of our Amazon ECS support, we knew that Kubernetes was the next container orchestration platform to take on. And given that automation is the very essence of Lumigo, we immediately asked ourselves what could we do to make it as easy and automated as possible to trace applications running on Kubernetes. After all, the user experience that you can enjoy today with Serverless on Lumigo is you effectively saying “Lumigo, trace me that!” by pressing one button on the Lumigo UI, and we would not settle for anything less than that.
Granted, the Lumigo OpenTelemetry Distro for Node.js and Lumigo OpenTelemetry Distro for Python already have best-in-class user-experience for adopters: all it takes is for you to add a dependency to your application and a couple of environment variables, and your application is traced. But in a world of containers, you still need to build and ship new versions of your container images, add environment variables and secrets to your environment, edit deployments and other resources. That is not nearly close enough to “Lumigo, trace me that!”
While there are open-source operators that offer automatic injection, like the OpenTelemetry Operator, they still take a lot of error-prone toil to make it work. For example, you need to go and annotate, container by container, exactly which instrumentation should be injected. If you make a mistake and the wrong instrumentation is injected, or you outright forget to add the annotation, no tracing occurs and you are missing vital information about the health of your applications. When you have more than a handful of components in your applications, it is far from trivial to understand that you are not tracing some of them, and which. This kind of pitfall is what I call “false-negative instrumentation”: you do not know you are missing instrumentation until you need it, and that realization tends to befall you during outages, when you lack the data to troubleshoot, compounding an already unpleasant situation.
Enter the Lumigo Kubernetes operator
As we want to offer you the ultimate “Lumigo, trace me that!” experience on Kubernetes, so we created the Lumigo Kubernetes operator. The experience of installing the Lumigo Kubernetes operator is in line with what one can expect from well-written operators:
helm repo add lumigo https://lumigo-io.github.io/lumigo-kubernetes-operator

helm install lumigo lumigo/lumigo-operator –namespace lumigo-system –create-namespace
The Lumigo Kubernetes operator is installed using Helm and it is discoverable on Artifact Hub.
What makes the Lumigo Kubernetes operator unique, however, is how simple it is to make it trace all of the applications in a namespace. All it takes, is to run one kubectl apply with this content (mind to replace your Lumigo token, which you find in Lumigo):
apiVersion: v1
kind: Secret
metadata:
  name: lumigo-credentials
stringData:
  token: [LUMIGO_TOKEN]
apiVersion: operator.lumigo.io/v1alpha1

kind: Lumigo

metadata:

  labels:

    app.kubernetes.io/name: lumigo

    app.kubernetes.io/instance: lumigo

    app.kubernetes.io/part-of: lumigo-operator

  name: lumigo

spec:

  lumigoToken:

    secretRef:

      name: lumigo-credentials

      key: token
The snippet above is made of two YAML documents:
- A Kubernetes Secret that stores your Lumigo token.
- A Lumigo resource that references the Lumigo token inside the Kubernetes secret.
When you create the two resources above, the Lumigo Kubernetes operator will immediately go and:
- Instrument existing resources: Add distributed tracing for Node.js and Python to all existing Deployments, DaemonSets, ReplicaSets, StatefulSets, CronJobs and Jobs in your namespace.
- Instrument future resources: Add distributed tracing for Node.js and Python to all future Deployments, DaemonSets, ReplicaSets, StatefulSets, CronJobs and Jobs in your namespace.
To make the instrumentation take effect, your pods will be restarted (there is a configuration option to opt out from instrumenting everything on the fly, in case you want to control the process). Besides, since removing things should be as easy as deploying them in the first place, the Lumigo Kubernetes operator will go and remove the instrumentations it applied if you delete the Lumigo resource in a namespace, or even if you uninstall the operator itself!
As you create new or edit existing resources in the namespace, the “Injector” Admission Controller Mutating Webhook provided by the Lumigo Kubernetes operator will ensure that the Lumigo distributed tracing is set up for them. Changes to your resources are displayed as Kubernetes events associated with your resources:
kubectl describe deployment my-deployment -n test-namespace
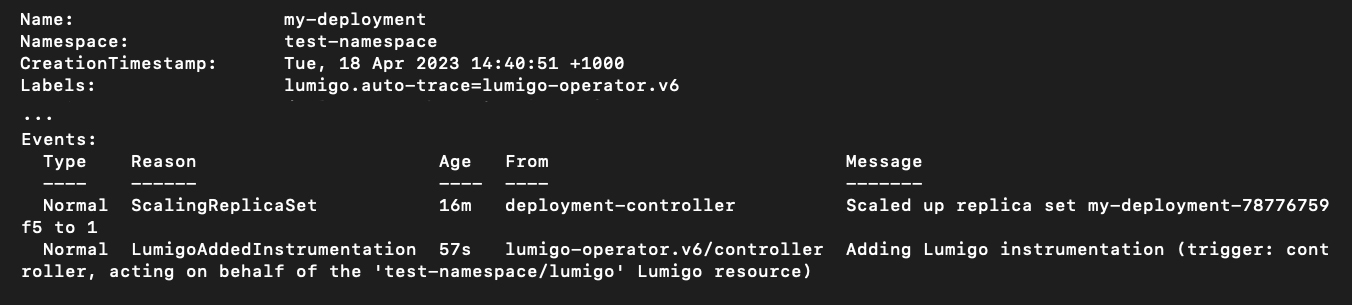
(Output of kubectl describe deployment my-deployment -n test-namespace, edited for readability by deleting a lot of non-relevant output.)
Above you see one such Kubernetes event on a Deployment instrumented by the Lumigo Kubernetes operator. All the information about the Pod templates has been removed for readability, and we delve into what the Lumigo Kubernetes operator does with them in the following section. Notice that the event description states that the instrumentation has been applied by the injector-webhook; if the instrumentation is added by the Lumigo Kubernetes operator when you create a new Lumigo resource, instead, the event will document a different trigger. The Lumigo Kubernetes operator also automatically adds the lumigo.auto-trace label that documents which version of the injection has occurred. The lumigo.auto-trace label has a few functions in the overall workings of the operator:
- It allows you to exclude resources from the work of the Lumigo Kubernetes operator. If you set the lumigo.auto-trace label with the false value, the Lumigo Kubernetes operator will not touch your resource.
- Enables you to use label selectors with kubectl to get an outlook with one command of all the resources that are instrumented by the Lumigo operator in your cluster:
kubectl get all -A -l ‘lumigo.auto-trace,lumigo.auto-trace!=false’

- (Soon!) the Lumigo Kubernetes operator will use updates of the lumigo.auto-trace label to trigger updates of the instrumentation applied to your applications.
Lifting the veil on Lumigo automated injection
If you have dabbled enough with Kubernetes operators and Kubernetes APIs, you should have a feeling for how we achieve the magical user-experience of the Lumigo Kubernetes operator in terms of modifying resources, undoing things over deletion of resource or uninstallation of the operator, and so on.
However, the knowledge of how the tracer injection actually works is a different thing altogether! The criteria our tracer injection must fulfill are challenging:
- If you have Node.js or Python inside your containers, the distributed tracing of those processes must Just Work™ without any code changes to your application or the way you deploy it on Kubernetes.
- Should work on both linux/amd64 and linux/arm64 in a way that is completely transparent to you, the end user.
- It must not require you to apply any label, annotation or other setting with any specific knowledge of what runs inside your containers.
- It must work irrespective of which container base image you are using, might it be a Debian-derivative like Debian or Ubuntu, RHEL Universal Base Image (UBI), Alpine Linux, Google distroless, or whatever you happen to throw at the Lumigo Kubernetes operator.
Now, if you are one of the handful of people in our industry that have been seriously dabbling with injecting distributed tracing into applications at scale, your eyebrows have likely gone up somewhere in between point (2) and (3), and at (4) you might have thrown your hands in the air. Why? Let’s break it down.
The basics: get the tracer into the container
At the most fundamental level, in order to trace an application inside a container, you need to have two things in the container hosting the application to trace:
- the files of the right tracer in the container
- a way of activating the tracer.
The Lumigo Kubernetes operator achieves both of the above by modifying pods’ PodSpec. Let’s say that the following is the specification of a simple pod, running a Python one-liner that you asked Kubernetes to schedule:
kubectl describe pod my-app-7ff66c8dc8-n2q9x -n my-namespace
| Name: my-app-7ff66c8dc8-n2q9x Namespace: my-namespace Labels: app=myapp pod-template-hash=7ff66c8dc8 type=deployment Controlled By: ReplicaSet/my-app-7ff66c8dc8 Containers: myapp: Image: python Command: python -c while True: print(“IT’S ALIIIIIIVE!”); import time; time.sleep(5) State: Running Environment: Mounts: /var/run/secrets/kubernetes.io/serviceaccount from kube-api-access-h4x98 (ro) |
The structure of the pod used in this example, using the output of kubectl describe pod as ways of documenting the pod structure, and removing unnecessary information.
When you actually go and check how Kubernetes created the pod, it looks rather different, with quite a bit of stuff added to it (highlighted in green):
kubectl describe pod my-app-7ff66c8dc8-n2q9x -n my-namespace
| Name: my-app-7ff66c8dc8-n2q9x Namespace: my-namespace Labels: app=myapp lumigo.auto-trace=lumigo-operator.v113 pod-template-hash=7ff66c8dc8 type=deployment Init Containers: lumigo-injector: # [2] Image: public.ecr.aws/lumigo/lumigo-autotrace:latest # [2A] State: Terminated # [2A] Reason: Completed # [2A] Exit Code: 0 # [2A] Environment: TARGET_DIRECTORY: /target Mounts: /target from lumigo-injector (rw) # [2B] Containers: myapp: Image: python Command: python -c while True: print(“IT’S ALIIIIIIVE!”); import time; time.sleep(5) State: Running Environment: # [3] LD_PRELOAD: /opt/lumigo/injector/lumigo_injector.so # [3A] LUMIGO_TRACER_TOKEN: <set to the key ‘token’ in secret ‘lumigo-credentials’> Optional: true # [3B] LUMIGO_ENDPOINT: http://lumigo-lumigo-operator-telemetry-proxy-service.lumigo-system.svc.cluster.local/v1/traces # [3C] Mounts: /opt/lumigo from lumigo-injector (ro) # [2C] Volumes: lumigo-injector: # [1] Type: EmptyDir Medium: SizeLimit: 200M |
The same pod as in the previous listing, but injected by the Lumigo Kubernetes operator. For ease of reference, relevant lines of YAML have comments like “#[2A]”.
Besides the lumigo.auto-trace label we discussed above, the Lumigo Kubernetes operator is adding:
- A volume called lumigo-injector, which is backed by an EmptyDir and it is therefore a so-called ephemeral volume, that is, a volume of which the content is lost when the pod terminates.
- An init-container, also called lumigo-injector that runs, completing successfully (see the “#[2A]” references in the listing). Since it is an init-container, it completes before the container myapp with the Python process even begins. The role of the lumigo-injector init-container is to copy the tracer files and the Lumigo injector (much more on this later!) that are part of the public.ecr.aws/lumigo/lumigo-autotrace:latest container image (see the “#[2A]” reference) into the lumigo-injector volume by means of the volume mounts both in the lumigo-injector init-container itself (“#[2B]”) and the myapp container (“#[2C]”). The outcome is that, as the lumigo-injector init-container starts, it copies the files needed to trace Node.js and Python apps in the lumigo-injector volume and then terminates, enabling the (non-init) container myapp to start with the tracer files already in the lumigo-injector volume mounted into it. As a side-note: unlike sidecars, that are usually active for the entire lifetime of a pod, consuming CPU and memory, init-containers by definition are only active during the pod’s initialization.
- A few environment variables (“#[3]”):
- The LD_PRELOAD environment variable is needed by the Lumigo injector, and will be discussed later
- The LUMIGO_TRACER_TOKEN is familiar to whoever has used the Lumigo OpenTelemetry Distros for Node.js or Python, as that tells the tracers how to authenticate to the Lumigo platform. Notice that it references the same secret you provided to the Lumigo resource, and it is set to optional, which is an important detail because, if it were not optional, and you happened to delete the secret or modify it so that it no longer has the token field, you would no longer be able to schedule pods referencing it.
- The LUMIGO_ENDPOINT references a local Kubernetes service, which routes trace data sent by the tracers through a Lumigo build of the OpenTelemetry Collector that is tailored to inject all types of useful OpenTelemetry Kubernetes semantic convention data into the data sent by your apps (this is a much longer story for a different blog post). Besides, since the OpenTelemetry Collector does the actual upload of data to Lumigo SaaS, while the tracers in your app talk with another pod in the cluster, that avoids some network overhead for the tracers in your applications.
Recap thus far: we achieved putting the tracer files into the application container without any intervention by a human (other than installing the Lumigo Kubernetes operator, that is).
The magic: the Lumigo injector
Having the right tracer in the container is actually not enough to trace your application, not unless you did some code modification to load the tracer in the first place (like a package import). And since at Lumigo we believe in seamless, just-works experiences, we definitely do not want you to modify your code to get distributed tracing going.
If you have used the Lumigo OpenTelemetry JS Distro and the Lumigo OpenTelemetry Python Distro, you likely have seen that their “no-code” activation, that is, activating the tracer without code modifications in your applications, is based on setting particular environment variables specific to the runtime (e.g., Node.js or Python). So, if only we could make sure that the right environment variables are set on the processes, everything would work: right?
Right! But what we do not want to do is to “scattershot” all the environment variables we may want to use irrespective of the container or what runs inside. Imagine the confusion you would experience when, troubleshooting why a Node.js application crashes, you would see Python-related environment variables in the PodSpec! That is more likely to send you chasing down the wrong rabbit hole (“Wait, did Jeff put Python into this thing? Since when?”) than not.
Now, dear reader, strap in: to explain this final step, we need to briefly delve into how runtimes like Node, CPython, the Java Virtual Machine, .Net and others are compiled. Virtually always, these runtimes are not compiled to be “self-contained”, meaning that you cannot just take their binary, let a Linux kernel run them, and they work. Instead, they rely on shared libraries that provide functionalities like Secure Socket Layer (SSL) or, like for pretty much any runtime out there, the so-called “standard C library”, also known as LibC. LibC is a library that provides a common API across different computing architectures for things commonplace in applications like reading from and writing to files, sockets and, most importantly for our current discussion, look up the process environment.
The process environment is effectively a set of key-value pairs that Linux makes available to your process as it starts. You can actually access the process environment of a process running in a Linux container by reading the virtual file /proc/<pid>/environ, where <pid> is the process identifier of the process you want to inspect:
docker run -it ubuntu cat /proc/1/environ | tr '\0' '\n'
| PATH=/usr/local/sbin:/usr/local/bin:/usr/sbin:/usr/bin:/sbin:/bin HOSTNAME=9ac75caa6b98 TERM=xterm HOME=/root |
The process environment of the ENTRYPOINT (that is, the “main process”) of an Ubuntu container running inside Docker. The output is piped into tr ‘\0’ ‘\n’ to replace C-style null-based string terminations (‘\0’) with human-friendly line-breaks (‘\n’).
Since LibC is mediating between the code of the runtime and the actual process environment, if we could hook into LibC and add the environment variables we care about, the entire plan comes together. The hook we need is provided by LD_PRELOAD, a capability of the dynamic linker of all modern Unix systems (including Linux, ubiquitous in containers the world over!). LD_PRELOAD, sometimes called the “LD_PRELOAD trick”, is a way to intercept calls from a binary to the dynamically-linked LibC it relies on, and have those calls served by a shared library like the Lumigo injector. LD_PRELOAD, for example, is used sometimes to change without recompilation the memory-allocation part of LibC (i.e., the implementations of malloc, free and other APIs) to adjust the behavior of a binary to situations where there is either a lot of memory, or very little of it.
What the Lumigo injector through LD_PRELOAD, is to intercept calls to the getenv function: if the environment variable name is relevant to the Lumigo injector, for example NODE_OPTIONS, the Lumigo injector adds to the actual value you set in the container an addition that activates the tracer as, realistically, the only process to look up NODE_OPTIONS is a Node process version 8 or above. If the environment variable is not one the Lumigo injector needs to modify, the actual value is returned to your process.
Are we there yet? Not quite
So far, we have achieved the criteria (1) and (3): if you have Node.js or Python inside your containers, the distributed tracing of those processes must Just Work™ without any code changes to your application or the way you deploy it on Kubernetes. (2), the fact that distributed tracing works seamless in both amd64 and arm64 without you needing to do anything about it, is handily achieved using a multi-architecture container image: the Lumigo Autotrace container image works on Linux on both amd64 and arm64 architectures, with your container runtime pulling the architecture-specific layers depending on the architecture used by the underpinning Kubernetes node, i.e., the (virtual) host running your specific pod. The Lumigo injector is compiled as two different binaries depending on the architecture, while the Lumigo OpenTelemetry Distros are largely architecture-independent.
But while dealing with different compute architectures is relatively simple, what is less simple is dealing with different LibC flavors.
Did I say LibC? I meant LibCs!
In the world of containerized applications, irrespective of which container orchestration (Kubernetes, Amazon ECS, does not really matter), there are actually more two different implementations of LibC, usually referred to as ”flavors”:
- GNU LibC (glibc) is used in Debian derivatives and Red Hat Enterprise Linux derivatives
- musl libc (sometimes called muslc) used most notably in Alpine Linux.
When you program your applications, the various LibC implementations have only minor differences in some corner cases. But when the compiler takes your runtime code and turns it into a dynamically-linked executable you can run on Linux, there is a tight coupling between your runtime binary, and the flavor of LibC it assumes it has available when executing. If, for example, you try to run on Alpine Linux a node binary compiled to be dynamically linked against GNU LibC, it is virtually guaranteed to crash.
LibC flavors are a crucial detail, because the Lumigo injector must be compatible with all of them: when injecting a pod, it is not possible to know which LibC flavor its containers use. It might even be all of them, one in each container. And an injector that is incompatible with the LibC flavor used by the application will crash the application. But how we did achieve that, well, is way beyond the scope of this blog. If you find me on the floor of some conference, and there is a coffee machine nearby, I’ll be happy to explain 😉
In the meantime, try the Lumigo Kubernetes Operator in your environment today with a free Lumigo account.