


I have always had a special fondness for Postgres, particularly captivated by its JSONB capabilities, which is at the core of what I love as it stands as a testament to its adaptability. This functionality exemplifies Postgres’s ability to adapt to modern apps’ rapidly changing needs to support structured and unstructured data to coexist seamlessly within the same database environment. The capabilities of PostgreSQL are not limited to its ability to manage relational and non-relational data. It includes advanced transactional support through MVCC (Multiversion Concurrency Control), a variety of indexing options including B-tree, Hash, GiST, SP-GiST, GIN, and BRIN indexes, and robust data integrity and security mechanisms like foreign key constraints, check constraints, and role-based access control. Collectively, these features ensure optimal performance, reliability, and scalability, making Postgres an excellent choice for complex, data-intensive applications.
However, the very features that make Postgres so powerful also contribute to its troubleshooting and performance optimization complexity. The JSONB capability, while incredibly flexible, requires careful consideration in indexing and query planning to avoid performance pitfalls. Furthermore, the features Postgres offers, from advanced indexing options like GIN and GiST for full-text search and geospatial data to partitioning for handling large datasets, means a better understanding of the unique nuances for maintaining optimal application and database performance.
With all that in mind, I’ve always been curious whether JSONB is better to store data in over a regular Postgres text field, and while there is no doubt there are many blog posts and debates on this very topic, let’s test it out using some OpenTelemetry, magic.
Setting up a Postgres Test App
Let’s first set up our demo application. For this, we will set up two containerized Postgres Docker databases, with those connected to a Python app. Then, using Opentelemetry, we will look at examples of storing the same data in both JSONB and text formats to compare the results.
We’ll need a few things to get started:
- Docker – If you haven’t installed docker, head to the getting started guide.
- Python development environment – Check out the official Python docs on how to get started.
- Lumigo Account – This is a must-have for anyone wanting to better understand their code and deployments. It’s easy to get set up and starts with heading to the lumigo sign up page.
Create a docker network and then launch two Postgres containers
docker network create postgres-network

docker run --name postgresjsonDb -e POSTGRES_PASSWORD=mysecretpassword --network=postgres-network -d postgres

docker run --name postgrestxtDb -e POSTGRES_PASSWORD=mysecretpassword --network=postgres-network -d postgres
While that is spinning up and doing its container thing, head over to a terminal in your development environment to get the Python app underway so we can connect to our initialized database. Start by creating a directory to work out of and then initializing a new virtual environment:
mkdir flask-postgres-app && cd flask-postgres-app
python3 -m venv venv
source venv/bin/activate  # On Windows use `venv\Scripts\activate`
Then add some libraries using Pythons package manager PIP:
pip install Flask psycopg Werkzeug
Also, while we are there, install the Lumigo OpenTelemetry Python distro with the following
pip install lumigo_opentelemetry
Then create a requirements.txt file in the project directory root and populate it with the following libraries, which will be installed with the Docker build:
Flask
Werkzeug
Psycopg
request
lumigo_opentelemetry
The only other thing we will need to do for the Lumigo OpenTelemetry distro is to then use the no-code method via an environmental variable for invoking the distro like this, which we will do inside the Dockerfile.
Next, terminal into each of the Postgres docker containers using the following command, changing postgrestxtDb for postgresjsonDB to make sure both get the same basic schema:
docker exec -it postgrestxtDb psql -U postgres
And then create a database in Postgres using this
CREATE TABLE testTable (
  id SERIAL PRIMARY KEY,
  jsonb_column JSONB,
  text_column TEXT
);
Then, we need to create an app.py in the root of the Python app and populate it with this Python code:
from flask import Flask, request, render_template_string, jsonify
import psycopg
import requests

app = Flask(__name__)

conn_info_txt = {
    “user”: “postgres”,
    “host”: “postgrestxtDb”,
    “dbname”: “postgres”,
    “password”: “mysecretpassword”,
}

conn_info_json = {
    “user”: “postgres”,
    “host”: “postgresjsonDb”,
    “dbname”: “postgres”,
    “password”: “mysecretpassword”,
}

@app.route(‘/’, methods=[‘GET’])
def index():
    # Query the databases for the count of entries
    with psycopg.connect(**conn_info_txt) as conn:
        with conn.cursor() as cur:
            cur.execute(“SELECT COUNT(*) FROM testTable”)
            txtcount = cur.fetchone()[0]

    with psycopg.connect(**conn_info_json) as conn:
        with conn.cursor() as cur:
            cur.execute(“SELECT COUNT(*) FROM testTable”)
            jsoncount = cur.fetchone()[0]

    html_content = f”’
    <!DOCTYPE html>
    <html>
    <head>
        <title>Submit Data</title>
    </head>
    <body>
        <form action=”/submit-data” method=”post”>
            <label for=”data”>Enter Data:</label>
            <input type=”text” id=”data” name=”data”>
            <button type=”submit”>Submit</button>
        </form>
        <p>Number of entries in the text database: {txtcount}</p>
        <p>Number of entries in the JSON database: {jsoncount}</p>
    </body>
    </html>
    ”’
    return render_template_string(html_content)

@app.route(‘/insert-jsonb’, methods=[‘POST’])
def insert_jsonb_route():
    data = request.json[‘data’]
    return jsonify(insert_jsonb(data))

@app.route(‘/insert-text’, methods=[‘POST’])
def insert_text_route():
    data = request.json[‘data’]
    return jsonify(insert_text(data))

def insert_jsonb(data):
    with psycopg.connect(**conn_info_json) as conn:
        with conn.cursor() as cur:
            try:
                cur.execute(“INSERT INTO testTable (jsonb_column) VALUES (%s) RETURNING id”, (data,))
                id = cur.fetchone()[0]
                return {“success”: True, “id”: id}
            except Exception as e:
                print(f”Error inserting into jsonb_column: {e}”)
                return {“success”: False, “error”: “Error submitting data to jsonb_column”}

def insert_text(data):
    with psycopg.connect(**conn_info_txt) as conn:
        with conn.cursor() as cur:
            try:
                cur.execute(“INSERT INTO testTable (text_column) VALUES (%s) RETURNING id”, (data,))
                id = cur.fetchone()[0]
                return {“success”: True, “id”: id}
            except Exception as e:
                print(f”Error inserting into text_column: {e}”)
                return {“success”: False, “error”: “Error submitting data to text_column”}

@app.route(‘/submit-data’, methods=[‘POST’])
def submit_data():
    data = request.form[‘data’]
    # Making HTTP POST requests to the new routes
    jsonb_response = requests.post(‘http://localhost:3000/insert-jsonb’, json={‘data’: data})
    text_response = requests.post(‘http://localhost:3000/insert-text’, json={‘data’: data})

    jsonb_result = jsonb_response.json()
    text_result = text_response.json()

    response = {
        “jsonbResult”: f”Success, ID: {jsonb_result[‘id’]}” if jsonb_result[‘success’] else jsonb_result[‘error’],
        “textResult”: f”Success, ID: {text_result[‘id’]}” if text_result[‘success’] else text_result[‘error’]
    }

    status_code = 200 if jsonb_result[‘success’] and text_result[‘success’] else 500
    return jsonify(response), status_code

if __name__ == ‘__main__’:
    app.run(debug=True, port=3000)
Now we need to create a Dockerfile in the project root, and we are good to go:
FROM python:3.12
WORKDIR /app
COPY requirements.txt ./
RUN pip install –no-cache-dir -r requirements.txt
COPY . .
EXPOSE 3000
ENV OTEL_SERVICE_NAME=PostgresDemo
ENV AUTOWRAPT_BOOTSTRAP=lumigo_opentelemetry
CMD [“flask”, “run”, “–host=0.0.0.0”, “–port=3000”]
Save the file and then build and run the docker, including your lumigo token as an environmental variable as part of the docker run.
docker build -t flask-postgres-app .
docker run –name my-flask-app –network=postgres-network -p 3000:3000 -e LUMIGO_TRACER_TOKEN=<token> -d flask-postgres-app
Once everything is loaded and running in a browser, head to http://localhost:3000, which should load the “submit data” basic web form from the flask app. It should also show some basic additional information from a count from each database.

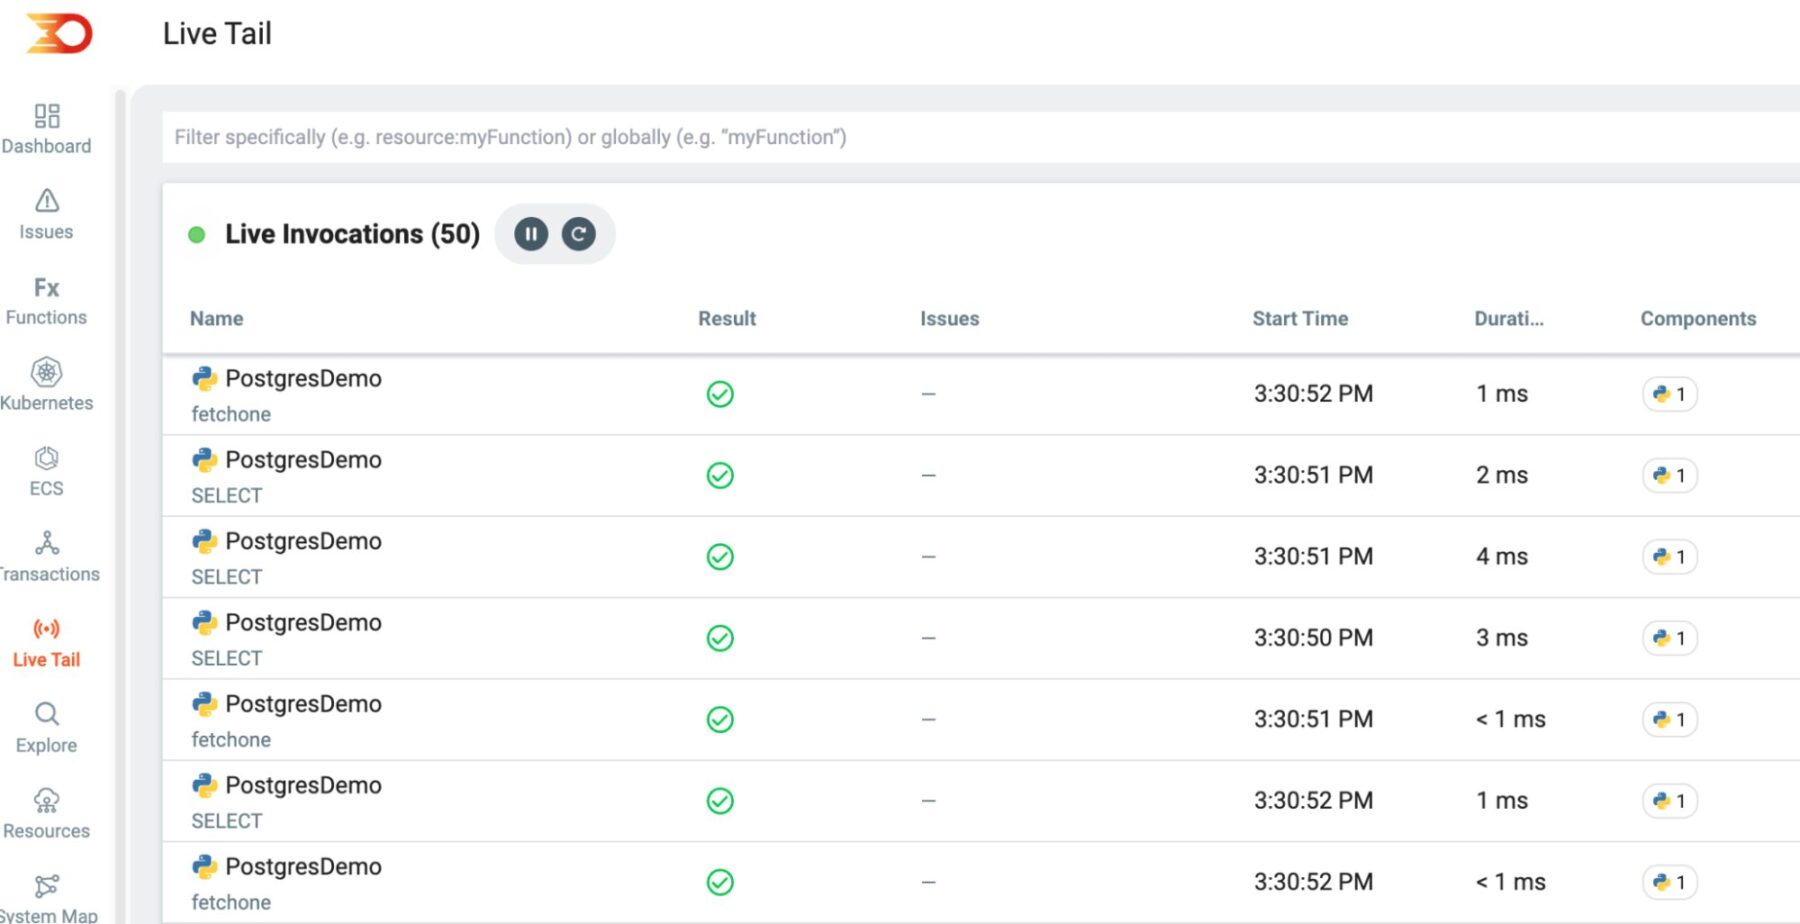
Refresh the page a few times and you should start to see some basic traces come into your Lumigo instance, this is where the Live Tail page is really handy being able to see immediate invocations arrive in and know that things are working as they should.
Comparing Postgres Data Storage
Now comes the fun part of comparing text over JSON storage types within Postgres and how each containerized database performs. In the input box in our flask demo app form, use the following and hit submit:
{“name”: “test”, “age”: 99}
This should send the JSON string over to get stored as a text database entry in 1 database and as a JSON database entry in the other, and should return something like this:

Then, switch to Lumigo in the transactions section and see that the data has arrived from those invocations; in particular, we are after the 2 different invocations of the JSON and text database saves.
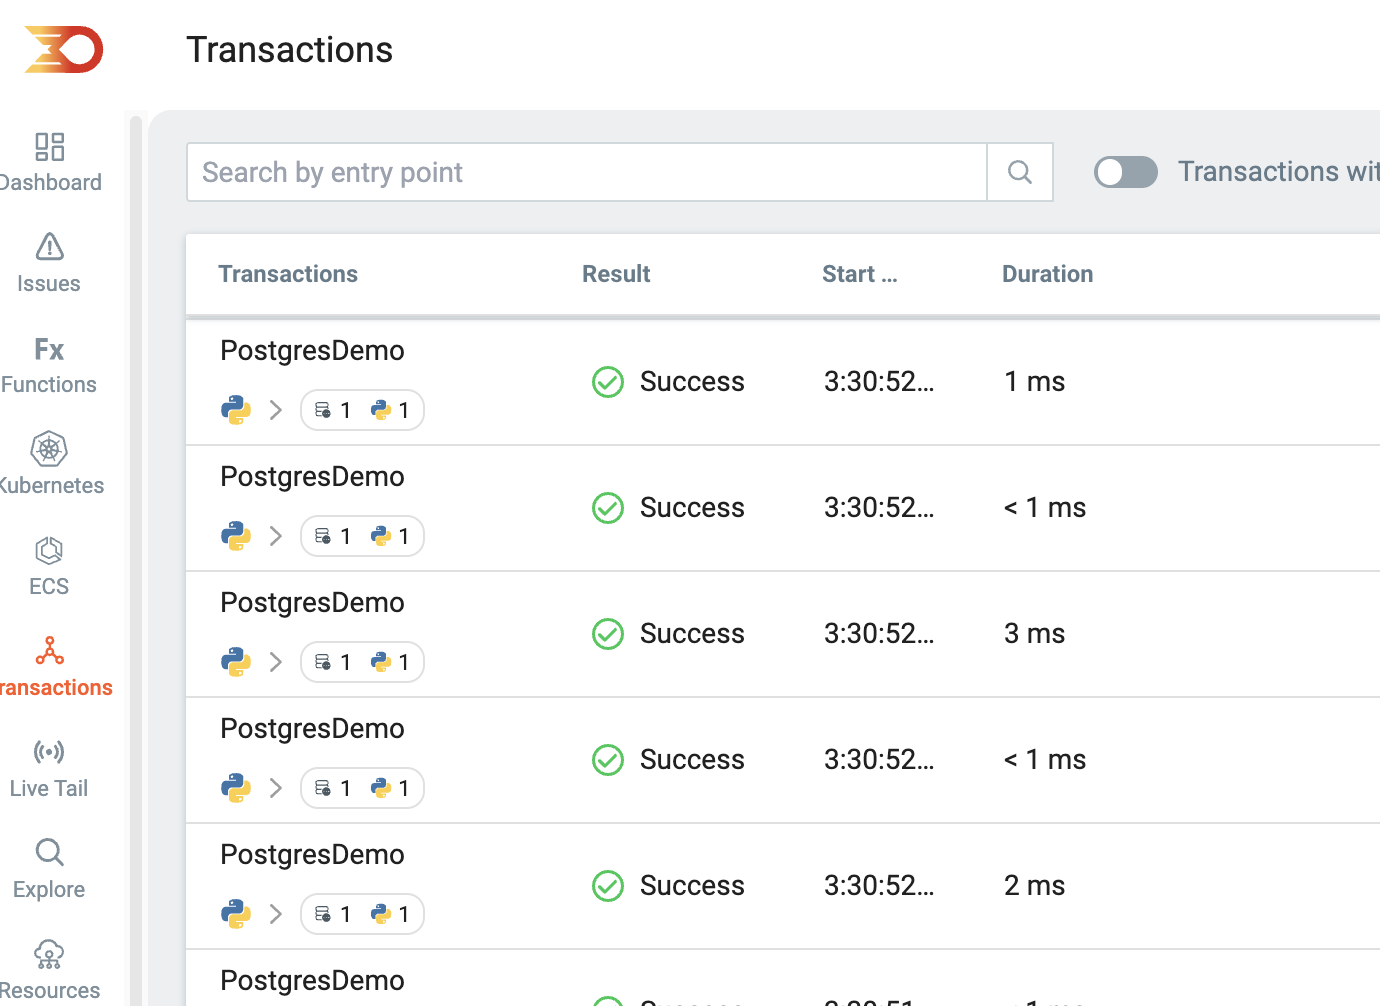
The trick here is to zero in on the 2 invocations of interest, specifically the text and JSON local routes. In this particular Python flask app, I’ve intentionally used localhost routes so that we can measure 2 clean and standalone database data saves.
However, if you are using Flask’s internal routing method, it can be beneficial to utilize Lumgio execution tags as part of each database routing type. Doing so allows you to easily filter and identify each invocation type, making it easier to manage and debug the app. That means making minor edits to the code to include a tracer output as part of the logic, specifically add_execution_tag(“user_id”,user_id).
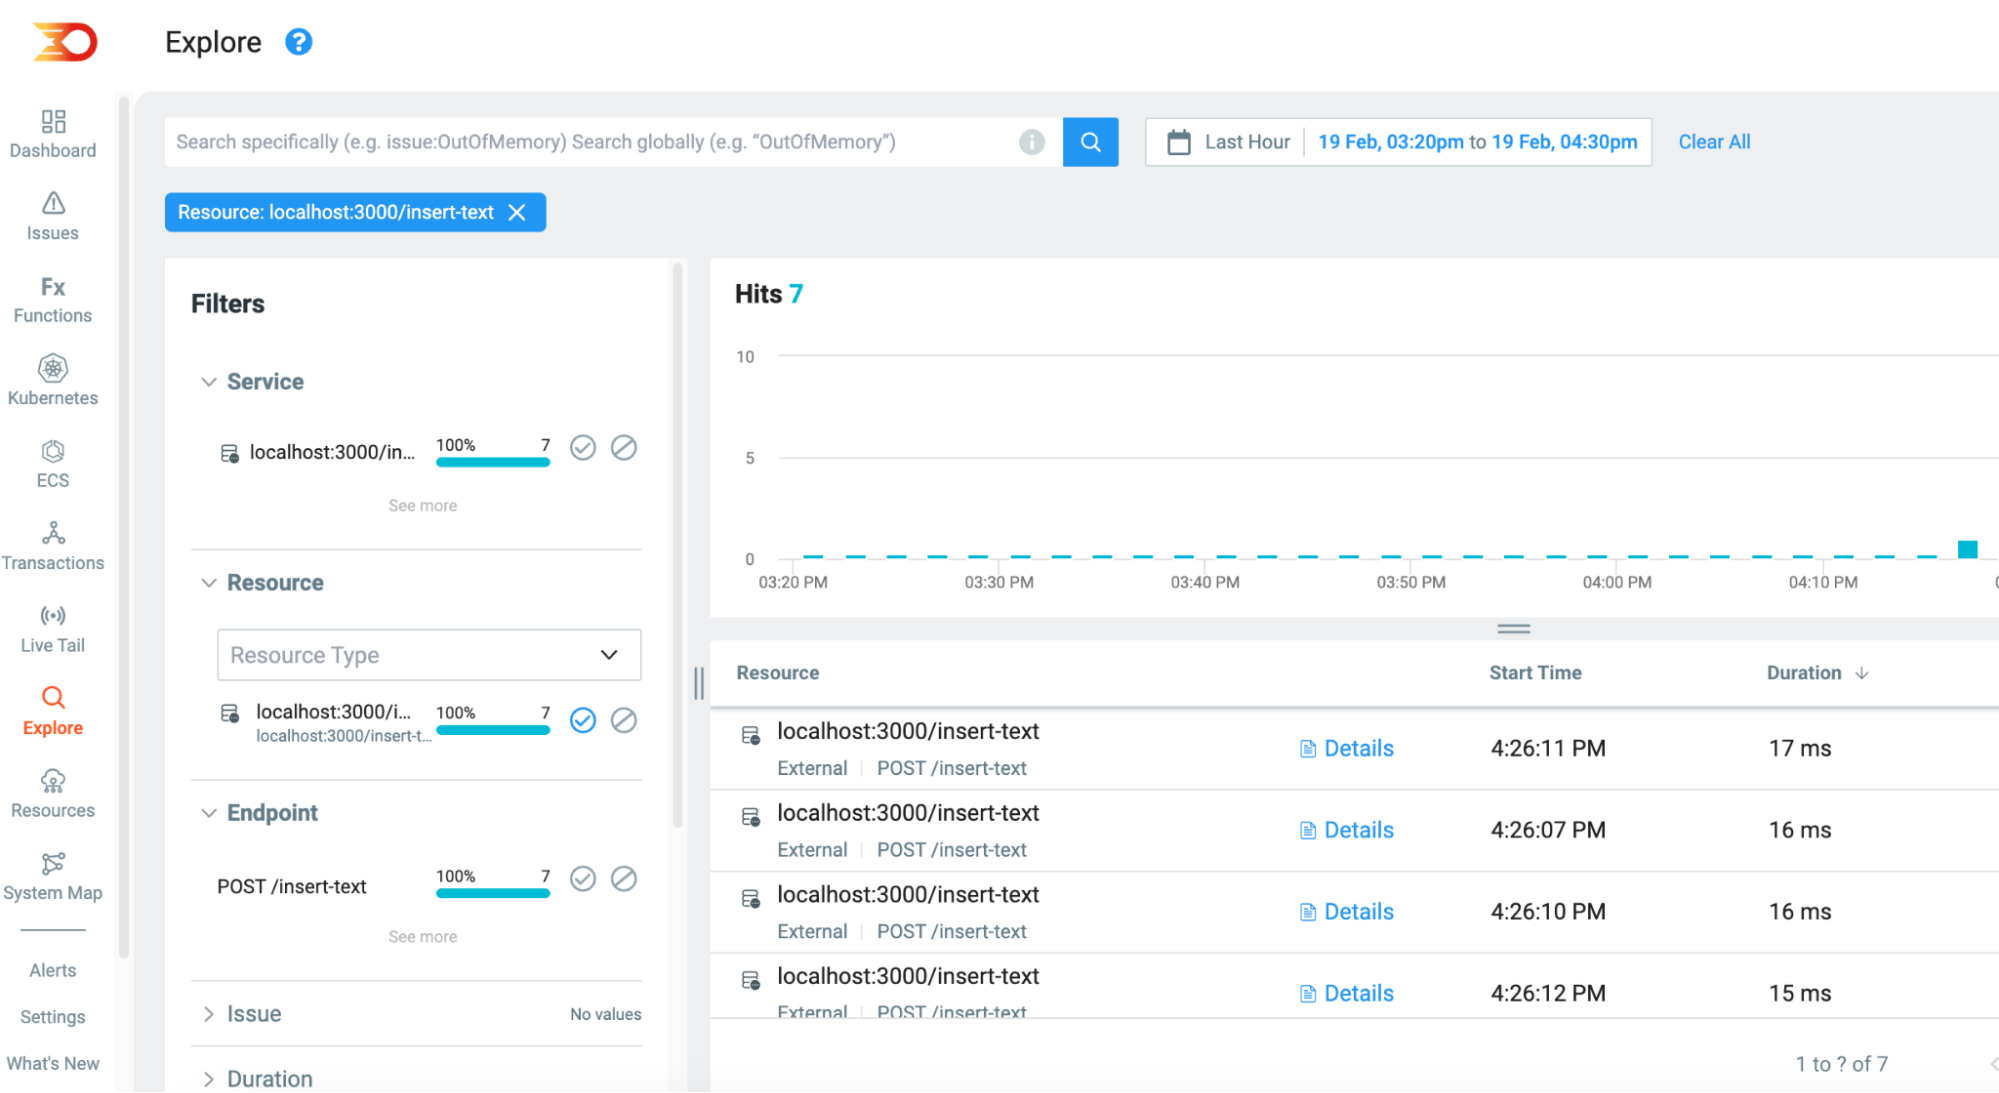
In the demo above with the localhost routing from within the application, we can switch to the explore tab and be able to filter down then using the Resource or Endpoint filters.

This then helps us identify just the text database routes
And the JSON database routes
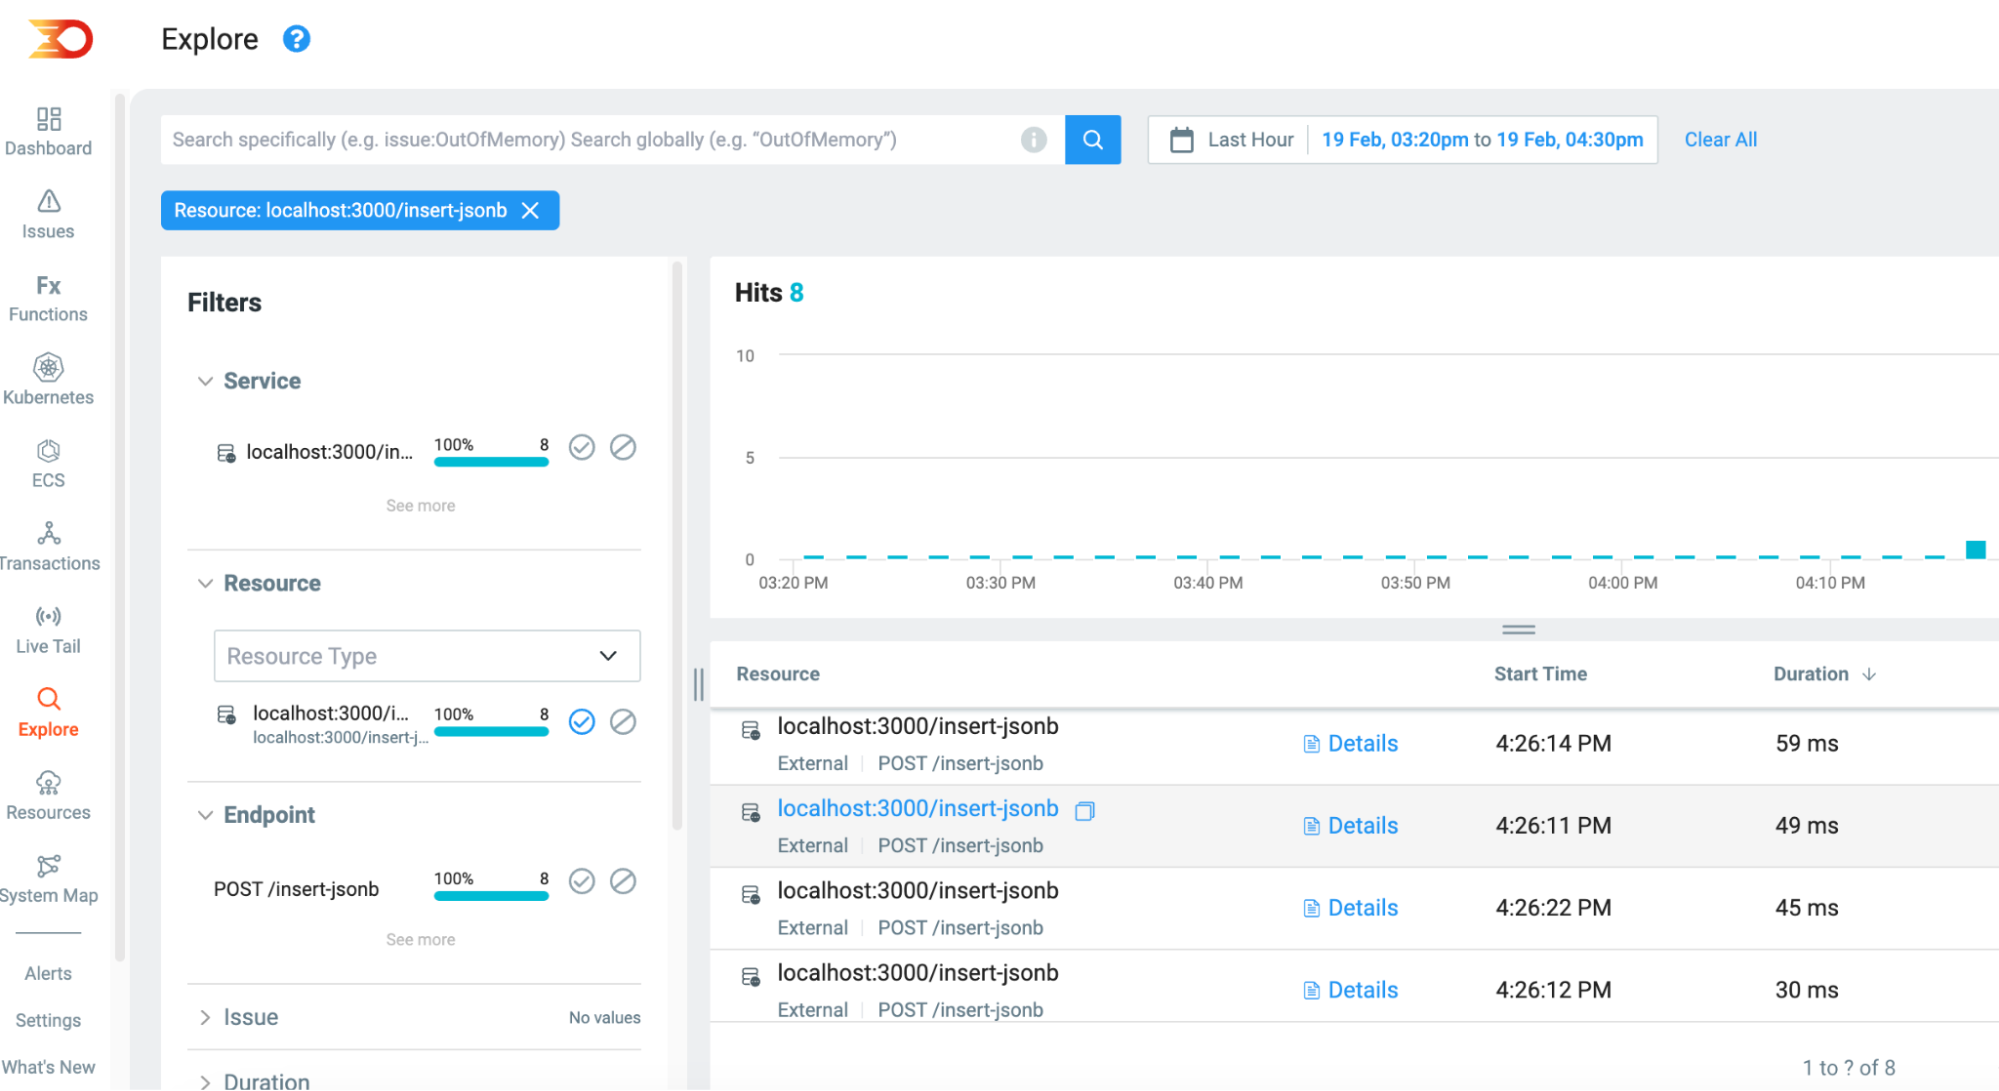
This validates that the text insert queries operate faster out of the two, which is a known and documented Postgres consideration to remember when planning out database schemas. A jsonB storage type holds a copy of the incoming data while it is being parsed and processed by Postgres itself and thus makes it a more resource-costly process.
Understanding and Optimizing your Database usage
What I especially love about using Lumigo to observe traces and associated resource usage is seeing the difference in runtime for the invocations, which will add up quickly at scale. From this experiment, we can easily see that while Postgres’s jsonb functionality is incredibly useful, it comes at the high cost of up to 3 times more intensive.
Sign up for a free Lumigo account and gain valuable insights into your database applications. With Lumigo, you’ll be able to quickly diagnose and fix issues, debug faster than ever, and gain a deeper understanding of your microservice applications across regions and distributed deployments like never before.