


MongoDB’s flexibility and document-oriented nature have always stood out to me as its most compelling features, setting it apart from the strict schema constraints of traditional relational databases. This adaptability is a boon for application development, allowing for more dynamic data interactions that mirror real-world information complexities and freeing table schemas’ constraints.
However, this flexibility introduces unique hurdles, especially when debugging applications that interact with MongoDB. Ensuring data consistency and maintaining the intended structure of information as it flows in and out of the database can be complex. Tracing how an application queries, updates, and manages data within MongoDB often requires a nuanced understanding of the database and the application’s logic, making debugging a challenging yet critical part of the development process, often requiring the pulling of large amounts of hair.
This is where OpenTelemetry steps in, able to scale an application in a single bound and bring contextual correlation in the wake of complex interactions between the application and MongoDB. This can not only streamline the debugging process but also enhance the overall reliability and efficiency of the application using an industry-standard approach to monitoring.
MongoDB Deploy
Let’s begin by deploying a demo application that integrates a MongoDB container with a simple Java Spring Boot app alongside OpenTelemetry to help trace a few troublesome bugs.
But before we get too far underway, you are going to need the following:
- Docker: A must-have for the container enthusiast, and this writeup is no exception, head on over to this link to get started.
- Java Development Kit: Run
Java –versionin your dev environment to see if it’s already installed, otherwise click this link to get started. - Maven: Useful for compiling and packaging Java apps, you can also use Gradle here as well, depending on which you prefer.
- Lumigo Account: The hero of the piece, able to deploy OpenTelemetry quicker than you can say, “Where are the logs?”. If you haven’t yet got a lumigo account, this page is the signup you are looking for, you will also need to retrieve your lumigo token.
To start, launch a MongoDB container using the docker run command, This will automatically pull the latest MongoDB image from Docker Hub if it’s not already available locally. Additionally, we are also going to create a custom network to communicate between the MongoDB container and a Java app.
docker network create mongo-net

docker run --name mongodb --network mongo-net -d -e MONGO_INITDB_ROOT_USERNAME=mongoadmin -e MONGO_INITDB_ROOT_PASSWORD=secret123 mongo:latest
This also initializes a MongoDB instance with a username of mongoadmin and a password of secret123 via a network connection called mongo-net, ensuring the MongoDB container and the Java application can see each other.
Next, generate a new Spring Boot project using Spring Initializr, selecting Web and Spring Data MongoDB as dependencies. The best part about using Spring Initializr is that you can also share setup links, so here’s one I prepared earlier.
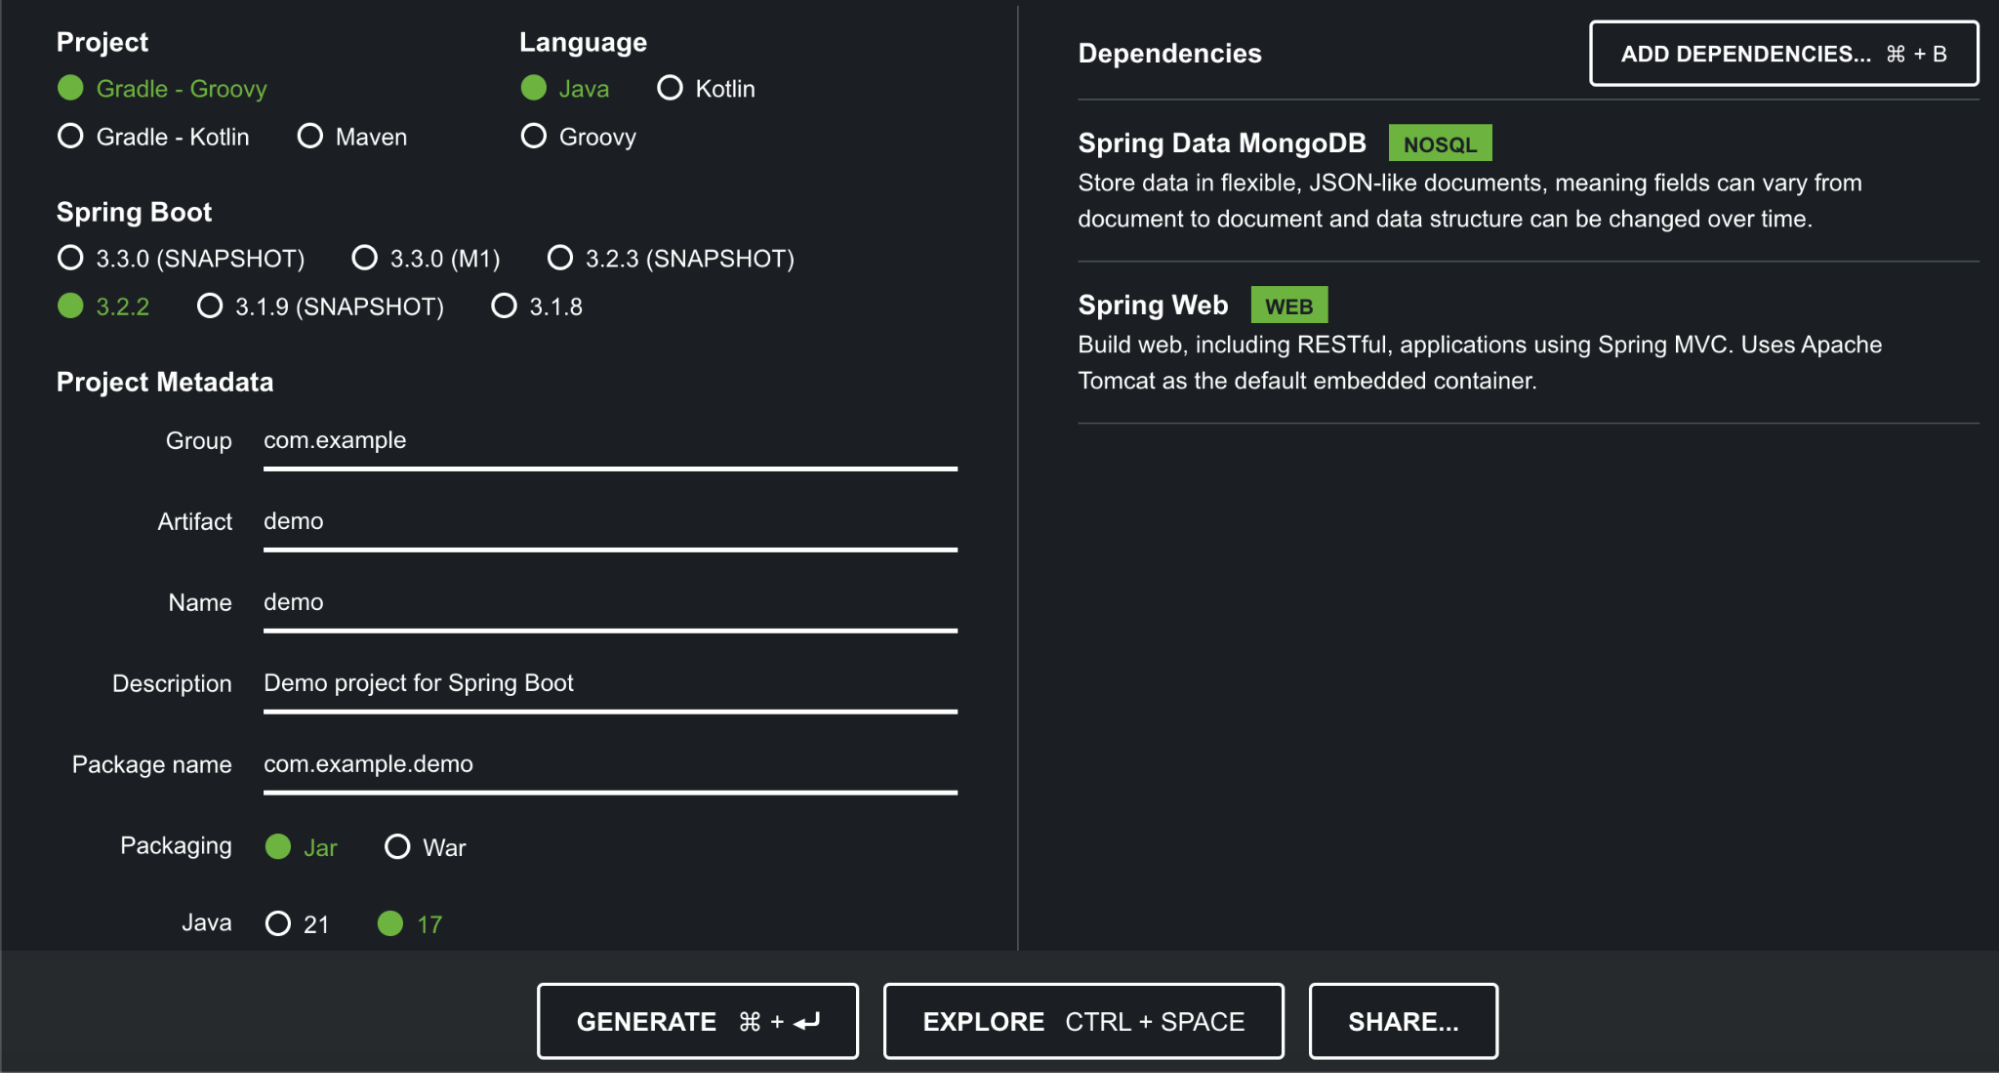
Download using the “Generate” button and then decompress into a folder of your choosing within your development environment.
Handy hint: When decompressing and moving the downloaded zip, make sure you also move the .mvn directory. Navigate to src/main/resources/application.properties, and configure the MongoDB URI to connect to your containerized database instance by adding the following to the file:
spring.data.mongodb.uri=mongodb://mongoadmin:secret123@mongodb:27017/test?authSource=admin
This will point the spring app to the MongoDB container, using the credentials defined earlier. Now define a model by creating a book class in src/main/java/com/example/demo/Book.java, then populate with the following:
package com.example.demo;

import org.springframework.data.annotation.Id;
import org.springframework.data.mongodb.core.mapping.Document;

@Document
public class Book {
    @Id
    private String id;
    private String title;
    private String author;

    // Constructors
    public Book() {}

    public Book(String title, String author) {
        this.title = title;
        this.author = author;
    }

    // Getters
    public String getId() {
        return id;
    }

    public String getTitle() {
        return title;
    }

    public String getAuthor() {
        return author;
    }

    // Setters
    public void setId(String id) {
        this.id = id;
    }

    public void setTitle(String title) {
        this.title = title;
    }

    public void setAuthor(String author) {
        this.author = author;
    }
}
Then create src/main/java/com/example/demo/BookRepository.java and implement a repository by extending MongoRepository for your Book model by adding:
package com.example.demo;

import org.springframework.data.mongodb.repository.MongoRepository;

public interface BookRepository extends MongoRepository<Book, String> {
}
Create src/main/java/com/example/demo/BookController.java, define a controller to handle book creation and retrieval by pasting the following code:
package com.example.demo;

import org.springframework.beans.factory.annotation.Autowired;
import org.springframework.http.ResponseEntity;
import org.springframework.web.bind.annotation.*;

import java.util.List;

@RestController
@RequestMapping(“/books”)
public class BookController {

    @Autowired
    private BookRepository repository;

    @PostMapping
    public Book addBook(@RequestBody Book book) {
        return repository.save(book);
    }

    @GetMapping
    public List<Book> getAllBooks() {
        return repository.findAll();
    }

   @DeleteMapping(“/{id}”)
    public ResponseEntity<?> deleteBook(@PathVariable String id) {
        return repository.findById(id)
                .map(book -> {
                    repository.delete(book);
                    return ResponseEntity.ok().build();
                }).orElse(ResponseEntity.notFound().build());
    }
}
Now we just have to sprinkle in a little Dockerfile container magic
FROM amazoncorretto:17 as build
WORKDIR /app
COPY .mvn/ .mvn
COPY mvnw pom.xml ./
COPY src ./src
RUN ./mvnw package -DskipTests
CMD [“java”, “-jar”, “target/demo-0.0.1-SNAPSHOT.jar”]
Then we just need to build the app and link the app container to the mongo-net network so that communication with the MongoDB container at runtime.
docker build -t spring-mongo-demo .
docker run -p 8080:8080 –name spring-mongo-demo –network mongo-net -d spring-mongo-demo
If everything goes to plan you should now have a deployed spring demo app with MongoDB connected.
Take the of your Java Spring Boot app for a spin using our trusty friend curl
To GET a list of books
To POST a new book
curl -X POST http://localhost:8080/books -H ‘Content-Type: application/json’ -d ‘{“title”: “Working app”, “author”: “this dev”}’
To DELETE a book – Replace {id} with the actual book ID from the GET list above.
curl -X DELETE http://localhost:8080/books/{id}
The easy way to Add OpenTelemetry
Now comes the really easy part of this write-up, adding OpenTelemetry to the app so we can not only do some debugging but also get more visibility into the interactions within our application. The best part about this is that you need absolutely no code changes to make it work.
We just need to make a few small changes to the Dockerfile to include the Lumigo Java Distro:
FROM amazoncorretto:17 as build
WORKDIR /app
COPY .mvn/ .mvn
COPY mvnw pom.xml ./
COPY src ./src
RUN yum install -y wget
RUN wget -O lumigo-opentelemetry-javaagent.jar https://github.com/lumigo-io/opentelemetry-java-distro/releases/download/v0.10.1/lumigo-opentelemetry-0.10.1.jar
RUN ./mvnw package -DskipTests
ENV OTEL_SERVICE_NAME=SpringMongoDemo
ENV JAVA_TOOL_OPTIONS=”-javaagent:/app/lumigo-opentelemetry-javaagent.jar”
CMD [“java”, “-jar”, “target/demo-0.0.1-SNAPSHOT.jar”]
In the code snippet above, we are importing the most recent version of the Lumigo OpenTelemetry Java distribution, which is currently 0.10.1. Then, we are using the no-code activation method via an ENV VAR to integrate it into the container. Additionally, we are also setting the OTEL_SERVICE_NAME variable to set the display name within Lumigo on the app traces.
Now we just need to rebuild and run the spring app, this time using the lumigo token as an environmental variable swapping out the <token> placeholder in the below with your Lumigo Token.
docker build -t spring-mongo-demo .
docker run -p 8080:8080 –name spring-mongo-demo –network mongo-net -e LUMIGO_TRACER_TOKEN=<token> -d spring-mongo-demo
While that is running, let’s also tweak the MongoDB container deployment a little by slightly changing the database and adding an index on the title. Run the following command to get a terminal into the Mongo container:
docker exec -it mongodb mongosh
Then this, which will authenticate and add an index so that duplicate titles cannot be entered:
use admin
db.auth(“mongoadmin”, “secret123”)
use test
db.book.createIndex({ “title”: 1 }, { unique: true })
If you get an error when trying to add the index about there being a duplicate key existing duplicate key error collection then you will need to delete the duplicate title entries or drop the database using db.book.drop() then add the index. Then Exit the connected container terminal just by running the exit command.
Once the spring app is done building and redeploying, run some test routes from above, which should now appear within your lumigo instance.
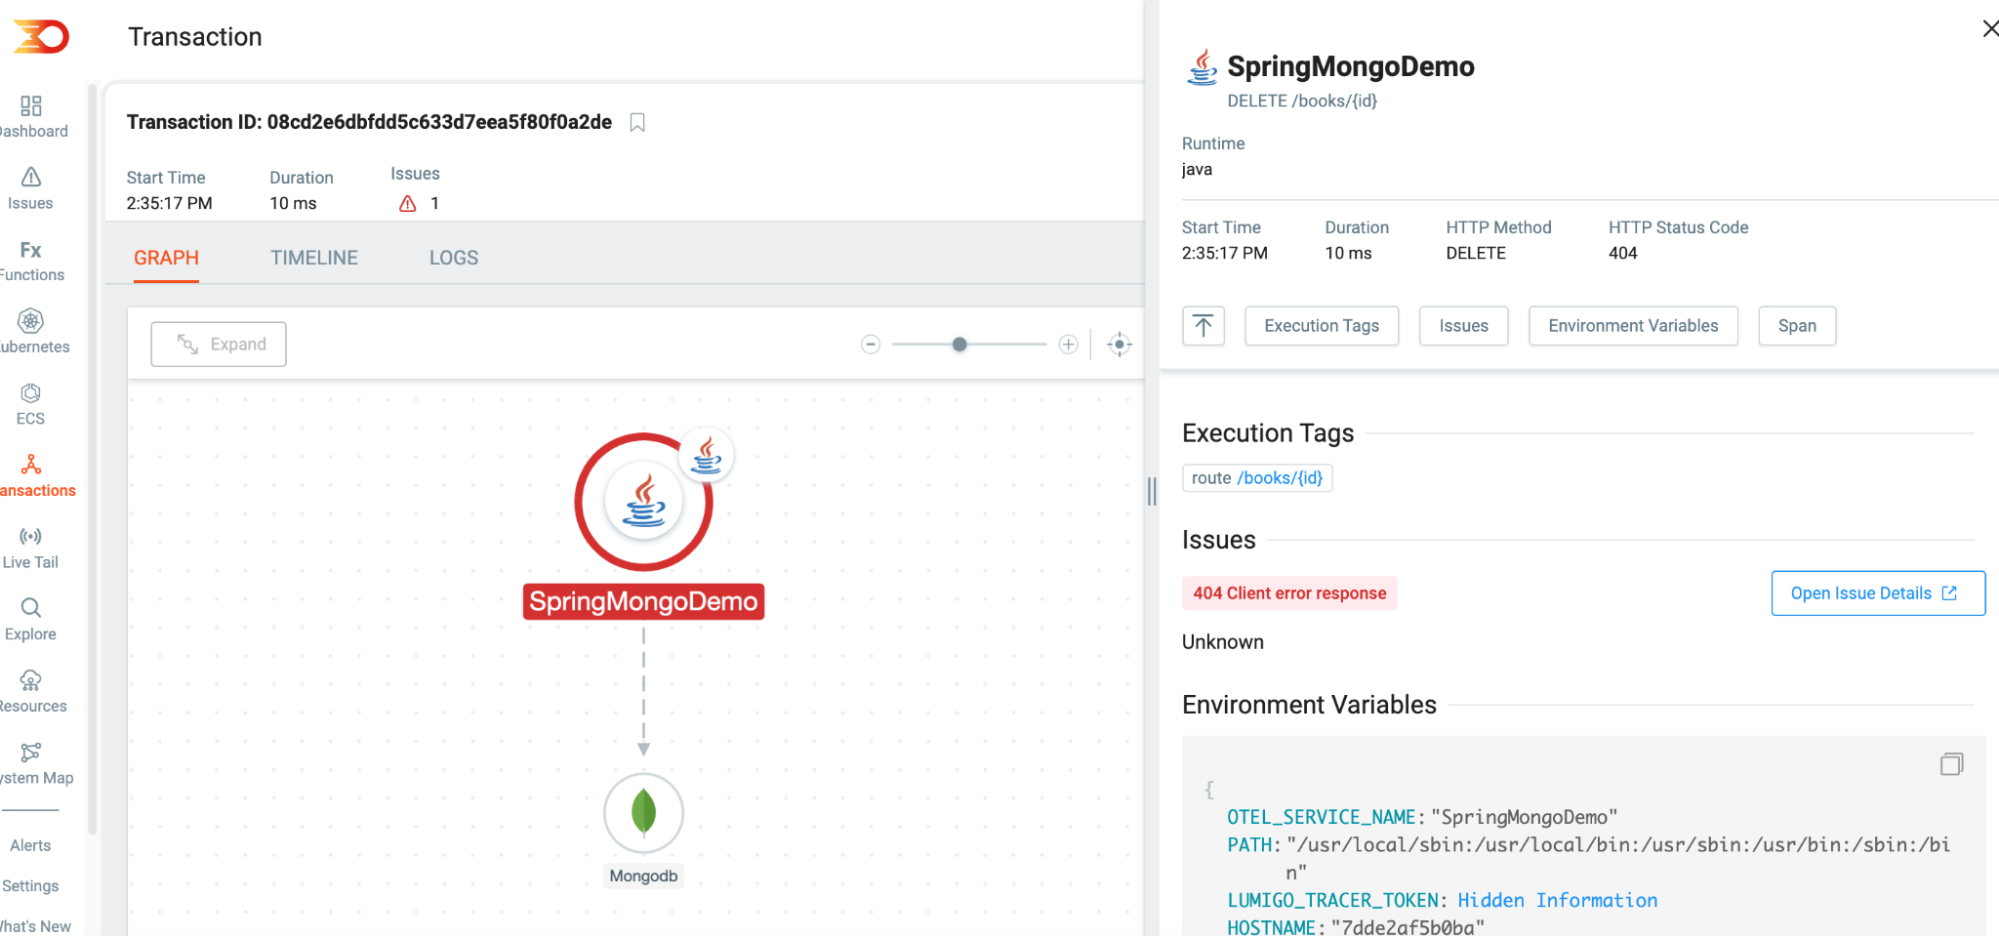
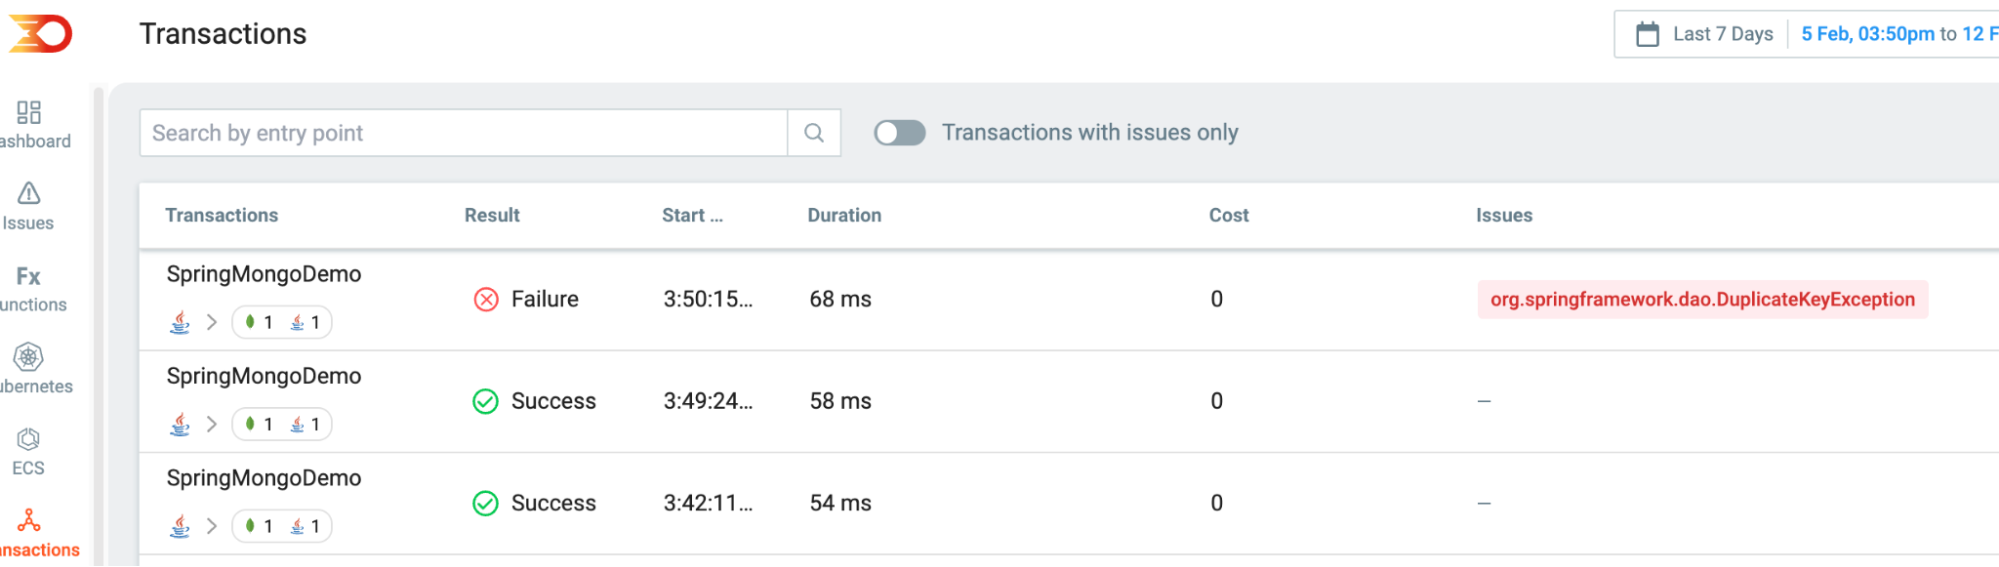
That then signifies that OpenTelemetry is tracing each request as it comes in and bringing the ability to debug at the speed of code. We can then start to identify issues more easily with each step being traceable, to test that out, run the following twice:
curl -X POST http://localhost:8080/books -H ‘Content-Type: application/json’ -d ‘{“title”: “test”, “author”: “this dev”}’
Which should generate the following response within your lumigo dashboard
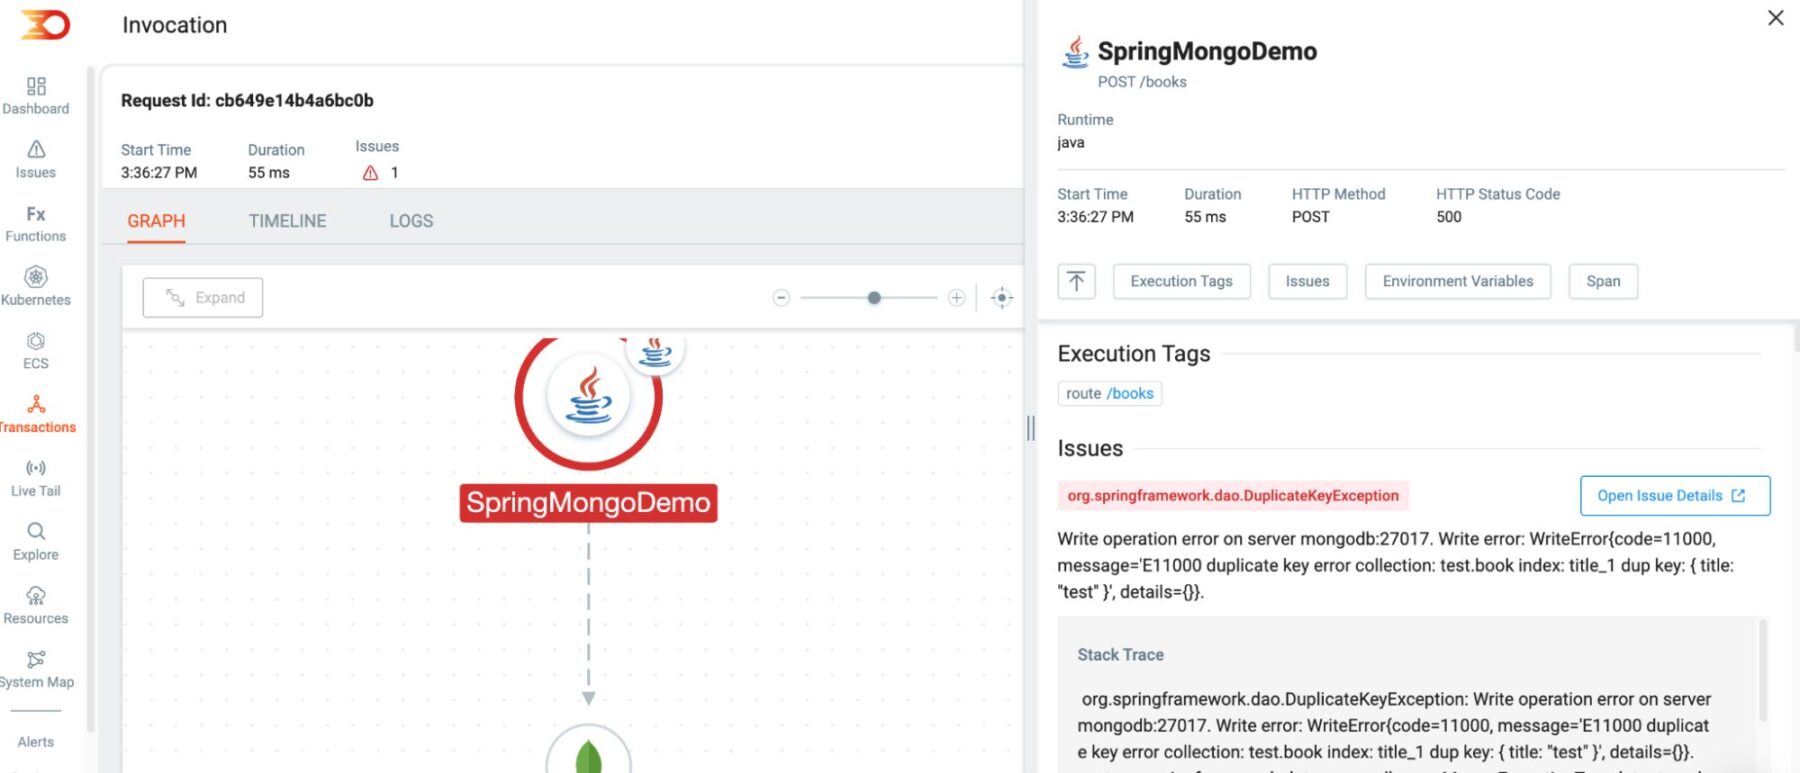
The best part is that you can click on the database instance and see all the body information so get a clearer picture of what is failing within the interaction between the services.
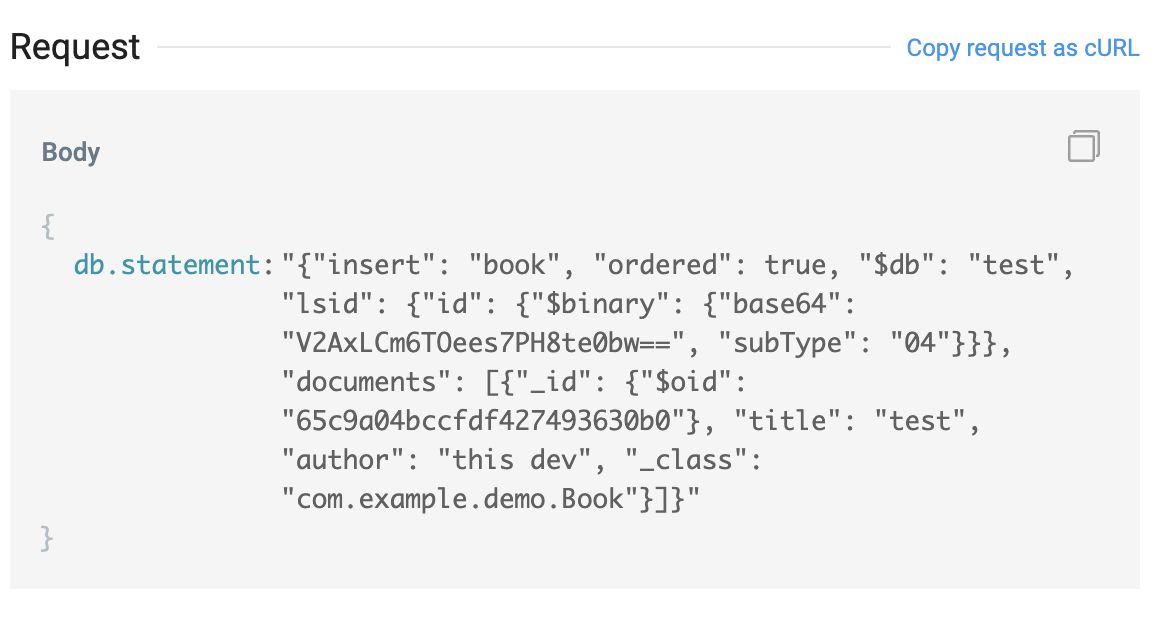
It’s important to remember that MongoDB imposes certain restrictions on field names. For instance, field names cannot start with a dollar sign ($) or contain a dot (.). If your application fails to validate field names, such as the app we’ve deployed above, and enables users to specify them (which is never recommended!) dynamically, to test that run the following:
curl -X POST http://localhost:8080/books -H ‘Content-Type: application/json’ -d ‘{“title”: “test”, “$author”: “this dev “}’
These will also show up as part of the trace data within Lumigo so that you can clearly see the issue to resolve clearly quickly and easily.
Wrapping up
OpenTelemetry is an essential component of any development toolchain, particularly for debugging complex database interactions like with MongoDB. This is where Lumigo really comes into its own, leveraging the foundational power of Opentelemetry to provide a more comprehensive and detailed view of the trace contextual correlation.
This only helps in allowing you to see the full trace picture, including the query, without needing to make any changes to the codebase. Sign up for a free lumigo account and run your own debugging experiments with MongoDB to experience firsthand how Lumigo and OpenTelemetry can help with your debugging. If you have found this post helpful, please support it by sharing it within your circles or letting us know you enjoyed it.