


Having delivered numerous applications, prototypes, and demos over the years, I’ve developed a deep appreciation for how robust development frameworks can significantly contribute to Speed to Delivery Time (SDT). This metric is vital in the fast-paced software industry, where the ability to bring scalable and maintainable applications to market quickly can set a project apart. Beyond the initial development phase, the capacity for ongoing optimization, debugging, and monitoring plays a critical role in an application’s lifecycle. This is where an observability framework like OpenTelemetry (Otel) comes into play, offering the ability to track and enhance application performance and issues as they arise.
Recently, there have been a few lively debates within some of the communities about the merits and drawbacks of using NestJS versus ExpressJS for building applications. Sparked by this discussion, I decided to do a hands-on code comparison by deploying identical applications to containerized environments alongside OpenTelemetry to see how each framework measures up. We will look into resource utilization and debugging with a side-by-side performance comparison.
So let’s start by building some quick demo apps and checking the performance and perils using OpenTelemetry.
Building an ExpressJS Demo App
Create a new directory for your ExpressJS application and initialize a new Node.js app with the Express framework installed:
mkdir express-demo

cd express-demo

npm init -y

npm install express @lumigo/opentelemetry
In the project root, create a file named app.js and add the following code. We are also saving some time here and installing the https://github.com/lumigo-io/opentelemetry-js-distro, which will be configured using the no-code instrumentation method. You also might notice a few intentional problematic code segments in here too.
const express = require(‘express’);
const app = express();
const port = 3001;

app.get(‘/’, (req, res) => {
  res.send(‘Hello World!’);
});

app.get(‘/divide’, (req, res) => {
  const { num1, num2 } = req.query;
  const numerator = parseFloat(num1);
  const denominator = parseFloat(num2);

  // Check for division by zero
  if (denominator === 0) {
    res.status(400).send(‘Error: Division by zero is not allowed.’);
  } else {
    const result = numerator / denominator;
    res.send(`Result: ${result}`);
  }
});

app.get(‘/data’, async (req, res) => {
  try {
    const data = await simulateAsyncOperation();
    res.send(data);
  } catch (error) {
    console.log(‘Error occurred’, error);
  }
});

function simulateAsyncOperation() {
  return new Promise((resolve, reject) => {
    setTimeout(() => reject(new Error(‘Failed to retrieve data’)), 1000);
  });
}

app.listen(port, () => {
  console.log(`Express app listening at http://localhost:${port}`);
});
After you’ve saved the app.js file with the provided code, you can start the ExpressJS demo application by running node app.js in the terminal from the project root. This will start the ExpressJS server on port 3000, from there you can access the app from `http://localhost:3001` and test the following routes:
Divide Function
URL: http://localhost:3001/divide?num1=x&num2=y
This performs a division operation with num1 and num2 as the query parameters. Replace x and y with any numbers you want to divide (e.g., http://localhost:3001/divide?num1=10&num2=2). Note that this route contains an intentional bug: it doesn’t handle the case where num2 is zero, which can lead to a divide-by-zero error.
Asynchronous Data Retrieval
URL: http://localhost:3001/data
This simulates an asynchronous operation (like fetching data from a database). This route intentionally rejects the promise after a timeout, simulating a failed data retrieval operation. The catch block logs the error but does not properly communicate it back to the client, potentially leading to a hanging request if not handled correctly.
Building a NestJS Demo App
Use the following to create a new directory for your NestJS app, plus install NestJS if its not already, then use the Nest CLI to start a new project:
mkdir nest-demo
cd nest-demo
npm i -g @nestjs/cli
nest new .
npm i @lumigo/opentelemetry
Navigate to the src directory, and in the `app.controller.ts` file, set up a basic controller with the following code. Like in the Express app we are also saving some time here and installing the Lumigo JS distro, using the no-code instrumentation method. You’ll also notice here that we are going to additionally build in similar issues to the express app within the code:
import { Controller, Get, Query, BadRequestException } from ‘@nestjs/common’;
import { AppService } from ‘./app.service’;

@Controller()
export class AppController {
  constructor(private readonly appService: AppService) {}

  @Get()
  getHello(): string {
    return ‘Hello World!’;
  }

  @Get(‘divide’)
  divide(@Query(‘num1’) num1: string, @Query(‘num2’) num2: string): string {
    const numerator = parseFloat(num1);
    const denominator = parseFloat(num2);

    if (denominator === 0) {
      throw new BadRequestException(‘Division by zero is not allowed.’);
    }

    const result = numerator / denominator;
    return `Result: ${result}`;
  }

  @Get(‘data’)
  async getData() {
    try {
      const data = await this.simulateAsyncOperation();
      return data;
    } catch (error) {
      console.error(‘Error occurred’, error);
      throw new Error(‘An error occurred while processing your request.’);
    }
  }

  simulateAsyncOperation(): Promise<string> {
    return new Promise((resolve, reject) => {
      setTimeout(() => reject(new Error(‘Failed to retrieve data’)), 1000);
    });
  }
}
After saving the app.controller.ts file with the provided code in your NestJS project’s src directory, you can start the NestJS demo application by running npm run start in your terminal from the project root. Then like before you can access the app from http://localhost:3000 and test the same routes:
Divide Function
URL: http://localhost:3000/divide?num1=x&num2=y
This executes a division operation using num1 and num2 as query parameters. Replace x and y with the numbers you wish to divide (e.g., http://localhost:3000/divide?num1=10&num2=2). This route also contains an intentional flaw: it does not account for the scenario where num2 is zero, which can lead to a divide-by-zero error, demonstrating a common logical error in application code.
Asynchronous Data Retrieval
URL: http://localhost:3000/data
This simulates an asynchronous operation that intentionally fails, such as a database fetch. The route is designed to reject the promise after a timeout, mimicking a data retrieval failure. The catch block captures the error and throws a new error, which, depending on the global error handling setup in NestJS, will be sent back to the client as an error response. This simulates and provides a context for handling asynchronous errors and exceptions in a real-world application.
Once Container to Rule Them All
Before we proceed, ensure that the ExpressJS application is set to run on port 3001 and the NestJS application on port 3000. Adjust the respective application settings if necessary, as outlined in previous sections.
Navigate to the parent directory containing your express-demo and nest-demo application directories. Here, create a Dockerfile to define your container environment and input the following configuration:
FROM node:20

WORKDIR /usr/src/app

COPY express-demo/package*.json ./express-demo/
COPY nest-demo/package*.json ./nest-demo/

RUN cd express-demo && npm install
RUN cd nest-demo && npm install

COPY express-demo/ ./express-demo/
COPY nest-demo/ ./nest-demo/

ENV OTEL_SERVICE_NAME=NestVsExpress

EXPOSE 3000 3001

CMD sh -c ‘cd /usr/src/app/express-demo && export OTEL_SERVICE_NAME=”express-app” && NODE_OPTIONS=”-r @lumigo/opentelemetry” node app.js & cd /usr/src/app/nest-demo && export OTEL_SERVICE_NAME=”nest-app” && NODE_OPTIONS=”-r @lumigo/opentelemetry” npm run start’
One thing to highlight here is the Lumigo distro which we installed earlier, in the dockerfile we are invoking the no-code implementation within both apps inside the 1 container. Save the Dockerfile and build and run the Docker image in the terminal at its location with your Lumigo token as an environmental variable using:
docker build -t express-nest-combo .
docker run -p 3000:3000 -p 3001:3001 -e LUMIGO_TRACER_TOKEN=<token> express-nest-combo
Give it a few minutes for everything to get up and running, in the dockerfile above you’ll notice a bit of a tweak in the environmental variables here because of the unconvential approach to the app runtimes. With both apps we are setting the OTEL_SERVICE_NAME as part of the runtime so that we can specify the Lumigo app name differently when we look at the invocations.
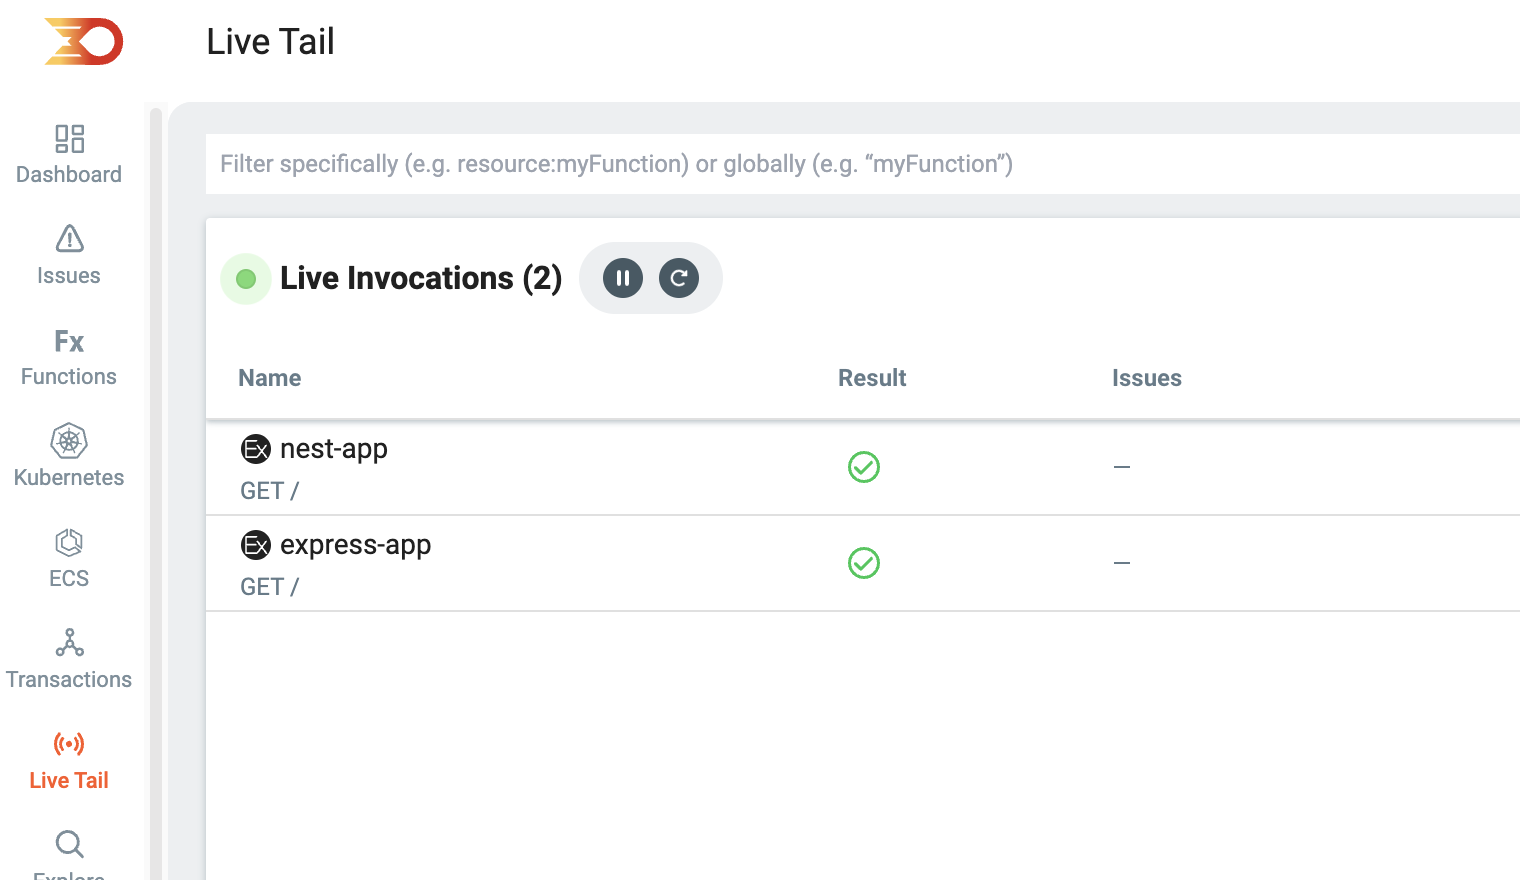
To see this, open the Lumigo Dashboard to the Live Tail tab and then open https://localhost:3000 and https://localhost:3001 in a browser. You should now be able to see the name of each application in the 1 container with invocations being populated, like so:
Measuring and Debugging
With our demo apps now up and running and instrumented with OpenTelemetry via Lumigo, we’re set to dig into the crux of this exploration, triggering invocations to assess and debug how these interactions manifest. This stage is important as it validates the performance and debugging prowess of both using the Lumigo opentelemetry distro with our applications and provides a tangible understanding of the performance metrics, tracing data, and other related data.
We’ll interact with a series of endpoints across both applications to generate a comprehensive dataset. Below are each of the routes with loaded get variables. Also included are the results from each of the outputs from lumigo. These have been filtered down by route in the Explore tab so that each can be seen side by side.
Homepage (/):
ExpressJS: http://localhost:3001/
NestJS: http://localhost:3000/
Action: A simple GET request to these endpoints returns a “Hello World!” message, serving as a basic check for application responsiveness.
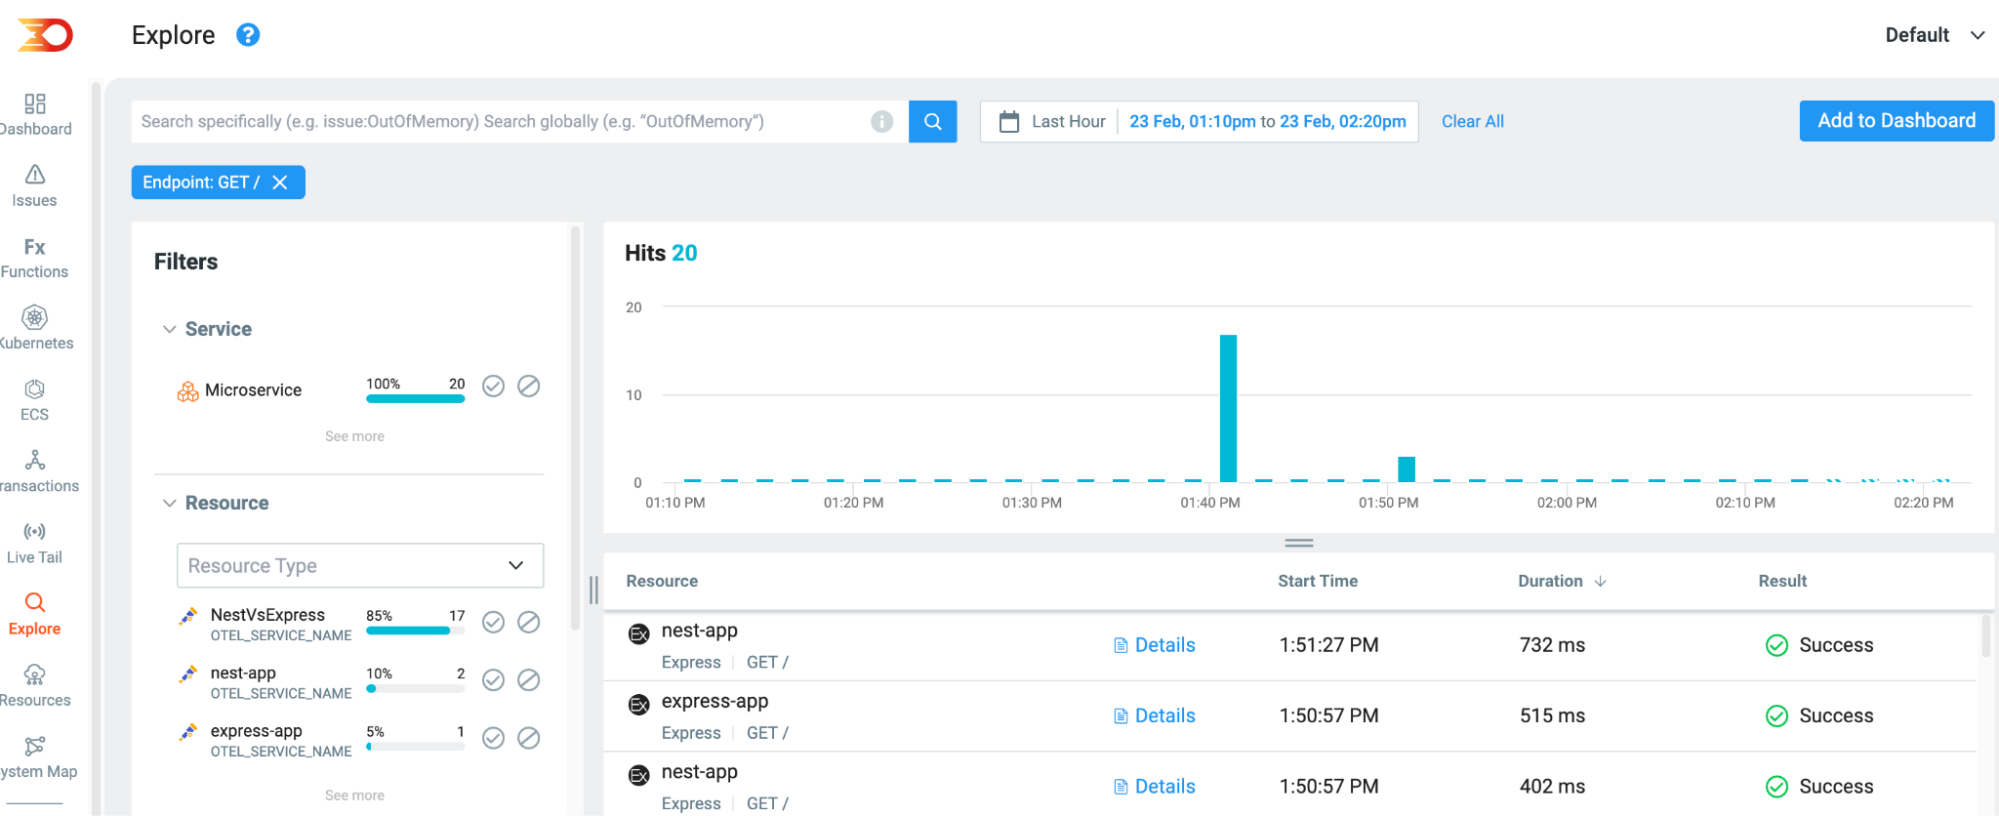
Divide Function (/divide):
ExpressJS: http://localhost:3001/divide?num1=10&num2=0
NestJS: http://localhost:3000/divide?num1=10&num2=0
Action: These endpoints perform a division operation, intentionally designed without error handling for situations like division by zero, which is a common error type in NodeJS.

Asynchronous Data Fetch (/data):
ExpressJS: http://localhost:3001/data
NestJS: http://localhost:3000/data
Action: Simulates a failed asynchronous operation to demonstrate how Lumigo traces asynchronous errors, providing examples into the application’s async flow and error management.
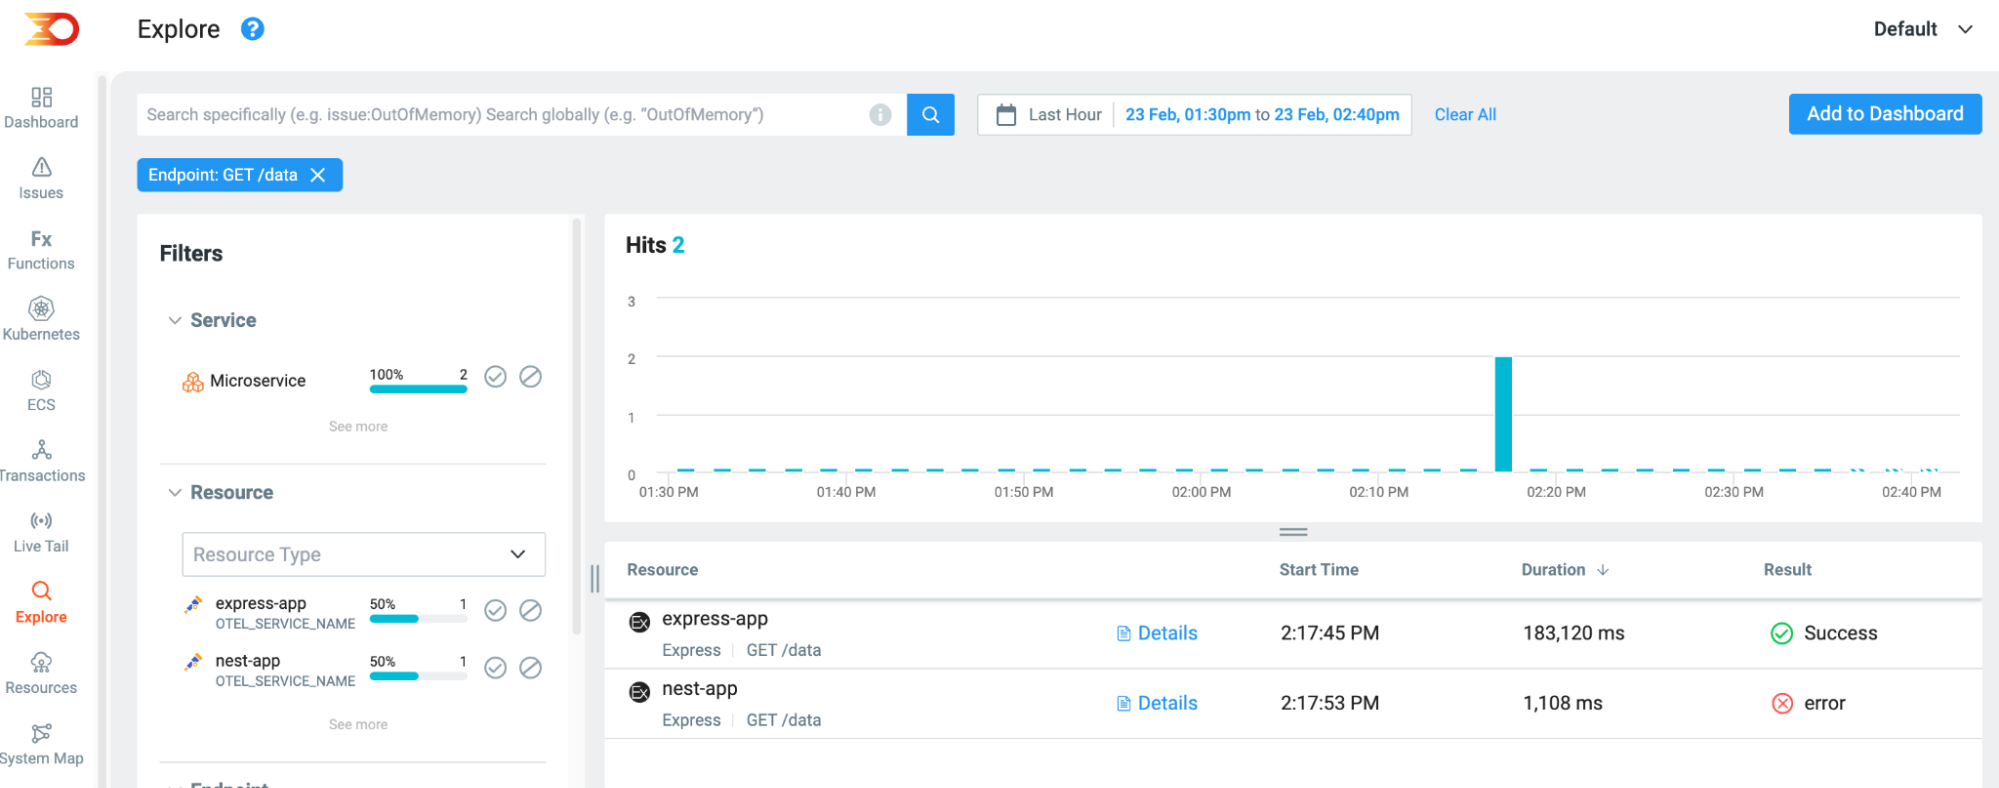
What is additionally interesting with this last example is how ExpressJS handles the error timeout over the NestJS app.
See How Your Deployments Stack Up
In comparing the error handling and performance nuances between ExpressJS and NestJS frameworks, it’s evident that each framework has its unique advantages and challenges. While ExpressJS offers simplicity and flexibility, NestJS brings a more structured approach with built-in exception filters, impacting how they each navigate error scenarios. Our experiment revealed variances in performance under load and in the intricacy of managing exceptions, highlighting that the choice of the framework can significantly influence application behavior and resilience. Through the lens of Lumigo, these differences were brought into sharp focus, providing valuable insights into how each application responds to errors and performs under various conditions. By signing up for Lumigo and integrating it into your deployments, you can embark on a similar journey of discovery and enhancement, uncovering the unique intricacies and opportunities within your own applications.