All Resources
 Docs
Docs Blog
Blog Guides
AWS Lambda Provisioned Concurrency: The End of Cold Starts

What Is Provisioned Concurrency?
Amazon Lambda is a serverless runtime that offers provisioned concurrency, which is a feature that extends control over the performance of your serverless applications. Provisioned concurrency can help you avoid cold starts and latency issues in serverless functions.
Provisioned concurrency enables serverless functions to adapt to sudden bursts of traffic and significant scaling events. You can use provisioned concurrency to build scalable serverless applications with predictable latency. The feature lets you set a desired concurrency for all aliases and versions of each function.
AWS Lambda uses provisioned concurrency to pre-prepare containers for your functions. It also helps ensure that after containers are called, they be invoked with double-digit millisecond latency.
In this article:
- What Are Cold Starts and How Does Provisioned Concurrency Help?
- How to Turn On Provisioned Concurrency
- How to Monitor Provisioned Concurrency
- Important Details to Note About Provisioned Concurrency
- Working with Lambda Concurrency Limits
- Provisioned Concurrency Pricing
- Provisioned Concurrency and AWS Autoscaling
- Scheduled Scaling for Lambda Functions
- Using Lumigo to Fine-Tune Provisioned Concurrency
What Are Cold Starts and How Does Provisioned Concurrency Help?
Cold starts can negatively impact Lambda performance. A cold start is the first request handled by new Lambda workers and may take up to five seconds to execute. This can significantly impact both latency and user experience.
Cold starts occur because Lambda needs to initialize a worker as well as your function module, before it can pass a request to a handler function. When functions are invoked, Lambda requires a ready supply of containers. This means functions are kept warm for only a limited amount of time after executing – typically 30-45 minutes – before being spun down.

Source: AWS
Once enabled, Provisioned Concurrency will keep your desired number of concurrent executions initialized and ready to respond to requests. This means an end to cold starts!
Consider the example of a food delivery service. The service might experience cold starts during peaks of deliveries at lunch and dinner time. To solve the problem, they could increase Provisioned Concurrency just before lunchtime and dinnertime spikes. So when the users flood in, there won’t be any cold starts.

Since these spikes happen at predictable times, you can use AWS Auto Scaling to adjust it on a schedule (learn more about this below ).
Provisioned concurrency can work seamlessly with the existing on-demand scaling behavior. When there are more requests coming in than it can handle, Lambda would simply spill over to on-demand scaling. There will still be cold starts for these spillover invocations, but they will be few and far between, if you configured enough provisioned concurrency.


How to Turn On Provisioned Concurrency
Here is a quick rundown that explains how you can configure provisioned concurrency for your Lambda functions from the AWS Management Console:
- Go to the AWS Lambda console and select an existing Lambda function.
- Go to the Actions drop-down menu, and then select Publish new version. This option lets you apply settings to a published version of a function or an alias.

Image Source: AWS
- Optional – add a description for the version and then select Publish.
- Go to the Actions drop-down menu and select Create alias. Enter a name for each alias.
- Go to the Version drop-down menu. Select 1 and then select Create.

Image Source: AWS
- Go to the Concurrency card and select Add.
- For Qualifier Type, select the Alias radio button. Next, select the function alias previously selected in the Alias drop-down menu. Specify a required value for Provisioned Concurrency – this number defines the number of function instances that run continuously. Select Save.
- Additional costs warning – AWS Lambda charges additional fees for provisioned concurrency. This fee is calculated in addition to regular Lambda invocation costs.
- Go to the Lambda console and make sure that the Provisioned Concurrency card displays the In progress status.
After several minutes, the initialization process is completed. You can now use the published alias of the function along with the Provisioned Concurrency feature.
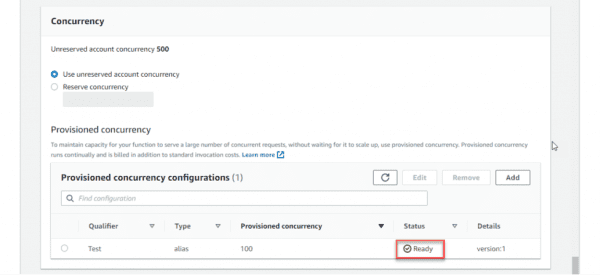
Image Source: AWS
To modify these settings, you can also use the AWS CLI, AWS SDK, and AWS CloudFormation.
How to Monitor Provisioned Concurrency
The basic way to monitor provisioned concurrency is to look at the following CloudWatch metrics:
- ProvisionedConcurrentExecutions – concurrent executions using Provisioned Concurrency.
- ProvisionedConcurrencyUtilization – fraction of Provisioned Concurrency in use.
- ProvisionedConcurrencyInvocations – number of invocations using Provisioned Concurrency.
- ProvisionedConcurrencySpilloverInvocations – number of invocations that are above Provisioned Concurrency.
For more advanced monitoring, and to receive proactive alerts about cold starts or insufficient cold starts, jump to provisioned concurrency with Lumigo below .
Important Details to Note About Provisioned Concurrency
- Provisioning time – after you enable Provisioned Concurrency, Lambda will provision the requested number of concurrent executions. This can take a minute or two, and you can check on its progress in the console.
- Provisioned Concurrency is always tied to a version – when you configure Provisioned Concurrency on an alias of a function, it’s passed to the underlying version. For instance, given the following configuration, where Provisioned Concurrency is configured on the canary alias, which currently points at version 10.
- You cannot use it on $LATEST – you cannot configure Provisioned Concurrency against the $LATEST alias, nor any alias that points to $LATEST.
- You cannot combine Provisioned Concurrency – What happens if you configure Provisioned Concurrency on an alias as well as the version it’s associated with? You can’t. Equally, if you have two aliases that point to the same version, you cannot use Provisioned Concurrency on both aliases.
Working with Lambda Concurrency Limits
Be aware that the Provisioned Concurrency comes out of your regional concurrency limit. You can configure Provisioned Concurrency on multiple aliases and/or versions of a function, all of which would count towards the regional concurrency limit.
But what if the function in question has also configured a reserved concurrency? In that case, the total Provisioned Concurrency across all its versions cannot exceed its reserved concurrency.
sum(Provisioned Concurrency of all versions) <= reserved concurrency
The reverse is also true.
For a function with existing Provisioned Concurrency, you need to choose a reserved concurrency value equal or greater to the sum of its Provisioned Concurrency.

Provisioned Concurrency Pricing
Provisioned Concurrency also has a slightly different pricing model.
On-demand concurrency charges you based on:
- Invocation duration: $0.06 per GB-hour, 100ms round up
- Requests: $0.20 per 1M requests
Provisioned Concurrency has a slightly lower duration cost, but introduces an extra uptime component to the pricing:
- Invocation duration: $0.035 per GB-hour, 100ms round up
- Requests: $0.20 per 1M requests
- $0.015 per GB-hour, 5 minute round up
Here are two pricing examples:
- If you configure 1 Provisioned Concurrency on a function with 1GB of memory, then you will pay $0.015 per hour for it, rounded up to the next 5 minute block, even if there are no invocations.
- If you configure 10 Provisioned Concurrency for this function, then you’ll pay $0.15 per hour for them.
Eagle-eyed readers might notice that $0.035 + $0.015 = $0.05 per GB-hour for a fully utilized concurrent execution. Which is $0.01 (16%) cheaper than on-demand concurrency! So a system with high Provisioned Concurrency utilization can also save on Lambda cost too 😀
Provisioned Concurrency and AWS Autoscaling
Provisioned Concurrency also works with AWS Auto Scaling, which allows you to configure scaling actions based on utilization level (think EC2 auto-scaling) or on a schedule (think cron).
In both cases, you have to first register the alias as a scaling target for AWS Auto Scaling. You can do this with the AWS CLI, like this:
aws –region sa-east-1 application-autoscaling register-scalable-target –service-namespace lambda –resource-id function:yc-test:canary –scalable-dimension lambda:function:ProvisionedConcurrency –min-capacity 1 –max-capacity 100
From now on, I will be able to configure scaling policies and scheduled actions against the canary alias on the function yc-test.
Scaling by utilization
Earlier, we mentioned the new ProvisionedConcurrencyUtilization metric. It shows you how much of the Provisioned Concurrency are you actually using.

It can be a useful indicator that you might have over-provisioned the number of Provisioned Concurrency. And, it can be used to auto-scale the Provisioned Concurrency as traffic patterns change.
Configuring a scaling policy
To auto-scale the number of Provisioned Concurrency, you can configure a scaling policy against this metric. You will need to run a command like this:
aws –region sa-east-1 application-autoscaling put-scaling-policy –service-namespace lambda –scalable-dimension lambda:function:ProvisionedConcurrency –resource-id function:yc-test:canary –policy-name TestPolicy –policy-type TargetTrackingScaling –target-tracking-scaling-policy-configuration file://config.json
My config.json file looks like this:
{

  “TargetValue”: 0.7,

  “PredefinedMetricSpecification”: {

    “PredefinedMetricType”: “LambdaProvisionedConcurrencyUtilization”

  }

}
When you run the command, you will get a response like this:

Monitoring scaling activity in CloudWatch
You can see the auto-generated CloudWatch Alarms in the CloudWatch console.

Starting with no Provisioned Concurrency on the alias, and a steady stream of traffic going to on-demand concurrency. Once the scaling policy was configured and the alarm is triggered, Provisioned Concurrency is automatically added to the alias:

And they start to take over the invocations from on-demand concurrency once the Provisioned Concurrency is ready.

At this point, our Provisioned Concurrency utilization is very low compared to our 70% threshold (see config.json above).

So as the traffic goes up, AWS Auto Scaling should take care of adding more Provisioned Concurrency to the alias.
Scheduled Scaling for Lambda Functions
We can configure a scheduled action to enable Provisioned Concurrency with a command like this:
aws –region sa-east-1 application-autoscaling put-scheduled-action –service-namespace lambda –scheduled-action-name TestScheduledAction –resource-id function:yc-test:canary –scalable-dimension lambda:function:ProvisionedConcurrency –scalable-target-action MinCapacity=20,MaxCapacity=20 –schedule “at(2019-11-28T11:05:00)”
This would configure 20 Provisioned Concurrency against the canary alias on the yc-test function. You can see the scheduled scaling actions with the following command:
aws –region sa-east-1 application-autoscaling describe-scheduled-actions –service-namespace lambda

And at exactly 11:05am UTC, I can see the Provisioned Concurrency being added to the specified alias.

As before, the new Provisioned Concurrency takes a few minutes to provision. From the CloudWatch metrics I can see it started to take over invocations as they come into active service.

If you want to enable and disable Provisioned Concurrency at the same time each day, you can use cron expressions with the –schedule value.
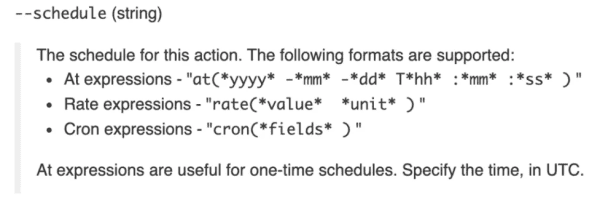
Check out the documentation for AWS CLI for more details on the application-scaling commands.
Using Lumigo to Fine-Tune Provisioned Concurrency
Lumigo is a serverless monitoring solution. As an AWS Advanced Technology Partner and an AWS launch partner, Lumigo supports Lambda and provisioned concurrency. You can use the Lumigo platform to gain visibility into all cold starts in serverless applications. These insights can help you fine-tune provisioned concurrency, minimize performance issues, and reduce costs.
Here is how to use Lumigo to fine tune provisioned concurrency:
- Create a free Lumigo account and then connect a tracer to your Lambdas. Once the installation process completes (in a few minutes), Lumigo can start helping you monitor and debug Lambda functions.
- Go to the main Lumigo console to view insights about cold starts and provisioned concurrency. The information is displayed in the same view, to help you analyze all important data using a single display.

- Set up alerts to track functions that are either over-provisioned or under-provisioned. Lumigo lets you customize alerts to help you right-size provisioned concurrency and maintain a balance between performance and cost.

- To get information directly from the command line, go to the Lumigo CLI. Next, run the analyze-lambda-cold-starts command, which calculates the total provisioned concurrency per function. The command then determines how a function was utilized over a predefined timeframe.